Table of Contents
- 1. Getting Started Guide
- 2. Computer
- 3. About EMC
- 4. Getting Help
- 5. Get EMC2
- 6. Stepper Configurations
- 7. Stepconf Wizard
- 7.1. Step by Step Instructions
- 7.2. Entry Page
- 7.3. Basic Information
- 7.4. Parallel Port Setup
- 7.5. Axis Configuration
- 7.6. Spindle Configuration
- 7.7. Advanced Configuration Options
- 7.8. Machine Configuration Complete
- 7.9. Axis Travel, Home Location, and Home Switch Location
- 7.10. Home and Limit Switch wiring options
- 8. Point n Click Configurator
- 9. Linux FAQ
- Index
- 10. Legal Section
This handbook is a work in progress. If you are able to help with writing, editing, or graphic preparation please contact any member of the writing team or join and send an email to emc-users@lists.sourceforge.net.
Copyright (c) 2000-9 LinuxCNC.org
Permission is granted to copy, distribute and/or modify this document under the terms of the GNU Free Documentation License, Version 1.1 or any later version published by the Free Software Foundation; with no Invariant Sections, no Front-Cover Texts, and one Back-Cover Text: This EMC Handbook is the product of several authors writing for linuxCNC.org. As you find it to be of value in your work, we invite you to contribute to its revision and growth.A copy of the license is included in the section entitled GNU Free Documentation License. If you do not find the license you may order a copy from Free Software Foundation, Inc. 59 Temple Place, Suite 330 Boston, MA 02111-1307
The minimum system to run EMC2 and Ubuntu may vary depending on the exact usage. Stepper systems in general require faster threads to generate step pulses than servo systems. Using the Live-CD you can test the software before committing a computer. Keep in mind that the Latency Test numbers are more important than the processor speed for software step generation. More information on the Latency Test is in Section ( [sub:Latency-Test]).
Additional information is on the EMC Wiki site:
http://wiki.linuxcnc.org/cgi-bin/emcinfo.pl?Hardware_Requirements
EMC2 and Ubuntu should run reasonably well on a computer with the following minimum hardware specification. These numbers are not the absolute minimum but will give reasonable performance for most stepper systems.
- 700 MHz x86 processor (1.2 GHz x86 processor recommended)
- 384 MB of RAM (512 MB up to 1 GB recommended)
- 4 GB hard disk
- Graphics card capable of at least 800x600 resolution, which is not using the NVidia or ATI fglrx proprietary drivers, and which is not an onboard video chipset that shares main memory with the CPU
- A network or Internet connection (not strictly needed, but very useful for updates and for communicating with the EMC community)
Laptops are not generally suited to real time software step generation. Again a Latency Test run for an extended time will give you the info you need to determine suitability.
- EMC (the Enhanced Machine Control) is a software system for computer control of machine tools such as milling machines and lathes.
- EMC is free software with open source code. Current versions of EMC are entirely licensed under the GNU General Public License and Lesser GNU General Public License (GPL and LGPL)
- EMC provides:
- a graphical user interface (actually several interfaces to chose from)
- an interpreter for "G-code" (the RS-274 machine tool programming language)
- a realtime motion planning system with look-ahead
- operation of low-level machine electronics such as sensors and motor drives
- an easy to use "breadboard" layer for quickly creating a unique configuration for your machine
- a software PLC programmable with ladder diagrams
- easy installation with a Live-CD
- It does not provide drawing (CAD - Computer Aided Design) or G-code generation from the drawing (CAM - Computer Automated Manufacturing) functions.
- It can simultaneously move up to 9 axes and supports a variety of interfaces.
- The control can operate true servos (analog or PWM) with the feedback loop closed by the EMC software at the computer, or open loop with "step-servos" or stepper motors.
- Motion control features include: cutter radius and length compensation, path deviation limited to a specified tolerance, lathe threading, synchronized axis motion, adaptive feedrate, operator feed override, and constant velocity control.
- Support for non-Cartesian motion systems is provided via custom kinematics modules. Available architectures include hexapods (Stewart platforms and similar concepts) and systems with rotary joints to provide motion such as PUMA or SCARA robots.
- EMC runs on Linux using real time extensions.
Ubuntu has been chosen, because it fits perfectly into the Open Source views of EMC2:
- Ubuntu will always be free of charge, and there is no extra fee for the "enterprise edition", we make our very best work available to everyone on the same Free terms.
- EMC is paired with the LTS versions of Ubuntu which provide support and security fixes from the Ubuntu team for 3 - 5 years.
- Ubuntu uses the very best in translations and accessibility infrastructure that the Free Software community has to offer, to make Ubuntu usable for as many people as possible.
- The Ubuntu community is entirely committed to the principles of free software development; we encourage people to use open source software, improve it and pass it on.
IRC stands for Internet Relay Chat. It is a live connection to other EMC users. The EMC IRC channel is #emc on freenode.
The simplest way to get on the IRC is to use the embedded java client on this page http://www.linuxcnc.org/content/view/4/8/lang,en/.
Some IRC etiquette:
- Ask specific questions… Avoid "Can someone help me?", "It won’t run" type of questions.
- If you’re really new to all this, think a bit about your question before typing it. Make sure you give enough information so someone can solve your question.
- Have some patience when waiting for an answer, sometimes it takes a while to formulate an answer or everyone might be busy working or something.
- Set up your IRC account with your unique name so people will know who you are. If you use the java client, use the same name every time you log in. This helps people remember who you are and if you have been on before many will remember the past discussions which saves time on both ends.
An Internet Mailing List is a way to put questions out for everyone on that list to see and answer at their convenience. You get better exposure to your questions on a mailing list than on the IRC but answers take longer. In a nutshell you e-mail a message to the list and either get daily digests or individual replies back depending on how you set up your account.
Information about the EMC Users Mailing List at:
A Wiki site is a user maintained web site that anyone can add to or edit.
The user maintained EMC Wiki site contains a wealth of information and tips at:
If the file is too large to download in one session because of a bad
or slow Internet connection use wget to allow resuming downloads.
Open a terminal window. In Ubuntu it is Applications/Accessories/Terminal. Note that actual file names may change so you might have to go to http://www.linuxcnc.org/ and follow the Download link to get the actual file name. In most browsers you can right click on the link and select Copy Link Location or similar then paste the link into the terminal window with a right mouse click and select Paste.
To get the Ubuntu 8.04 Hardy Heron version copy this in the terminal window and press enter:
` wget -r http://www.linuxcnc.org/hardy/ubuntu-8.04-desktop-emc2-aj07-i386.iso`
To get the Ubuntu 6.06 Dapper Drake version:
` wget -r http://www.linuxcnc.org/iso/emc2.2.2-1-ubuntu6.06-desktop-i386.iso`
To continue a download that has been stopped add the -c option to wget:
` wget -r -c http://www.linuxcnc.org/hardy/ubuntu-8.04-desktop-emc2-aj07-i386.iso`
To stop a download use Ctrl-C or close the terminal window.
After the download is complete you will find a new directory called www.linuxcnc.org or something similar. In the subdirectory under the above directory you will find the ISO CD image file. Next is burning the CD.
The wget program is also available for Windows from
http://gnuwin32.sourceforge.net/packages/wget.htm
Follow the instructions on the web page for downloading and installing the windows version of the wget program.
To run wget open a command prompt window.
In most Windows it is Programs/Accessories/Command Prompt
First you have to change to the directory where wget is installed in.
Typically it is in C:\Program Files\GnuWin32\bin so in the Command Prompt window type:
cd C:\Program Files\GnuWin32\bin
and the prompt should change to C:\Program Files\GnuWin32>
Type the wget command into the window and press enter as above.
EMC2 is distributed as CD image files, called ISOs. To install EMC2, you first need to burn the ISO file onto a CD. You need a working CD/DVD burner and an 80 minute (700 Mb) CD for this. If the CD writing fails, try writing at a slower burn speed.
Before burning a CD, it is highly recommended that you verify the md5 sum (hash) of the .iso file.
Open a terminal window. In Ubuntu it is Applications/Accessories/Terminal.
Change to the directory where the ISO was downloaded to.
cd download_directory
The run the md5sum command with the file name you saved.
md5sum ubuntu-8.04-desktop-emc2-aj07-i386.iso
The md5sum should print out a single line after calculating the hash. On slower computers this might take a minute or two.
91c5abb84386091e0ff056e9ebc40fdb
ubuntu-8.04-desktop-emc2-aj07-i386.iso
Now compare it to the md5sum on the EMC2 download page.
Burning the ISO to a CD
- Insert a blank CD into your burner. A "CD/DVD Creator" or "Choose Disc Type" window will pop up. Close this, as we will not be using it.
- Browse to the downloaded ISO image in the file browser.
- Right click on the ISO image file and choose Write to Disc.
- Select the write speed. If you are burning a Ubuntu Live CD, it is recommended that you write at the lowest possible speed.
- Start the burning process.
- If a choose a file name for the disc image window pops up just pick OK.
Before burning a CD, it is highly recommended that you verify the md5 sum (hash) of the .iso file.
Windows does not come with a md5sum program. You will have to download and install one to check the md5sum. More information can be found at:
https://help.ubuntu.com/community/HowToMD5SUM
Burning the ISO to a CD
- Download and install Infra Recorder, a free and open source image burning program.
- Insert a blank CD in the drive and select Do nothing or Cancel if an auto-run dialog pops up.
- Open Infra Recorder, and select the Actions menu, then Burn image.
With the Live CD in the CD/DVD drive shut down the computer then turn the computer back on. This will boot the computer from the Live CD. Once the computer has booted up you can try out EMC2 without installing it. You can not create custom configurations or modify most system settings like screen resolution unless you install EMC2.
To try out EMC2 from the Applications/CNC menu pick EMC2. Then select a sim configuration to try out.
To see if your computer is suitable for software step pulse generation run the Latency Test as outlined in Section ( [sub:Latency-Test])
If you like what you see, just click the Install icon on the desktop, answer a few questions (your name, timezone, password) and the install completes in a few minutes. Make sure you write down the name you used and the password. Once the install process is complete and you go on line the update manager will pop up and allow you to upgrade to the latest stable version of EMC2.
The AXIS interface is one of the interfaces to choose from. It can be configured to add a Virtual Control Panel to customize the interface to suit your needs. AXIS is the default user interface and is actively being developed.

With the normal install the Update Manager will notify you of updates to EMC2 when you go on line and allow you to easily upgrade with no Linux knowledge needed. If you want to upgrade to 10.04 from 8.04 a clean install from the Live-CD is needed. It is OK to upgrade EMC when asked to.
Warning: Do not upgrade Ubuntu to a new version (like 8.04 to 8.10) as it will prevent EMC from running.
This section assumes you have done a standard install from the Live CD. After installation it is recommended that you connect the computer to the Internet and wait for the update manager to pop up and get the latest updates for EMC and Ubuntu before continuing. For more complex installations see the Integrators Manual.
The Latency Test determines how late your computer processor is in responding to a request. Some hardware can interrupt the processing which could cause missed steps when running a CNC machine. This is the first thing you need to do. Follow the instructions in section ( [sub:Latency-Test]) to run the latency test.
If you have a Sherline several predefined configurations are provided. This is on the main menu CNC/EMC then pick the Sherline configuration that matches yours and save a copy.
If you have a Xylotex you can skip the following sections and go straight to the Stepper Config Wizard in Section ( [cha:Stepconf-Wizard]). EMC has provided quick setup for the Xylotex machines.
Gather the information about each axis of your machine.
Drive timing is in nano seconds. If you’re unsure about the timing many popular drives are included in the stepper configuration wizard. Note some newer Gecko drives have different timing than the original one. A list is also on the user maintained EMC wiki site of more drives at http://wiki.linuxcnc.org.
| Axis | Drive Type | Step Time ns | Step Space ns | Direction Hold ns | Direction Setup ns |
|---|---|---|---|---|---|
X | |||||
Y | |||||
Z |
Gather the information about the connections from your machine to the PC parallel port.
| Output Pin | Typical Function | If Different | Input Pin | Typical Function | If Different |
|---|---|---|---|---|---|
1 | E-Stop Out | 10 | Both Limit & Home X | ||
2 | X Step | 11 | Both Limit & Home Y | ||
3 | X Direction | 12 | Both Limit & Home Z | ||
4 | Y Step | 13 | Both Limit & Home A | ||
5 | Y Direction | 15 | Probe In | ||
6 | Z Step | ||||
7 | Z Direction | ||||
8 | A Step | ||||
9 | A Direction | ||||
14 | Spindle CW | ||||
16 | Spindle PWM | ||||
17 | Amplifier Enable |
Note any pins not used should be set to Unused in the drop down box. These can always be changed later by running Stepconf again.
Gather information on steps and gearing. The result of this is steps per user unit which is used for SCALE in the .ini file.
| Axis | Steps/Revolution | Micro steps | Motor Teeth | Leadscrew Teeth |
|---|---|---|---|---|
Leadscrew Pitch | ||||
Steps per revolution is how many steps it takes to turn the stepper one revolution.
Micro steps is how many steps the drive needs to move the stepper one step.
Motor & Leadscrew Teeth is if you have some reduction between the motor and the leadscrew. If not set these to 1.
Leadscrew pitch is how many turns it takes to move your table one user unit. If you’re setting up in inches then it is turns per inch. If you’re setting up in millimeters then how many millimeters per turn.
Run the Stepconf Wizard in chapter ( [cha:Stepconf-Wizard])
- 7.1. Step by Step Instructions
- 7.2. Entry Page
- 7.3. Basic Information
- 7.4. Parallel Port Setup
- 7.5. Axis Configuration
- 7.6. Spindle Configuration
- 7.7. Advanced Configuration Options
- 7.8. Machine Configuration Complete
- 7.9. Axis Travel, Home Location, and Home Switch Location
- 7.10. Home and Limit Switch wiring options
EMC2 is capable of controlling a wide range of machinery using many different hardware interfaces. Stepconf is a program which generates EMC configuration files for a specific class of CNC machine: those connected to the PC using a standard parallel port and controlled with step & direction signals. Stepconf is installed when you install EMC2 and is in the CNC menu.
Stepconf places a file in the emc2/config directory to store the choices for each configuration you create. When you change something you need to pick the file that matches your configuration name. The file extension is .stepconf.
The Stepconf Wizard needs at least 800 x 600 screen resolution to see the buttons on the bottom of the pages.
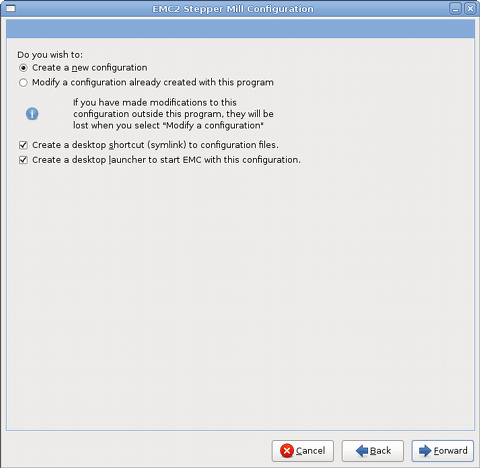
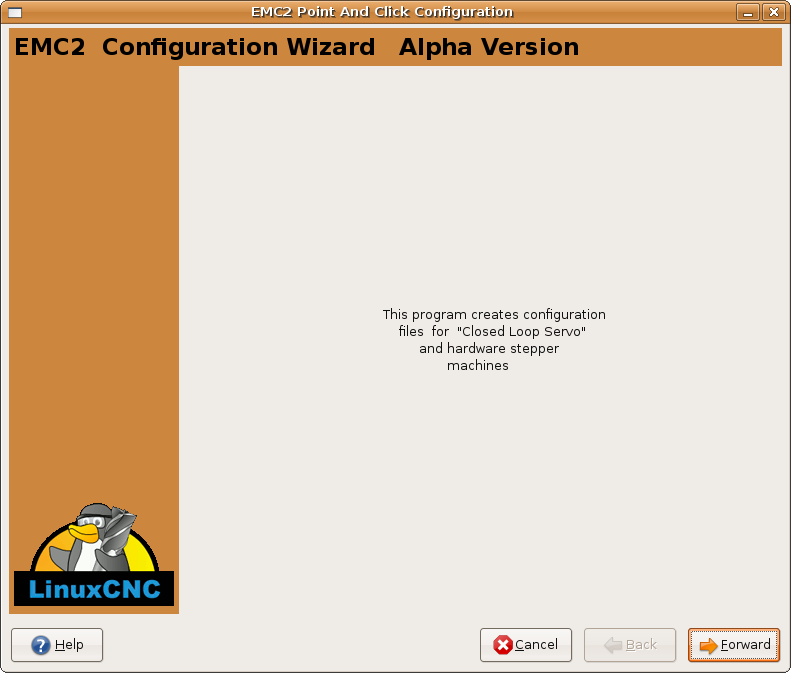
- Create New
- Creates a fresh configuration.
- Modify
- Modify and existing configuration. After selecting this a file picker pops up so you can select the .stepconf file for modification. If you made any modifications to the main .hal or the .ini file these will be lost. Modifications to custom.hal and custom_postgui.hal will not be changed by the Stepconf Wizard.
- Create Desktop Shortcut
- This will place a link on your desktop to the files.
- Create Desktop Launcher
- This will place a launcher on your desktop to start your application.
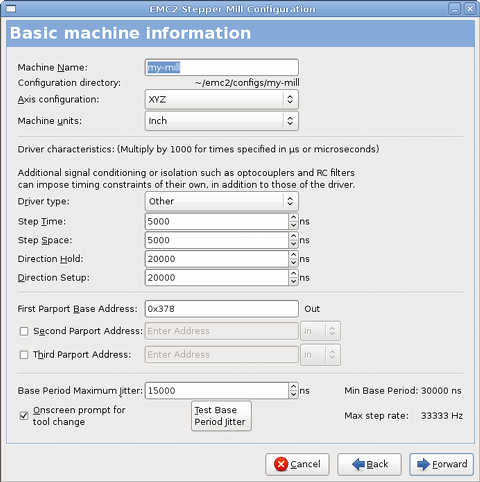
- Machine Name
- Choose a name for your machine. Use only uppercase letters, lowercase letters, digits, "-" and "_".
- Axis Configuration
- Choose XYZ (Mill), XYZA (4-axis mill) or XZ (Lathe).
- Machine Units
- Choose Inch or mm. All subsequent questions (such as machine travel, leadscrew pitch, etc) will be answered in the chosen units
- Driver Type
- If you have one of the stepper drivers listed in the pull down box, choose it. Otherwise, find the 4 timing values in your driver’s data sheet and enter them. If the data sheet gives a value in microseconds, multiply by 1000. For example, enter 4.5us as 4500. A list is on the Linuxcnc Wiki site of most popular drives with the timing values is in the Stepper Drive Timing Page. Additional signal conditioning or isolation such as optocouplers and RC filters on break out boards can impose timing constraints of their own, in addition to those of the driver. You may find it necessary to add some time to the drive requirements to allow for this. The EMC Configuration Selector has configs for Sherline all ready configured.
- Step Time
- How long the step pulse is "on" in nano seconds.
- Step Space
- Minimum time between step pulses in nano seconds.
- Direction Hold
- How long the direction pin is held after a change of direction in nano seconds.
- Direction Setup
- How long before a direction change after the last step pulse in nano seconds
- First Parport
- Usually the default of Ox378 is correct.
- Second Parport
- If you need to specify addional parallel ports enter the address and the type. For information on finding the address of PCI parallel ports see the Port Address in the Integrators Manual.
- Base Period Maximum Jitter
- Enter the result of the Latency Test here. To run a latency test press the "Test Base Period Jitter" button. See the latency test section for more details.
- Max Step Rate
- Stepconf automatically calculates the Max Step Rate based on the driver characteristics entered and the latency test result.
- Min Base Period
- Stepconf automatically determines the Min Base Period based on the driver characteristics entered and latency test result.
- Onscreen Prompt For Tool Change
- If this box is checked, EMC will pause and prompt you to change the tool when M6 is encountered. Leave this box checked unless you plan to add support for an automatic tool changer in a custom hal file
While the test is running, you should "abuse" the computer. Move windows around on the screen. Surf the web. Copy some large files around on the disk. Play some music. Run an OpenGL program such as glxgears. The idea is to put the PC through its paces while the latency test checks to see what the worst case numbers are. Do not run EMC2 while the latency test is running. Run the test at least a few minutes. The longer you run the test the better it will be at catching events that might occour at less frequent intervals. This is a test for your computer only, so no hardware needs to be connected to run the test.

Latency is how long it takes the PC to stop what it is doing and respond to an external request. In our case, the request is the periodic "heartbeat" that serves as a timing reference for the step pulses. The lower the latency, the faster you can run the heartbeat, and the faster and smoother the step pulses will be.
Latency is far more important than CPU speed. The CPU isn’t the only factor in determining latency. Motherboards, video cards, USB ports, nuxcnc.org/cgi-bin/emcinfo.pl?FixingSMIIssues[SMI] issues, and a number of other things can hurt the latency.
The important numbers are the "max jitter". In the example above 7085 nanoseconds is the highest jitter. Record this number, and enter it in the Base Period Maximum Jitter box.
If your Max Jitter number is less than about 15-20 microseconds (15000-20000 nanoseconds), the computer should give very nice results with software stepping. If the max latency is more like 30-50 microseconds, you can still get good results, but your maximum step rate might be a little disappointing, especially if you use microstepping or have very fine pitch leadscrews. If the numbers are 100uS or more (100,000 nanoseconds), then the PC is not a good candidate for software stepping. Numbers over 1 millisecond (1,000,000 nanoseconds) mean the PC is not a good candidate for EMC, regardless of whether you use software stepping or not.
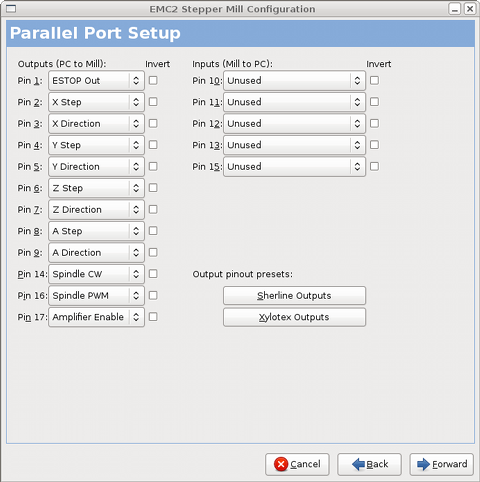
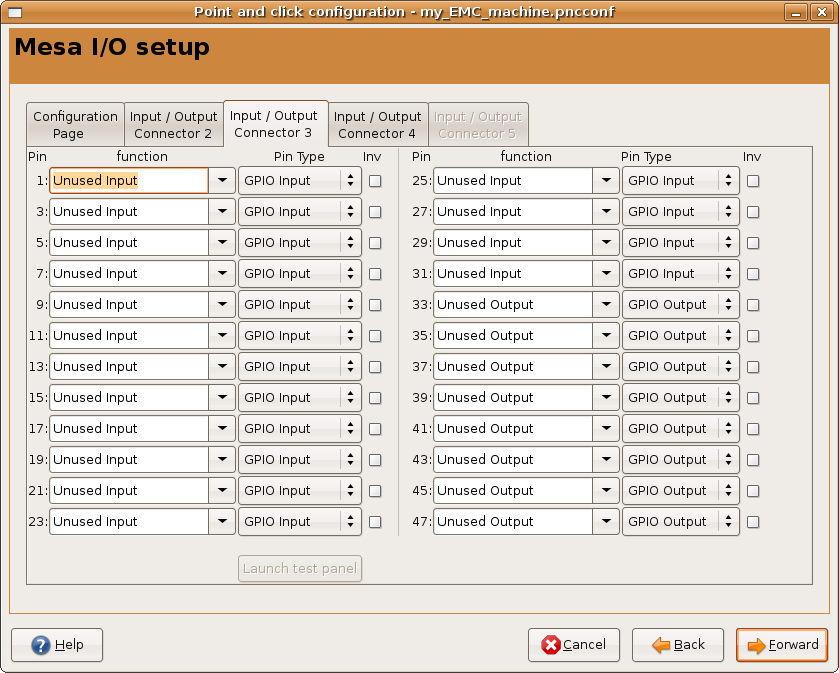
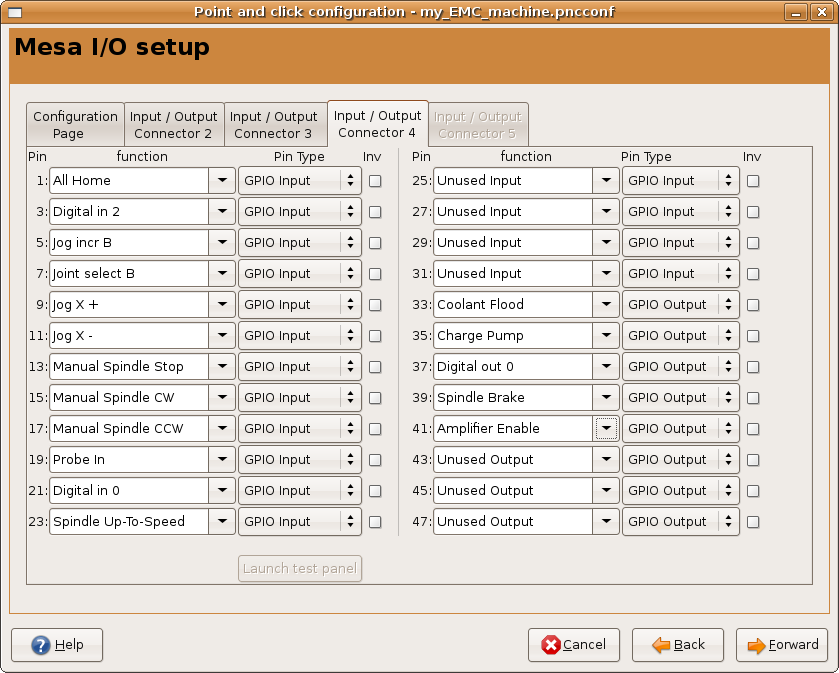
For each pin, choose the signal which matches your parallel port pin out. Turn on the "invert" check box if the signal is inverted (0V for true/active, 5V for false/inactive).
- Output pinout presets
- Automatically set pins 2 through 9 according to the Sherline standard (Direction on pins 2, 4, 6, 8) or the Xylotex standard (Direction on pins 3, 5, 7, 9).
- Inputs and Outputs
- If the input or output is not used set the option to "Unused".
- External E Stop
- This can be selected from an input pin drop down box. A typical E Stop chain uses all normally closed contacts.
- Homing & Limit Switches
- These can be selected from an input pin drop down box for most configurations.
- Charge Pump
- If your driver board requires a charge pump signal simply select Charge Pump from the drop down list for the output pin you wish to connect to your charge pump input. The charge pump output is connected to the base thread by Stepconf. The charge pump output will be about 1/2 of the maximum step rate shown on the Basic Machine Configuration page.
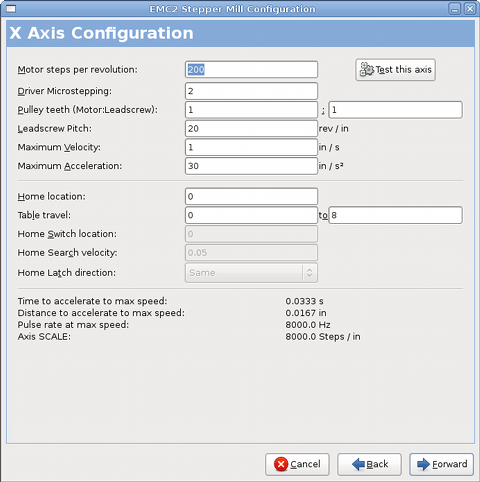
- Motor Steps Per Revolution
- The number of full steps per motor revolution. If you know how many degrees the motor is (e.g., 1.2 degree), then divide 360 by the degrees to find the number of steps per motor revolution.
- Driver Microstepping
- The amount of microstepping performed by the driver. Enter "2" for half-stepping.
- Pulley Ratio
- If your machine has pulleys between the motor and leadscrew, enter the ratio here. If not, enter "1:1".
- Leadscrew Pitch
- Enter the pitch of the leadscrew here. If you chose "Inch" units, enter the number of threads per inch here (e.g., enter 8 for 8TPI). If you have a multi-lead screw then you need to know how many turns per inch it takes to move the "nut". If you chose "mm" units, enter the number of millimeters the "nut" would move per revolution here (e.g., enter 2 for 2mm/rev). If the machine travels in the wrong direction, enter a negative number here instead of a positive number or invert the direction pin for the axis.
- Maximum Velocity
- Enter the maximum velocity for the axis in units per second.
- Maximum Acceleration
- The correct values for these items can only be determined through experimentation. See "Finding Velocity and Acceleration" below.
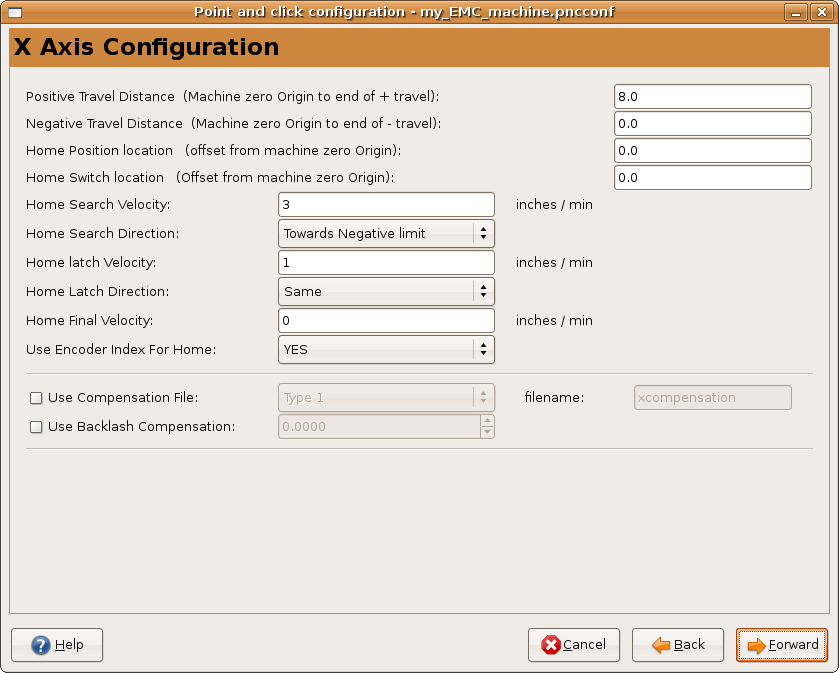
- Home Location
- The position the machine moves to after completing the homing procedure for this axis. For machines without home switches, this is the location the operator manually moves the machine to before pressing the Home button. If you combine the home and limit switches you must move off of the switch to the home position or you will get a joint limit error.
- Table Travel
- The range of travel that g code programs must not exceed. The home location must be inside the Table Travel. In particular, having Home Location exactly equal to one of the Table Travel values is incorrect configuration
- Home Switch Location
- The location at which the home switch trips or releases during the homing process. This item and the two below only appear when Home Switches were chosen in the Parallel Port Pinout. If you combine home and limit switches the home switch location can not be the same as the home position or you will get a joint limit error.
- Home Search Velocity
- The velocity to use when moving towards the switch. If the switch is near the end of travel, this velocity must be chosen so that the axis can decelerate to a stop before hitting the end of travel. If the switch is only closed for a short range of travel (instead of being closed from its trip point to one end of travel), this velocity must be chosen so that the axis can decelerate to a stop before the switch opens again, and homing must always be started from the same side of the switch. If the machine moves the wrong direction at the beginning of the homing procedure, negate the value of Home Search Velocity.
- Home Latch Direction
- Choose "Same" to have homing back off the switch, then approach it again at a very low speed. The second time the switch closes, the home position is set. Choose "Opposite" to have homing slowly back off the switch. When the switch opens, the home position is set.
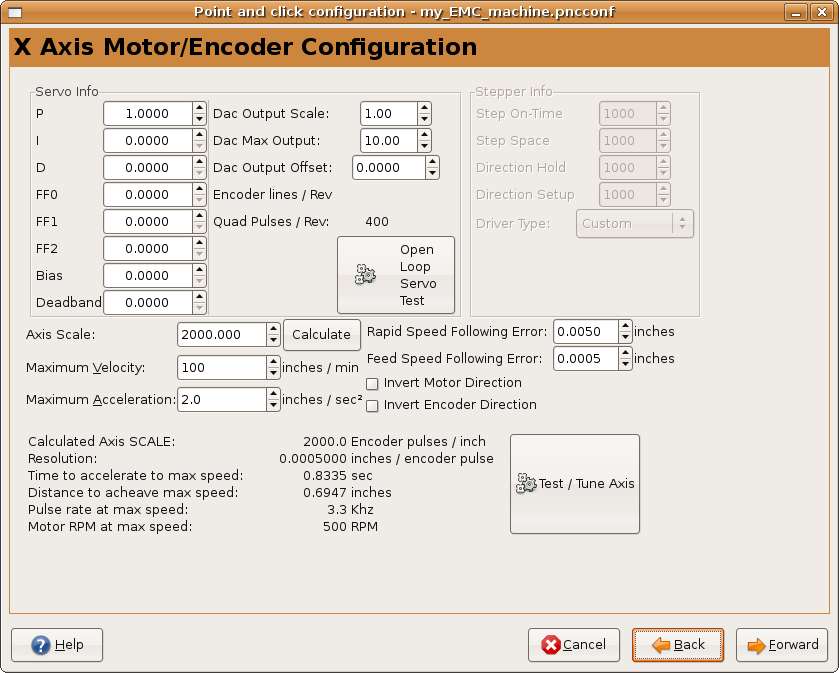
- Time to accelerate to max speed
- Distance to accelerate to max speed
- Pulse rate at max speed
Information computed based on the values entered above. The greatest Pulse rate at max speed determines the BASE_PERIOD , and values above 20000Hz may lead to slow response time or even lockups (the fastest usable pulse rate varies from computer to computer)
- Axis SCALE
- The number that will be used in the ini file [SCALE] setting. This is how many steps per user unit.
- Test this axis
- This will open a window to allow testing for each axis. This can be used after filling out all the information for this axis.
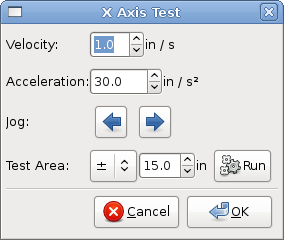
With Stepconf it is easy to try different values for acceleration and velocity.
Begin with a low Acceleration (e.g., 2 in/s2 or 50mm/s2) and the velocity you hope to attain. Using the buttons provided, jog the axis to near the center of travel. Take care because with a low acceleration value, it can take a surprising distance for the axis to decelerate to a stop.
After gauging the amount of travel available, enter a safe distance in Test Area, keeping in mind that after a stall the motor may next start to move in an unexpected direction. Then click Run. The machine will begin to move back and forth along this axis. In this test, it is important that the combination of Acceleration and Test Area allow the machine to reach the selected Velocity and "cruise" for at least a short distance—the more distance, the better this test is. The formula d=.5*v*v/a gives the minimum distance required reach the specified velocity with the given acceleration. If it is convenient and safe to do so, push the table against the direction of motion to simulate cutting forces. If the machine stalls, reduce the speed and start the test again.
If the machine did not obviously stall, click the "Run" button off. The axis now returns to the position where it started. If the position is incorrect, then the axis stalled or lost steps during the test. Reduce Velocity and start the test again.
If the machine doesn’t move, stalls, or loses steps no matter how low you turn Velocity, verify the following:
- Correct step waveform timings
- Correct pinout, including "Invert" on step pins
- Correct, well-shielded cabling
- Physical problems with the motor, motor coupling, leadscrew, etc.
Once you have found a speed at which the axis does not stall or lose steps during this testing procedure, reduce it by 10% and use that as the axis Maximum Velocity.
With the Maximum Velocity you found in the previous step, enter the acceleration value to test. procedure as above, adjusting the Acceleration value up or down as necessary. In this test, it is important that the combination of Acceleration and Test Area allow the machine to reach the selected Velocity. Once you have found a value at which the axis does not stall or lose steps during this testing procedure, reduce it by 10% and use that as the axis Maximum Acceleration.
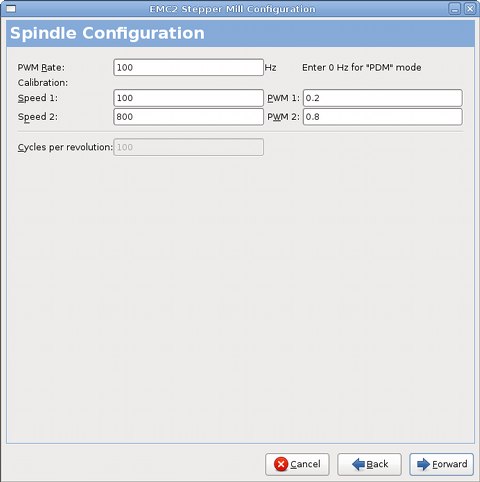
This page only appear when "Spindle PWM" is chosen in the Parallel Port Pinout page for one of the outputs.
If "Spindle PWM" appears on the pinout, the following information should be entered:
- PWM Rate
- The "carrier frequency" of the PWM signal to the spindle. Enter "0" for PDM mode, which is useful for generating an analog control voltage. Refer to the documentation for your spindle controller for the appropriate value.
- Speed 1 and 2, PWM 1 and 2
- The generated configuration file uses a simple linear relationship to determine the PWM value for a given RPM value. If the values are not known, they can be determined. For more information see section ( [sub:Determining-Spindle-Calibration])
When the appropriate signals from a spindle encoder are connected to the parallel port, EMC supports lathe threading. These signals are:
- Spindle Index
- Is a pulse that occurs once per revolution of the spindle.
- Spindle Phase A
- This is a pulse that occurs in multiple equally-spaced locations as the spindle turns.
- Spindle Phase B
- (optional) This is a second pulse that occurs, but with an offset from Spindle Phase A. The advantages to using both A and B are increased noise immunity and increased resolution.
If "Spindle Phase A" and "Spindle Index" appear on the pinout, the following information should be entered:
Enter the following values in the Spindle Configuration page:
| Speed 1: | 0 | PWM 1: | 0 |
|---|---|---|---|
Speed 2: | 1000 | PWM 1: | 1 |
Finish the remaining steps of the configuration process, then launch
EMC with your configuration. Turn the machine on and select the MDI
tab. Start the spindle turning by entering: M3 S100. Change the
spindle speed by entering a different S-number: S800. Valid numbers
range from 1 to 1000.
For two different S-numbers, measure the actual spindle speed in RPM. Record the S-numbers and actual spindle speeds. Run Stepconf again. For "Speed" enter the measured speed, and for "PWM" enter the S-number divided by 1000.
Because most spindle drivers are somewhat nonlinear in their response curves, it is best to:
- Make sure the two calibration speeds are not too close together in RPM
- Make sure the two calibration speeds are in the range of speeds you will typically use while milling
For instance, if your spindle will go from 0RPM to 8000RPM, but you generally use speeds from 400RPM to 4000RPM, then find the PWM values that give 1600RPM and 2800RPM.
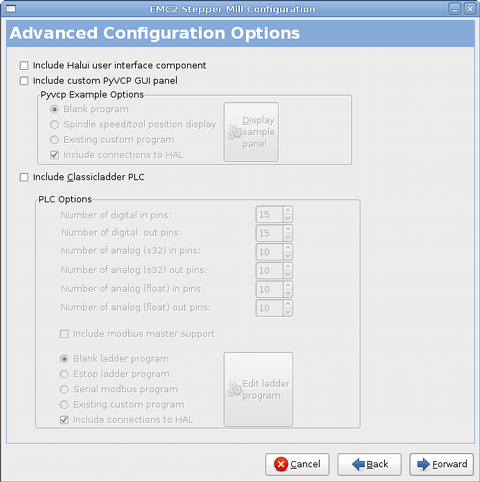
- Include Halui
- This will add the Halui user interface component. See the Integrators Manual for more information on Halui.
- Include pyVCP
- This option adds the pyVCP panel base file or a sample file to work on. See the Integrators Manual for more information on pyVCP.
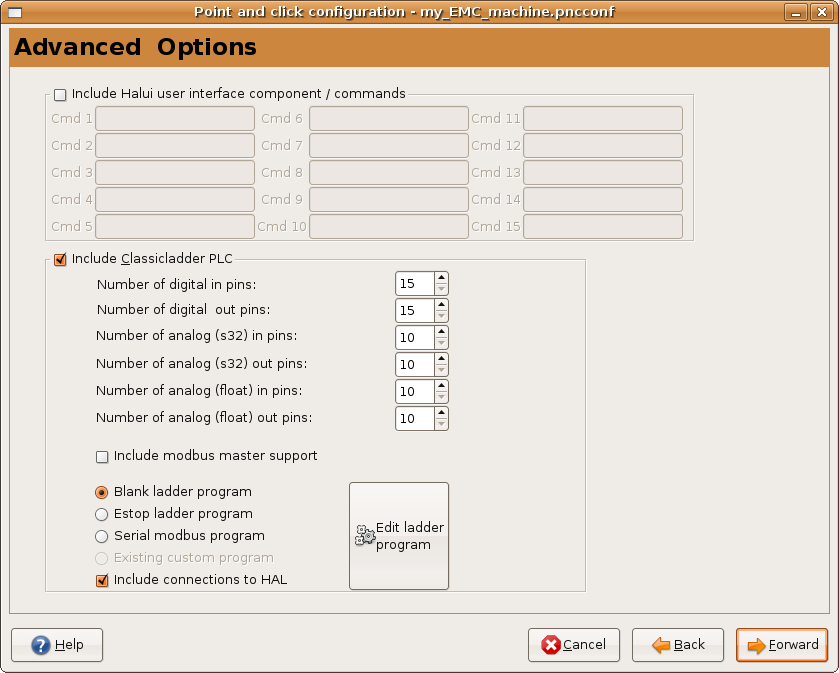
- Include ClassicLadder PLC
- This option will add the ClassicLadder PLC (Programmable Logic Controller). See the Integrators Manual for more information on ClassicLadder.
Click “Apply” to write the configuration files. Later, you can re-run this program and tweak the settings you entered before.
For each axis, there is a limited range of travel. The physical end of travel is called the hard stop.
Before the hard stop there is a limit switch . If the limit switch is encountered during normal operation, EMC shuts down the motor amplifier. The distance between the hard stop and limit switch must be long enough to allow an unpowered motor to coast to a stop.
Before the limit switch there is a soft limit . This is a limit enforced in software after homing. If a MDI command, or g code program would pass the soft limit, it is not executed. If a jog would pass the soft limit, it is terminated at the soft limit.
The home switch can be placed anywhere within the travel (between hard stops). As long as external hardware does not deactivate the motor amplifiers with the limit switch is reached, one of the limit switches can be used as a home switch.
The zero position is the location on the axis that is 0 in the machine coordinate system. Usually the zero position will be within the soft limits. On lathes, constant surface speed mode requires that machine X=0 correspond to the center of spindle rotation when no tool offset is in effect.
The home position is the location within travel that the axis will be moved to at the end of the homing sequence. This value must be within the soft limits. In particular, the home position should never be exactly equal to a soft limit.
A machine can be operated without limit switches. In this case, only the soft limits stop the machine from reaching the hard stop. Soft limits only operate after the machine has been homed.
A machine can be operated without home switches. If the machine has limit switches, but no home switches, it is best to use a limit switch as the home switch (e.g., choose Minimum Limit + Home X in the pinout). If the machine has no switches at all, or the limit switches cannot be used as home switches for another reason, then the machine must be homed "by eye" or by using match marks. Homing by eye is not as repeatable as homing to switches, but it still allows the soft limits to be useful.
The ideal wiring for external switches would be one input per switch. However, the PC parallel port only offers a total of 5 inputs, while there are as many as 9 switches on a 3-axis machine. Instead, multiple switches are wired together in various ways so that a smaller number of inputs are required.
The figures below show the general idea of wiring multiple switches to a single input pin. In each case, when one switch is actuated, the value seen on INPUT goes from logic HIGH to LOW. However, EMC expects a TRUE value when a switch is closed, so the corresponding "Invert" box must be checked on the pinout configuration page.
Wiring N/C switches in series (simplified diagram)
Wiring N/O switches in parallel (simplified diagram)
The following combinations of switches are permitted in Stepconf:
- Combine home switches for all axes
- Combine limit switches for all axes
- Combine both limit switches for one axis
- Combine both limit switches and the home switch for one axis
- Combine one limit switch and the home switch for one axis
The last two combinations are also appropriate when a "home to limit" is used.
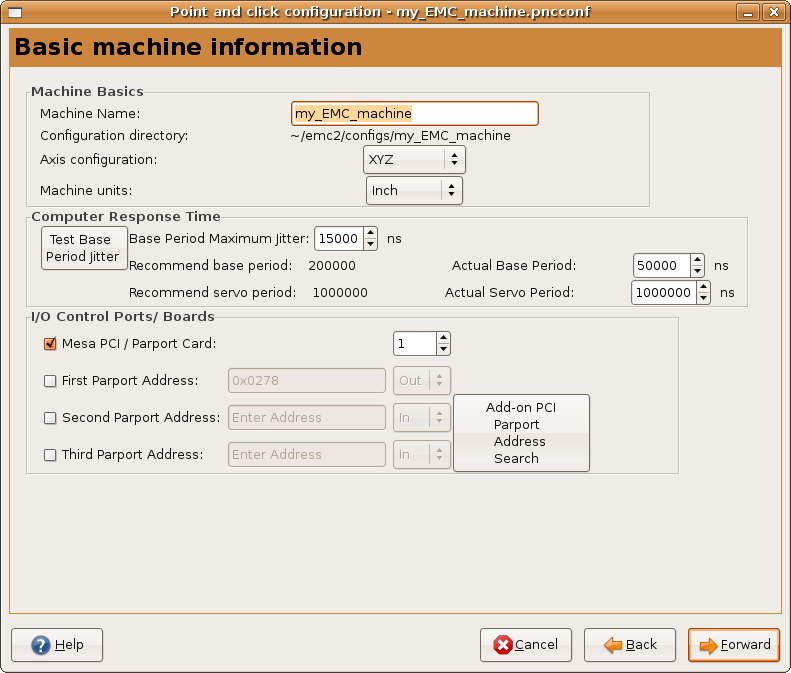
The Point n Click Configurator covers Mesa cards and parallel port stepper configurations. If you have a simple parallel port stepper machine the StepConf Wizard might be a better choice. The Point n Click Configurator can generate some advanced configurations without knowing anything about HAL.
Start the PnCConf program from the CNC menu or from a terminal window
with pncconf. For more information on the terminal window see the
Linux FAQ section.
- Machine Name
- What you want to call your machine and must not have any spaces.
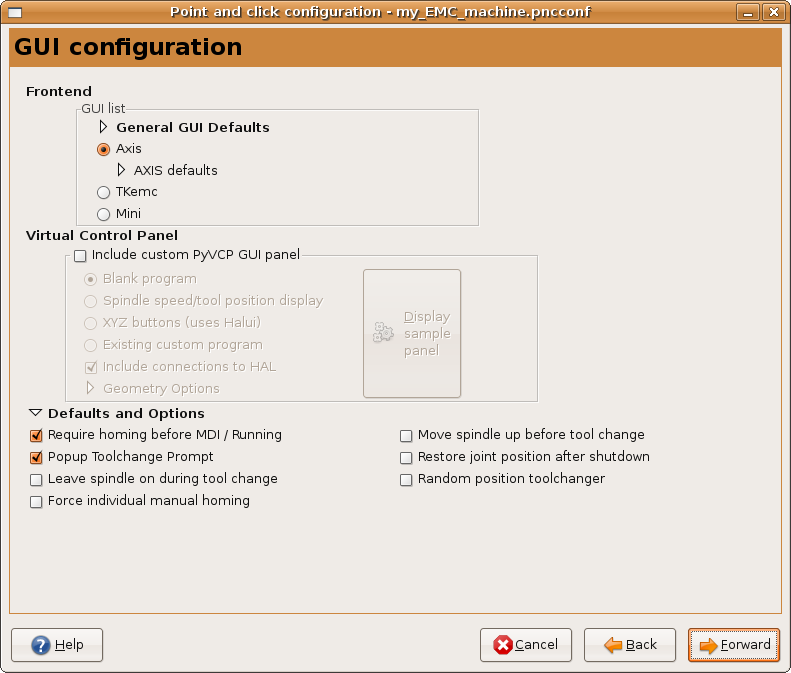
Here you can select from different GUI’s and options for each one.
These are some basic Linux commands and techniques for new to Linux users. More complete information can be found on the web or by using the man pages.
When you install EMC2 with the Ubuntu LiveCD the default is to have to log in each time you turn the computer on. To enable automatic login go to System/Administration/Login Window. If it is a fresh install the Login Window might take a second or three to pop up. You will have to have your password that you used for the install to gain access to the Login Window Preferences window. In the Security tab check off Enable Automatic Login and pick a user name from the list (that would be you).
To have EMC start automatically with your config after turning on the computer go to System/Preferences/Sessions Startup Programs , add new. Navigate to your config and select the .ini file. When the file picker dialog closes add emc and a space in front of the path to your .ini file.
Example:
emc /home/mill/emc2/config/mill/mill.ini
Man pages are automatically generated manual pages in most cases. Man pages are usually available for most programs and commands in Linux.
To view a man page open up a terminal window by going to Applications, Accessories, Terminal. For example if you wanted to find out something about the find command in the terminal window type:
man find
Use the Page Up and Page Down keys to view the man page and the Q key to quit viewing.
Sometimes when troubleshooting you need to get a list of modules that are loaded. In a terminal window type:
lsmod
If you want to send the output from lsmod to a text file in a terminal window type:
lsmod > mymod.txt
The resulting text file will be located in the home directory if you did not change directories when you opened up the terminal window and it will be named mymod.txt or what ever you named it.
When you open the file browser and you see the Owner of the file is root you must do extra steps to edit that file. Editing some root files can have bad results. Be careful when editing root files. You can open and view most root files normally but they will open in “read only” mode.
Open up Applications, Accessories, Terminal.
In the terminal window type
sudo gedit
Open the file with File, Open then edit
- Right click on the desktop and select Create Launcher
- Type a name in like sudo edit
-
Type
gksudo "gnome-open %u"as the command and save the launcher to your desktop - Drag a file onto your launcher to open and edit
To find out the path to the present working directory in the terminal window type:
pwd
To move up one level in the terminal window type:
cd ..
To move up two levels in the terminal window type:
cd ../..
To move down to the emc2/configs subdirectory in the terminal window type:
cd emc2/configs
To view a list of all the files and subdirectories in the terminal window type:
dir
or
ls
The find command can be a bit confusing to a new Linux user. The basic syntax is:
find starting-directory parameters actions
For example to find all the .ini files in your emc2 directory you first need to use the pwd command to find out the directory. Open a new terminal window and type:
pwd
might return the following result
/home/joe
With this information put the command together like this:
find /home/joe/emc2 -name *.ini -print
The -name is the name of the file your looking for and the -print tells it to print out the result to the terminal window. The *.ini tells find to return all files that have the .ini extension.
To find all the files in the directory named and all the subdirectories under that add the -L option to the find command like this:
find -L /home/joe/emc2 -name *.ini -print
grep -i -r 'text to search for' *
To find all the files that contain the text to search for in the current directory and all the subdirectories below the current while ignoring the case. The -i is for ignore case and the -r is for recursive (include all subdirectories in the search). The * is a wild card for search all files.
To view the bootup messages use "dmesg" from the command window. To save the bootup messages to a file use the redirection operator like this:
dmesg > bootmsg.txt
The contents of this file can be copied and pasted on line to share with people trying to help you diagnose your problem.
To clear the message buffer type this:
sudo dmesg -c
This can be useful to do just before you launch EMC to only show the infomation related to the start up of EMC.
To find out what hardware is connected to your motherboard in a terminal window type:
lspci -v
During installation Ubuntu attempts to detect the monitor settings. If this fails you are left with a generic monitor with a maximum resolution of 800x600.
Instructions for fixing this are located here:
A
- Advanced Configuration Options, Advanced Configuration Options
- Automatic Login, Automatic Login
- Automatic Startup, Automatic Startup
- Axis Configuration, Basic Information , Axis Configuration
- Axis Travel, Axis Travel, Home Location, and Home Switch Location
B
- Base Period Maximum Jitter, Basic Information
C
- cd, Changing Directories
- Changing Directories, Changing Directories
- Cycles per revolution, Spindle-synchronized motion (lathe threading)
D
- Determining Spindle Calibration, Determining Spindle Calibration
- dir, Listing files in a directory
- Distance to accelerate to max speed, Axis Configuration
- Driver Microstepping, Axis Configuration
- Driver Type, Basic Information
E
- Editing a Root File, Editing a Root File
F
- find, Finding a File
- Finding a File, Finding a File
- Finding Maximum Acceleration, Finding Maximum Acceleration
- Finding Maximum Velocity, Finding Maximum Velocity
G
- gksudo, The GUI Way
- grep, Searching for Text
H
- Home and Limit Switch wiring options, Home and Limit Switch wiring options
- Home Latch Direction, Axis Configuration
- Home Location, Axis Configuration , Axis Travel, Home Location, and Home Switch Location
- Home Search Velocity, Axis Configuration
- Home Switch Location, Axis Configuration , Axis Travel, Home Location, and Home Switch Location
L
- Lathe Threading, Spindle-synchronized motion (lathe threading)
- Leadscrew Pitch, Axis Configuration
- Linux FAQ, Linux FAQ
- Listing files in a directory, Listing files in a directory
- ls, Listing files in a directory
M
- Machine Name, Basic Information
- Machine Units, Basic Information
- Man Pages, Man Pages
- Max Step Rate, Basic Information
- Maximum Acceleration, Axis Configuration
- Maximum Velocity, Axis Configuration
- Min Base Period, Basic Information
- Minimum Requirements, Minimum Requirements
- Motor Steps Per Revolution, Axis Configuration
- Multi-session Download, Multi-session Download
O
- Onscreen Prompt For Tool Change, Basic Information
- Operating without Home Switches, Operating without Home Switches
- Operating without Limit Switches, Operating without Limit Switches
P
- Parallel Port Setup, Parallel Port Setup
- Pulley Ratio, Axis Configuration
- Pulse rate at max speed, Axis Configuration
- pwd, Working Directory
- PWM 1 and 2, Spindle Speed Control
- PWM Rate, Spindle Speed Control
S
- Searching for Text, Searching for Text
- Speed 1 and 2, Spindle Speed Control
- Spindle A, Spindle-synchronized motion (lathe threading)
- Spindle B, Spindle-synchronized motion (lathe threading)
- Spindle Configuration, Spindle Configuration
- Spindle PPR, Spindle-synchronized motion (lathe threading)
- spindle speed control, Spindle Speed Control
- spindle-synchronized motion, Spindle-synchronized motion (lathe threading)
- Stepconf Wizard, Stepconf Wizard
- sudo gedit, The Command Line Way
T
- Table Travel, Axis Configuration
- Terminal Commands, Terminal Commands
- Test this axis, Axis Configuration
- Time to accelerate to max speed, Axis Configuration
U
- Updates to EMC2, Updates to EMC2
W
- Wget Linux, Wget Linux
- Wget Windows, Wget Windows
- Working Directory, Working Directory
Copyright (c) 2000 LinuxCNC.org
Permission is granted to copy, distribute and/or modify this document under the terms of the GNU Free Documentation License, Version 1.1 or any later version published by the Free Software Foundation; with no Invariant Sections, no Front-Cover Texts, and one Back-Cover Text: "This EMC Handbook is the product of several authors writing for linuxCNC.org. As you find it to be of value in your work, we invite you to contribute to its revision and growth." A copy of the license is included in the section entitled "GNU Free Documentation License". If you do not find the license you may order a copy from Free Software Foundation, Inc. 59 Temple Place, Suite 330, Boston, MA 02111-1307
GNU Free Documentation License Version 1.1, March 2000
Copyright © 2000 Free Software Foundation, Inc. 59 Temple Place, Suite 330, Boston, MA 02111-1307 USA Everyone is permitted to copy and distribute verbatim copies of this license document, but changing it is not allowed.
- PREAMBLE
The purpose of this License is to make a manual, textbook, or other written document "free" in the sense of freedom: to assure everyone the effective freedom to copy and redistribute it, with or without modifying it, either commercially or noncommercially. Secondarily, this License preserves for the author and publisher a way to get credit for their work, while not being considered responsible for modifications made by others.
This License is a kind of "copyleft", which means that derivative works of the document must themselves be free in the same sense. It complements the GNU General Public License, which is a copyleft license designed for free software.
We have designed this License in order to use it for manuals for free software, because free software needs free documentation: a free program should come with manuals providing the same freedoms that the software does. But this License is not limited to software manuals; it can be used for any textual work, regardless of subject matter or whether it is published as a printed book. We recommend this License principally for works whose purpose is instruction or reference.
1. APPLICABILITY AND DEFINITIONS
This License applies to any manual or other work that contains a notice placed by the copyright holder saying it can be distributed under the terms of this License. The "Document", below, refers to any such manual or work. Any member of the public is a licensee, and is addressed as "you".
A "Modified Version" of the Document means any work containing the Document or a portion of it, either copied verbatim, or with modifications and/or translated into another language.
A "Secondary Section" is a named appendix or a front-matter section of the Document that deals exclusively with the relationship of the publishers or authors of the Document to the Document’s overall subject (or to related matters) and contains nothing that could fall directly within that overall subject. (For example, if the Document is in part a textbook of mathematics, a Secondary Section may not explain any mathematics.) The relationship could be a matter of historical connection with the subject or with related matters, or of legal, commercial, philosophical, ethical or political position regarding them.
The "Invariant Sections" are certain Secondary Sections whose titles are designated, as being those of Invariant Sections, in the notice that says that the Document is released under this License.
The "Cover Texts" are certain short passages of text that are listed, as Front-Cover Texts or Back-Cover Texts, in the notice that says that the Document is released under this License.
A "Transparent" copy of the Document means a machine-readable copy, represented in a format whose specification is available to the general public, whose contents can be viewed and edited directly and straightforwardly with generic text editors or (for images composed of pixels) generic paint programs or (for drawings) some widely available drawing editor, and that is suitable for input to text formatters or for automatic translation to a variety of formats suitable for input to text formatters. A copy made in an otherwise Transparent file format whose markup has been designed to thwart or discourage subsequent modification by readers is not Transparent. A copy that is not "Transparent" is called "Opaque".
Examples of suitable formats for Transparent copies include plain ASCII without markup, Texinfo input format, LaTeX input format, SGML or XML using a publicly available DTD, and standard-conforming simple HTML designed for human modification. Opaque formats include PostScript, PDF, proprietary formats that can be read and edited only by proprietary word processors, SGML or XML for which the DTD and/or processing tools are not generally available, and the machine-generated HTML produced by some word processors for output purposes only.
The "Title Page" means, for a printed book, the title page itself, plus such following pages as are needed to hold, legibly, the material this License requires to appear in the title page. For works in formats which do not have any title page as such, "Title Page" means the text near the most prominent appearance of the work’s title, preceding the beginning of the body of the text.
2. VERBATIM COPYING
You may copy and distribute the Document in any medium, either commercially or noncommercially, provided that this License, the copyright notices, and the license notice saying this License applies to the Document are reproduced in all copies, and that you add no other conditions whatsoever to those of this License. You may not use technical measures to obstruct or control the reading or further copying of the copies you make or distribute. However, you may accept compensation in exchange for copies. If you distribute a large enough number of copies you must also follow the conditions in section 3.
You may also lend copies, under the same conditions stated above, and you may publicly display copies.
3. COPYING IN QUANTITY
If you publish printed copies of the Document numbering more than 100, and the Document’s license notice requires Cover Texts, you must enclose the copies in covers that carry, clearly and legibly, all these Cover Texts: Front-Cover Texts on the front cover, and Back-Cover Texts on the back cover. Both covers must also clearly and legibly identify you as the publisher of these copies. The front cover must present the full title with all words of the title equally prominent and visible. You may add other material on the covers in addition. Copying with changes limited to the covers, as long as they preserve the title of the Document and satisfy these conditions, can be treated as verbatim copying in other respects.
If the required texts for either cover are too voluminous to fit legibly, you should put the first ones listed (as many as fit reasonably) on the actual cover, and continue the rest onto adjacent pages.
If you publish or distribute Opaque copies of the Document numbering more than 100, you must either include a machine-readable Transparent copy along with each Opaque copy, or state in or with each Opaque copy a publicly-accessible computer-network location containing a complete Transparent copy of the Document, free of added material, which the general network-using public has access to download anonymously at no charge using public-standard network protocols. If you use the latter option, you must take reasonably prudent steps, when you begin distribution of Opaque copies in quantity, to ensure that this Transparent copy will remain thus accessible at the stated location until at least one year after the last time you distribute an Opaque copy (directly or through your agents or retailers) of that edition to the public.
It is requested, but not required, that you contact the authors of the Document well before redistributing any large number of copies, to give them a chance to provide you with an updated version of the Document.
4. MODIFICATIONS
You may copy and distribute a Modified Version of the Document under the conditions of sections 2 and 3 above, provided that you release the Modified Version under precisely this License, with the Modified Version filling the role of the Document, thus licensing distribution and modification of the Modified Version to whoever possesses a copy of it. In addition, you must do these things in the Modified Version:
- Use in the Title Page (and on the covers, if any) a title distinct from that of the Document, and from those of previous versions (which should, if there were any, be listed in the History section of the Document). You may use the same title as a previous version if the original publisher of that version gives permission. B. List on the Title Page, as authors, one or more persons or entities responsible for authorship of the modifications in the Modified Version, together with at least five of the principal authors of the Document (all of its principal authors, if it has less than five). C. State on the Title page the name of the publisher of the Modified Version, as the publisher. D. Preserve all the copyright notices of the Document. E. Add an appropriate copyright notice for your modifications adjacent to the other copyright notices. F. Include, immediately after the copyright notices, a license notice giving the public permission to use the Modified Version under the terms of this License, in the form shown in the Addendum below. G. Preserve in that license notice the full lists of Invariant Sections and required Cover Texts given in the Document’s license notice. H. Include an unaltered copy of this License. I. Preserve the section entitled "History", and its title, and add to it an item stating at least the title, year, new authors, and publisher of the Modified Version as given on the Title Page. If there is no section entitled "History" in the Document, create one stating the title, year, authors, and publisher of the Document as given on its Title Page, then add an item describing the Modified Version as stated in the previous sentence. J. Preserve the network location, if any, given in the Document for public access to a Transparent copy of the Document, and likewise the network locations given in the Document for previous versions it was based on. These may be placed in the "History" section. You may omit a network location for a work that was published at least four years before the Document itself, or if the original publisher of the version it refers to gives permission. K. In any section entitled "Acknowledgements" or "Dedications", preserve the section’s title, and preserve in the section all the substance and tone of each of the contributor acknowledgements and/or dedications given therein. L. Preserve all the Invariant Sections of the Document, unaltered in their text and in their titles. Section numbers or the equivalent are not considered part of the section titles. M. Delete any section entitled "Endorsements". Such a section may not be included in the Modified Version. N. Do not retitle any existing section as "Endorsements" or to conflict in title with any Invariant Section.
If the Modified Version includes new front-matter sections or appendices that qualify as Secondary Sections and contain no material copied from the Document, you may at your option designate some or all of these sections as invariant. To do this, add their titles to the list of Invariant Sections in the Modified Version’s license notice. These titles must be distinct from any other section titles.
You may add a section entitled "Endorsements", provided it contains nothing but endorsements of your Modified Version by various parties—for example, statements of peer review or that the text has been approved by an organization as the authoritative definition of a standard.
You may add a passage of up to five words as a Front-Cover Text, and a passage of up to 25 words as a Back-Cover Text, to the end of the list of Cover Texts in the Modified Version. Only one passage of Front-Cover Text and one of Back-Cover Text may be added by (or through arrangements made by) any one entity. If the Document already includes a cover text for the same cover, previously added by you or by arrangement made by the same entity you are acting on behalf of, you may not add another; but you may replace the old one, on explicit permission from the previous publisher that added the old one.
The author(s) and publisher(s) of the Document do not by this License give permission to use their names for publicity for or to assert or imply endorsement of any Modified Version.
5. COMBINING DOCUMENTS
You may combine the Document with other documents released under this License, under the terms defined in section 4 above for modified versions, provided that you include in the combination all of the Invariant Sections of all of the original documents, unmodified, and list them all as Invariant Sections of your combined work in its license notice.
The combined work need only contain one copy of this License, and multiple identical Invariant Sections may be replaced with a single copy. If there are multiple Invariant Sections with the same name but different contents, make the title of each such section unique by adding at the end of it, in parentheses, the name of the original author or publisher of that section if known, or else a unique number. Make the same adjustment to the section titles in the list of Invariant Sections in the license notice of the combined work.
In the combination, you must combine any sections entitled "History" in the various original documents, forming one section entitled "History"; likewise combine any sections entitled "Acknowledgements", and any sections entitled "Dedications". You must delete all sections entitled "Endorsements."
6. COLLECTIONS OF DOCUMENTS
You may make a collection consisting of the Document and other documents released under this License, and replace the individual copies of this License in the various documents with a single copy that is included in the collection, provided that you follow the rules of this License for verbatim copying of each of the documents in all other respects.
You may extract a single document from such a collection, and distribute it individually under this License, provided you insert a copy of this License into the extracted document, and follow this License in all other respects regarding verbatim copying of that document.
7. AGGREGATION WITH INDEPENDENT WORKS
A compilation of the Document or its derivatives with other separate and independent documents or works, in or on a volume of a storage or distribution medium, does not as a whole count as a Modified Version of the Document, provided no compilation copyright is claimed for the compilation. Such a compilation is called an "aggregate", and this License does not apply to the other self-contained works thus compiled with the Document, on account of their being thus compiled, if they are not themselves derivative works of the Document.
If the Cover Text requirement of section 3 is applicable to these copies of the Document, then if the Document is less than one quarter of the entire aggregate, the Document’s Cover Texts may be placed on covers that surround only the Document within the aggregate. Otherwise they must appear on covers around the whole aggregate.
8. TRANSLATION
Translation is considered a kind of modification, so you may distribute translations of the Document under the terms of section 4. Replacing Invariant Sections with translations requires special permission from their copyright holders, but you may include translations of some or all Invariant Sections in addition to the original versions of these Invariant Sections. You may include a translation of this License provided that you also include the original English version of this License. In case of a disagreement between the translation and the original English version of this License, the original English version will prevail.
9. TERMINATION
You may not copy, modify, sublicense, or distribute the Document except as expressly provided for under this License. Any other attempt to copy, modify, sublicense or distribute the Document is void, and will automatically terminate your rights under this License. However, parties who have received copies, or rights, from you under this License will not have their licenses terminated so long as such parties remain in full compliance.
10. FUTURE REVISIONS OF THIS LICENSE
The Free Software Foundation may publish new, revised versions of the GNU Free Documentation License from time to time. Such new versions will be similar in spirit to the present version, but may differ in detail to address new problems or concerns. See http:///www.gnu.org/copyleft/.
Each version of the License is given a distinguishing version number. If the Document specifies that a particular numbered version of this License "or any later version" applies to it, you have the option of following the terms and conditions either of that specified version or of any later version that has been published (not as a draft) by the Free Software Foundation. If the Document does not specify a version number of this License, you may choose any version ever published (not as a draft) by the Free Software Foundation.
ADDENDUM: How to use this License for your documents
To use this License in a document you have written, include a copy of the License in the document and put the following copyright and license notices just after the title page:
Copyright (c) YEAR YOUR NAME. Permission is granted to copy, distribute and/or modify this document under the terms of the GNU Free Documentation License, Version 1.1 or any later version published by the Free Software Foundation; with the Invariant Sections being LIST THEIR TITLES, with the Front-Cover Texts being LIST, and with the Back-Cover Texts being LIST. A copy of the license is included in the section entitled "GNU Free Documentation License".
If you have no Invariant Sections, write "with no Invariant Sections" instead of saying which ones are invariant. If you have no Front-Cover Texts, write "no Front-Cover Texts" instead of "Front-Cover Texts being LIST"; likewise for Back-Cover Texts.
If your document contains nontrivial examples of program code, we recommend releasing these examples in parallel under your choice of free software license, such as the GNU General Public License, to permit their use in free software.
The End