GladeVCP
GladeVCP is an EMC2 component which adds the ability to add a virtual control panel to EMC user interfaces like Axis or Touchy. It is similar to PyVCP; whereas PyVCP panels are created by editing an XML file manually, GladeVCP uses the glade WYSIWYG user interface editor. Therefore, it’s faster and easier to create visually pleasing panels with GladeVCP.
|
Note
|
Until GladeVCP is fully integrated with EMC2 please refer to the EMC wiki page GladeVcpSetup for instructions on installing and setting up GladeVCP. |
Creating your first GladeVCP UI component
Either modify an existing UI component, or start a new one with running glade. In the left tab, expand the HAL Python components. Create a window as top level window from the Toplevels section, which by default will be named window1. Leave that name as is - gladevcp assumes the top level window has this name. Add a HAL_Box or a HAL_Table from HAL Python to the frame, and pick and place some elements like LED, button etc in its box.
This will look like so:
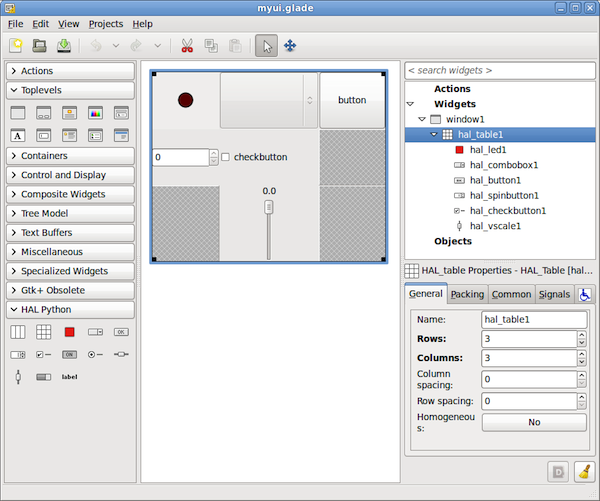
Select File-]Save as, give it a name like myui.ui and make sure it`s saved as GtkBuilder file (radio button left bottom corner in Save dialog). The convention for GtkBuilder file extension is .ui. You can now run it with:
gladevcp myui.ui
Integrating the example UI into Axis
While you could run your UI as a separate top level window side-by-side with Axis, having it within the Axis frame as a tab side-by-side with the Preview and DRO tabs is more elegant. To do so, edit your .ini file and add two variables to the DISPLAY section of ini file:
EMBED_TAB_NAME = GladeVCP

EMBED_TAB_COMMAND = gladevcp -c gladevcp-test -w {XID} -H gladevcp-test.hal gladevcp-test.ui
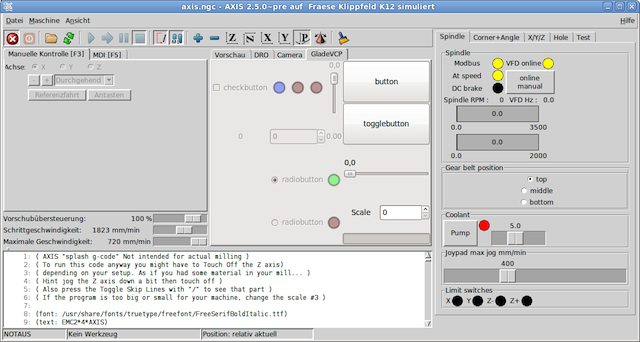
Try it out by running Axis - there should be a new tab called GladeVCP near the DRO tab. Select that tab, you should see the example panel nicely fit within Axis like so:
Integrating into Touchy
Touchy also understands EMBED_TAB_NAME/EMBED_TAB_COMMAND variables from INI file so instructions for it are equal to Axis.
Axis: linking HAL pins in the example UI
To be useful, the pins in your UI need to be linked to the rest of your setup. Usually this is done by running one or several HAL files through the HALFILE and POSTGUI_HALFILE statements in the HAL section of your .ini file.
For gladevcp components this not currently possible because all of these HALFILE statements are run before gladevcp is started, so linking to your UI’s pins from there would refer to pins which do not yet exist. You therefore need to prepare a file of all HAL commands which refer to / link with your UI’s pins and pass it to the gladevcp command in the EMBED_TAB_COMMAND statement like so:
EMBED_TAB_COMMAND = gladevcp -c gladevcp-test -H gladevcp-test.hal -w {XID} gladevcp-test.glade
There is an example gladevcp-test.hal file in the emc2-dev/lib/python/gladevcp directory. Before using it in the EMBED_TAB_NAME statement, make sure the loadusr statements at the top are commented out.
Adding custom user callbacks in Python
This is just a very minimal example to convey the idea - for a detailed description on how to program a gladevcp application, see GladeVCPprogramming and HalWidgets.
gladevcp cannot only manipulate or display HAL pins, you can also write regular event handlers in Python. This could be used, among others, to execute MDI commands. Here’s how you do it:
Write a Python module like so and save as e.g. handlers.py:
nhits = 0

def on_button_press(gtkobj,data=None):
    global nhits
    nhits += 1
    gtkobj.set_label("hits: %d" % nhits)
In glade, define a button or HAL button, select the Signals tab, and in the GtkButton properties select the pressed line. Enter on_button_press there, and save the glade file.
Then add the option -u handlers.py to the gladevcp command line. If your event handlers are spread over several files, just add multiple -u [pyfilename] options.
Now, pressing the button should change its label since it’s set in the callback function.
What the -u flag does is: all Python functions in this file are collected and setup as potential callback handlers for your Gtk widgets - they can be referenced from glade Signals tabs. The callback handlers are called with the particular object instance as parameter, like the GtkButton instance above, so you can apply any GtkButton method from there.
Or do some more useful stuff, like calling an MDI command!
Gladevcp command line options
See also man gladevcp . This is the usage message when you run gladevcp -h:
Usage: gladevcp [options] myfile.ui
Options:
- -h, --help
-
show this help message and exit
- -c NAME
-
Set component name to NAME. Default is base name of UI file
- -d
-
Enable debug output
- -g GEOMETRY
-
Set geometry WIDTHxHEIGHT+XOFFSET+YOFFSET.Values are in pixel units, XOFFSET/YOFFSET is referenced from top left of screen use -g WIDTHxHEIGHT for just setting size or -g +XOFFSET+YOFFSET for just position -H FILE execute hal statements from FILE with halcmd after the component is set up and ready
- -x XID
-
Re-parent gladevcp into an existing window XID instead of creating a new top level window
- -u FILE
-
Use File’s as additional user defined modules with handlers
- -U USEROPT
-
pass USEROPTs to Python modules
Troubleshooting
-
make sure your have the development version of emc2 installed. You don’t need the axisrc file any more, this was mentioned in the old GladeVcp wiki page.
-
run gladevcp or Axis from a terminal window. If you get Python errors, check whether there’s still a /usr/lib/python2.6/dist-packages/hal.so file lying around besides the newer /usr/lib/python2.6/dist-packages/_hal.so (note underscore); if yes, remove the hal.so file. It has been superseded by hal.py in the same directory and thus creates confusion.
-
if you’re using run-in-place, do a make clean to remove any accidentially left over hal.so file, then make.
-
if you’re using HAL_table or HAL_HBox widgets, be aware they have an HAL pin associated with it which is off by default. This pin controls whether these container’s children are active or not.
GladeVCP Programming
PyVCP to GladeVCP
Stock gladevcp can be used pretty much in the style of PyVCP - the major difference being that in the case of gladevcp, the glade user interface editor is used to design a screen layout, whereas PyVCP is driven by manually edited XML files. Also, PyVCP uses the TkInter widgets, whereas gladevcp uses the much richer GTK toolkit. Both support HAL widgets - widgets with one or more associated HAL pin which is the interface to the rest of EMC. Stock gladevcp and PyVCP panels are really just a bunch of virtual switches, dials, leds an so forth, wired to the outside world through the HAL layer, designed to set and read ints, bits and floats values.
Most widget sets, and their associated user interface editors, support the concept of callbacks - functions in user-written code which are executed when something happens in the UI - events like mouse clicks, characters typed, mouse movement, timer events, window hiding and exposure and so forth. Both PyVCP and stock gladevcp mainly do two things: mapping events on HAL widgets to actions like a value change of the associated HAL pin, and in the other direction - detecting if HAL pin values changed and updating the associated widget, like a LED, a meter, a bar, or just some label displaying a value. However, neither PyVCP nor stock gladevcp provide support for other actions than changing HAL values. Doing something more complex, like executing MDI commands to call a G-code subroutine, is outside scope.
Hal Widgets
GladeVcp includes a collection of Gtk widgets with attached HAL pins called HAL Widgets, intended to control, display or otherwise interact with the EMC HAL layer. They are intended to be used with the glade user interface editor. With proper installation, the HAL Widgets should show up in glade’s HAL Python widget group. Many HAL specific fields in the glade General section have an associated mouse-over tool tip.
HAL signals come in two variants, bits and numbers. Bits are off/on signals. Numbers can be "float", "s32" or "u32". For more information on HAL data types see the [-]] section. The GladeVcp widgets can either display the value of the signal with an indicator widget, or modify the signal value with a control widget. Thus there are four classes of GladeVcp widgets that you can connect to a HAL signal. Another class of helper widgets allow you to organize and label your panel.
-
Widgets for indicating "bit" signals: HAL_LED
-
Widgets for controlling "bit" signals: HAL_Button, HAL_RadioButton, HAL_CheckButton, HAL_RadioButton
-
Widgets for indicating "number" signals: HAL_Label, HAL_ProgressBar, HAL_Bar, HAL_VBar, HAL_Meter
-
Widgets for controlling "number" signals: HAL_SpinButton, HAL_HScale, HAL_VScale
-
Helper widgets: HAL_Table, HAL_HBox
-
Tool Path preview: HAL_Gremlin
HAL Widgets inherit methods, properties and signals from the underlying Gtk widgets, so it is helpful to consult the Gtk and PyGTK documentation as well.
Widget and HAL pin naming
Most HAL widgets have a single associated HAL pin with the same name as the widget (glade: General-]Name). Exceptions to this rule currently are the HAL_Spinbutton, which has two pins: a [widgetname]-f (float) and a [widgetname]-s (s32) pin, and the HAL_ProgressBar, which has a [widgetname] value input pin, and a [widgetname].scale input pin.
Setting pin and widget values
As a general rule, if you need to set a HAL output widget’s value from Python code, do so by calling the underlying Gtk setter (e.g. set_active(), set_value()) - do not try to set the associated pin’s value by halcomp[pinname] = value directly because the widget will not notice.
It might be tempting to set HAL widget input pins programmatically. Note this defeats the purpose of an input pin in the first place - it should be linked to, and react to signals generated by other HAL components. While there is currently no write protection on writing to input pins in HAL Python, this doesn’t make sense. You might use setp pinname value in the associated halfile for testing though.
It is perfectly OK to set an output HAL pin’s value with halcomp[pinname] = value provided this HAL pin is not associated with a widget, that is, has been created by the hal_glib.GPin(halcomp.newpin([name],[type],[direction]) method (see GladeVCProgramming for an example).
The hal-pin-changed signal
Event-driven programming means that the UI tells you when "something happens" - through a callback, like when a button was pressed. The output HAL widgets (those which display a HAL pin’s value) like LED, Bar, VBar, Meter etc, support the hal-pin-changed signal which may cause a callback into your Python code when - well, a HAL pin changes its value. This means there’s no more need for permanent polling of HAL pin changes in your code, the widgets do that in the background and let you know. The example in configs/gladevcp/examples/complex shows how this is handled in Python.
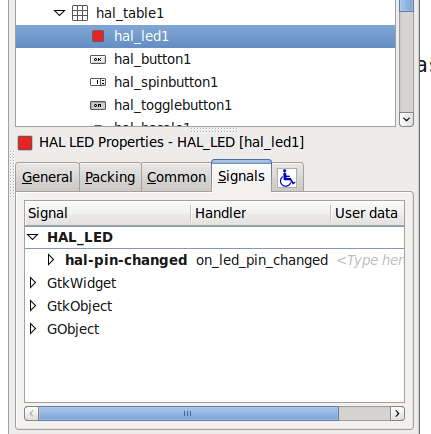
Here is an example how to set a hal-pin-changed signal for a HAL_LED in the glade UI editor:
Buttons
This group of widget is derived from various Gtk buttons and consists of HAL_Button, HAL_ToggleButton, HAL_RadioButton and CheckButton widgets. All of them have a single output BIT pin named identical to the widget. Buttons have no additional properties compared to their base Gtk classes.
HAL_Button: instantaneous action, does not retain state. Important signal: pressed
HAL_ToggleButton, HAL_CheckButton: retains on/off state. Important signal: toggled
HAL_RadioButton: a one-of-many group. Important signal: toggled (per button).
Important common methods: set_active(), get_active()
Important properties: label, image
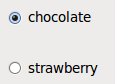
Hint: Defining radio button groups in glade:
-
decide on default active button
-
in the other button’s General-]Group select the default active button’s name in the Choose a Radio Button in this project dialog.
See configs/gladevcp/by-widget/radiobutton for a gladevcp application and UI file for working with radio buttons.
Scales
HAL_HScale and HAL_VScale are derived from the GtkHScale and GtkVScale respectively. They have one output FLOAT pin with name equal to widget name. Scales have no additional properties.

Hint: To make a scale useful in glade, add an Adjustment (General-]Adjustment-]New or existing adjustment) and edit the adjustment object. It defines the default/min/max/increment
values. Also, set adjustment Page size and Page increment to zero to avoid warnings.
SpinButton
HAL SpinButton is derived from GtkSpinButton and holds two pins:
{widgetname}-f: out FLOAT pin
{widgetname}-s: out S32 pin
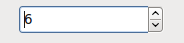
Hint: to be useful, Spinbuttons need an adjustment value like scales, see above.
Label
HAL_Label is simple widget based on GtkLabel which represents a HAL pin value in a user-defined format. The pin’s HAL type depends on the label_pin_type property (0:S32, 1:float, 2:U32), see also the tooltip on General-]HAL pin type (note this is different from PyVCP which has three label widgets, one for each type).
The text displayed depends on the text_template property - an Python format string to represent the pin value. It defaults to "%s" (values are converted by the str() function) but may contain anything legit in a as argument to Pythons format() method.
Example: Distance: %.03f will display the text and the pin value with 3 fractional digits padded with zeros for a FLOAT pin.
Containers: HAL_HBox and HAL_Table
Compared to their Gtk counterparts they have one input BIT pin which controls if their child widgets are sensitive or not. If the pin is low then child widgets are inactive which is the default.
|
Tip
|
If you find some part of your gladevcp application is grayed out (insensitive), see whether a container’s pin is unset. |
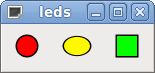
LED
The HAL_Led simulates a real indicator LED . It has a single input BIT pin which controls it’s state: ON or OFF. Leds have several properties which control their look and feel:
-
on_color: a String defining ON color of led. May be any valid gtk.gdk.Color name. Not working on Ubuntu 8.04.
-
off_color: String defining OFF color of led. May be any valid gtk.gdk.Color name or special value "dark". "dark" means that OFF color will be set to 0.4 value of ON color. Not working on Ubuntu 8.04.
-
pick_color_on, pick_color_off: Colors for ON and OFF states may be represented as #RRRRGGGGBBBB strings. These are optional properties which have precedence over "on_color" and "off_color".
-
led_size: LED radius (for square - half of LED’s side)
-
led_shape: LED Shape. Valid values are 0 for round, 1 for oval and 2 for square shapes.
-
led_blink_rate: if set and led is ON then it’s blinking. Blink frequency is equal to "led_blink_rate" specified in milliseconds.
As an input widget, LED also supports the hal-pin-changed signal. If you want to get a notification in your code when the LED’s HAL pin was changed, then connect this signal to a handler, for example on_led_pin_changed and provide the handler as follows:
def on_led_pin_changed(self,hal_led,data=None):
    print "on_led_pin_changed() - HAL pin value:",hal_led.hal_pin.get()
This will be called at any edge of the signal and also during program start up to report the current value.
Example LEDs:
ProgressBar
|
Note
|
This widget might go away. Use the HAL_HBar and HAL_VBar widgets instead. |
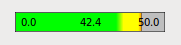
The HAL_ProgressBar is derived from gtk.ProgressBar and has two float HAL input pins:
[widgetname] - the current value to be displayed
[widgetname].scale - the maximum absolute value of input
It has the following properties:
-
scale - value scale. set maximum absolute value of input. Same as setting the [widgetname].scale pin. A float, range from -224 to 224.
-
green_limit - green zone limit lower limit
-
yellow_limit - yellow zone limit lower limit
-
red_limit - red zone limit lower limit
-
text_template - Text template to display the current value of the [widgetname] pin. Python formatting may be used for dict {"value":value}
ComboBox
HAL_ComboBox is derived from gtk.ComboBox. It enables choice of a value from a dropdown list.
It exports two HAL pins:
[widgetname]-f: the current value, type FLOAT
[widgetname]-s: the current value, type S32
It has the following property which can be set in glade:
column: the column index, type S32, defaults to -1, range from -1..100 .
In default mode this widgets sets the pins to the index of the chosen list entry. So if your widget has three labels, it may only assume values 0,1 and 2.
In column mode (column ] -1), the value reported is chosen from the ListStore array as defined in Glade. So typically your widget definition would have two columns in the ListStore , one with text displayed in the dropdown, and an int or float value to use for that choice.
There’s an example in configs/gladevcp/by-widget/combobox/combobox.{py,ui} which uses column mode to pick a float value from the ListStore.
If you’re confused like me about how to edit ComboBox ListStores and CellRenderer , see http://www.youtube.com/watch?v=Z5_F-rW2cL8.
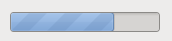
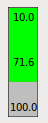
Bars
HAL Bar and VBar widgets for horizontal and vertical bars representing float values. They have one input FLOAT hal pin. Both bars have the following properties:
-
invert: Swap min and max direction. An inverted HBar grows from right to left, an inverted VBar from top to bottom.
-
min, max: Minimum and maximum value of desired range. It is not an error condition if the current value is outside this range.
-
zero: Zero point of range. If it’s inside of min/max range then the bar will grow from that value and not from the left (or right) side of the widget. Useful to represent values that may be both positive or negative.
-
force_width, force_height: Forced width or height of widget. If not set then size will be deduced from packing or from fixed widget size and bar will fill whole area.
-
text_template: Like in Label sets text format for min/max/current values. Can be used to turn off value display.
-
bg_color: Background (inactive) color of bar.
-
z0_color, z1_color, z2_color: Colors of different value zones. Defaults are "green", "yellow" and "red". For description of zones see "z*_border" properties.
-
z0_border, z1_border: Define up bounds of color zones. By default only one zone is enabled. If you want more then one zone set "z0_border" and "z1_border" to desired values so zone 0 will fill from 0 to first border, zone 1 will fill from first to second border and zone 2 — from last border to 1. Borders are set as fractions, values from 0 to 1.
Examples:
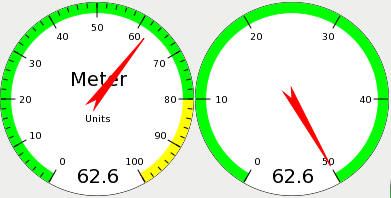
Meter
HAL Meter is widget like PyVCP meter representing float value. It have one input FLOAT hal pin. Widget has following properties:
-
min, max: Minimum and maximum value of desired range. It is not an error condition if the current value is outside this range.
-
force_size: Forced diameter of widget. If not set then size will be deduced from packing or from fixed widget size and meter will fill all available space with respect to aspect ratio.
-
text_template: Like in Label sets text format for current value. Can be used to turn off value display.
-
label: Large label above center of meter.
-
sublabel: Small label below center of meter.
-
bg_color: Background color of meter.
-
z0_color, z1_color, z2_color: Colors of different value zones. Defaults are "green", "yellow" and "red". For description of zones see "z*_border" properties.
-
z0_border, z1_border: Define up bounds of color zones. By default only one zone is enabled. If you want more then one zone set "z0_border" and "z1_border" to desired values so zone 0 will fill from min to first border, zone 1 will fill from first to second border and zone 2 — from last border to max. Borders are set as values in range min-max.
Examples:
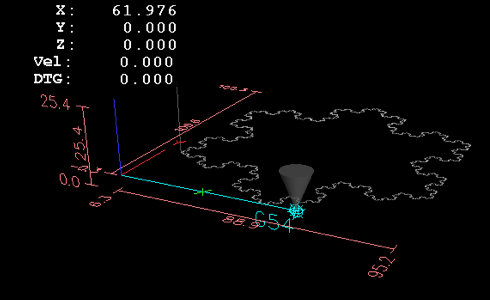
Gremlin tool path preview for .ngc files
Gremlin is a plot preview widget similar to the Axis preview window. It assumes a running EMC environment like Axis or Touchy. To connect to it, inspects the INI_FILE_NAME environment variable. Gremlin displays the current .ngc file - it does monitor for changes and reloads the ngc file if the file name in Axis/Touchy changes. If you run it in a gladevcp application when EMC is not running you might get a traceback because the Gremlin widget cant find EMC status, like the current file name.
Gremlin does not export any HAL pins. It has the following properties:
-
view : may be any of x, y, z, p (perspective) . Defaults to z view.
-
enable_dro : boolean; wether to draw a DRO on the plot or not. Defaults to True.
Example:
Action Widgets
GladeVcp includes a collection of "canned actions" called EMC Action Widgets for the glade user interface editor. Other than HAL widgets, which interact with HAL pins, EMC Actions interact with EMC and the G-code interpreter.
EMC Action Widgets are derived from the Gtk.Action widget. The Action widget in a nutshell:
-
it is an object available in glade
-
it has no visual appearance by itself
-
it’s purpose: associate a visible, sensitive UI component like menu, toolbutton, button with a command. See these widget’s General-Related Action property.
-
the "canned action" will be executed when the associated UI component is triggered (button press, menu click..)
-
it provides an easy way to execute commands without resorting to Python programming.
The appearance of EMC Actions in glade is roughly as follows:
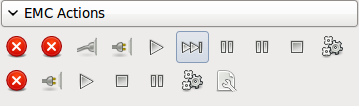
Tooltip hovers provide a description.
Action widget types
EMC Action widgets
These are one-shot type widgets. They implement a single action and are for use in simple buttons, menu entries or radio/check groups.
EMC ToggleAction widgets
These are bi-modal widgets. They implement two actions or use a second (usually pressed) state to indicate that currently an action is running. Toggle actions are aimed for use in ToggleButtons, ToggleToolButtons or toggling menu items. A simplex example is the ESTOP toggle button.
Currently the following widgets are available:
-
The ESTOP toggle sends ESTOP or ESTOP_RESET commands to EMC depending on it’s state.
-
The ON/OFF toggle sends STATE_ON and STATE_OFF commands.
-
Pause/Resume sends AUTO_PAUSE or AUTO_RESUME commands.
The following toggle actions have only one associated command and use the pressed state to indicate that the requested operation is running:
-
The Run toggle sends an AUTO_RUN command and waits in the pressed state until the interpreter is idle again.
-
The Stop toggle is inactive until the interpreter enters the active state (is running G-code) and then allows user to send AUTO_ABORT command.
-
The MDI toggle sends given MDI command and waits for its completion in pressed inactive state.
The Action_MDI Toggle and Action_MDI widgets
These widgets provide a means to execute arbitrary MDI commands.
A simple example: Execute MDI command on button press
Here’s a glade UI file which conveys the basics:
Open it in glade and study how it’s done. Start Axis, and then start this from a terminal window with gladevcp whoareyou.ui . See the hal_action_mdi1 Action and it’s MDI command property - this just executes (MSG, "Hi, I’m an EMC_Action_MDI") so there should be a message popup in Axis like so:
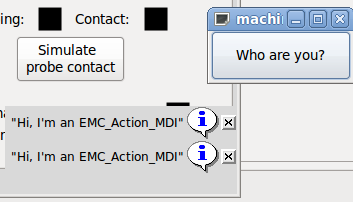
You’ll notice that the button associated with the Action_MDI action is grayed out if the machine is off, in E-Stop or the program is running. It will automatically become active when the machine is turned on and out of E-Stop, and the program is idle.
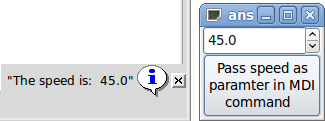
Parameter processing in the Action_MDI and ToggleAction_MDI widgets
Optionally, MDI command strings may have parameters substituted before they are passed to the interpreter. Parameters currently may be names of HAL pins in the gladevcp component (in a later release, this will be extended to cover HAL pins of other components as well). This is how it works:
-
assume you have a HAL SpinBox named speed, and you want to pass it’s current value as a parameter in an MDI command.
-
The HAL SpinBox? will have a float-type HAL pin named speed-f (see HalWidgets description).
-
To substitute this value in the MDI command, insert the HAL pin
-
for the above HAL SpinBox, we could use (MSG, "The speed is: ${speed-f}") just to show what’s happening.
Here’s the example UI file for gladevcp: , and here’s what you get:
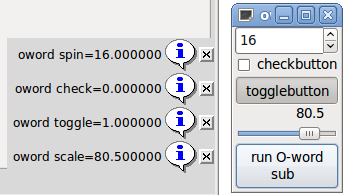
An advanced example: Feeding parameters to an O-word subroutine
It’s perfectly OK to call an O-word subroutine in an MDI command, and pass HAL pin values as actual parameters. Here’s an example UI file upload:owordsub.ui and O-word sub:
Place oword.ngc so Axis can find it, and run gladevcp owordsub.ui from a terminal window. This looks like so:
Preparing for an MDI Action, and cleaning up afterwards
The EMC G-Code interpreter has a single global set of variables, like feed, spindle speed, relative/absolute mode and others. If you use G code commands or O-word subs, some of these variables might get changed by the command or subroutine - for example, a probing subroutine will very likely set the feed value quite low. With no further precautions, your previous feed setting will be overwritten by the probing subroutine’s value.
To deal with this surprising and undesirable side effect of a given O-word subroutine or G-code statement executed with an EMC ToggleAction_MDI, you might associate pre-MDI and post-MDI handlers with a given EMC ToggleAction_MDI. These handlers are optional and provide a way to save any state before executing the MDI Action, and to restore it to previous values. The signal names are mdi-command-start and mdi-command-stop; the handler names can be set in glade like any other handler.
Here’s an example how a feed value might be saved and restored by such handlers (note that EMC command and status channels are available as self.emc and self.stat through the _EMC_ActionBase class:
def on_mdi_command_start(self, action, userdata=None):
    action.stat.poll()
    self.start_feed = action.stat.settings[1]

def on_mdi_command_stop(self, action, userdata=None):
    action.emc.mdi('F%.1f' % (self.start_feed))
    while action.emc.wait_complete() == -1:
        pass
Only the Action_MDI Toggle widget supports these signals.
Using the EMC Stat object to deal with status changes
Many actions depend on EMC status - is it in manual, MDI or auto mode? is a program running, paused or idle? You cannot start an MDI command while a G-code program is running, so this needs to be taken care of. Many EMC actions take care of this themselves, and related buttons and menu entries are deactivated when the operation is currently impossible.
When using Python event handlers - which are at a lower level than Actions - one needs to take care of dealing with status dependencies oneself. For this purpose, there’s the EMC Stat widget: to associate EMC status changes with event handlers.
EMC Stat has no visible component - you just add it to your UI with glade. Once added, you can associate handlers with its following signals:
-
state-related: "state-estop", "state-estop-reset", "state-on", "state-off" - emitted when E-Stop condtion occurs, is reset, machine is turned on, or is turned off
-
mode-related: "mode-manual", "mode-mdi", "mode-auto" - emitted when EMC enters that particular mode
-
interpreter-related: "interp-run", "interp-idle", "interp-paused", "interp-reading", "interp-waiting" - emitted when the G-code interpreter changes into that mode
User Defined Actions
As most of the infrastructure to support user-defined actions in glade and the GTK widget set is in place, the new gladevcp version really just provides a way for the user to write a Python module whose class methods - or in the simple case, just functions - can be referred to in glade as event handlers, a way to import this module(s) into gladevcp at runtime and properly link it with the rest of the HAL layer.
HAL value change events
We also extended the way the HAL input pins interact with the gladevcp panel. Beyond HAL widgets displaying pin values, there is now a way to attach a value-changed callback to a HAL pin, which fits nicely with the event-driven structure of a typical widget application: every activity, be it mouse click, key, timer expired, or the change of a HAL pin’s value, generates a callback and is handled by the same orthogonal mechanism.
Note that the above refers to explicitly declared HAL pins. HAL widgets come with a pre-defined signal hal-pin-changed, see the HalWidgets page for details.
See the Adding HAL pins section below for details.
Persistent values in GladeVCP
A annoying aspect of gladevcp in its earlier form and pyvcp is the fact that you may change values through text entry, sliders, spin boxes, toggle buttons etc, but their settings are not saved and restored at the next run of EMC - they start at the default value as set in the panel or widget definition. Therefore I added an easy-to-use mechanism to save and restore the state of HAL widgets, and program variables (in fact instance attributes) as well. This mechanism uses the popular .ini file syntax and has safeguards against the .ini file and the corresponding user interface or program variables getting out of sync - just imagine renaming, adding or deleting widgets in glade: an .ini file lying around from a previous program version, or an entirely different user interface, would be not be able to restore the state properly. This situation is detected through a signature which depends on all object names and types which are saved and to be restored. In the case of signature mismatch, a new .ini file with default settings is generated.
Programming model
The overall protocol is as follows:
-
design your UI with glade, and set signal handlers where you want actions associated with a widget
-
write a Python module which contains callable objects (see handler models below)
-
pass your module’s path name to gladevcp with the -u [module] option
-
gladevcp imports the module, inspects it for signal handlers and connects them to the widget tree
-
the main event loop is run.
The simple handler model
For simple tasks it’s sufficient to define functions named after the glade signal handlers. These will be called when the corresponding event happens in the widget tree. Here’s a trivial example - it assumes that the pressed signal of a GTK Button or HAL Button is linked to a callback called on_button_press:
nhits = 0

def on_button_press(gtkobj,data=None):
    global nhits
    nhits += 1
    gtkobj.set_label("hits: %d" % nhits)
Add this function to a Python file and run as follows:
gladevcp -u [myhandler].py mygui.ui
Note communication between handlers has to go through global variables, which does not scale well and is positively un-pythonic. This is why we came up with the class-based handler model.
The class-based handler model
The idea here is: handlers are linked to class methods. The underlying class(es) are instantiated and inspected during gladevcp startup and linked to the widget tree as signal handlers. So the task now is to write:
-
one or more several class definition(s) with one or several methods, in one module or split over several modules,
-
a function get_handlers in each module which will return a list of class instances to gladevcp - their method names will be linked to signal handlers
Here is a minimum user-defined handler example module:
class MyCallbacks :
    def on_this_signal(self,obj,data=None):
        print "this_signal happened, obj=",obj

def get_handlers(halcomp,builder,useropts):
    return [MyCallbacks ()]
Now, on_this_signal will be available as signal handler to your widget tree.
The get_handlers protocol
If during module inspection gladevcp finds a function get_handlers, it calls it as follows:
get_handlers(halcomp,builder,useropts)
the arguments are:
-
halcomp - refers to the HAL component under construction
-
builder - widget tree - result of reading the UI definition (either referring to a GtkBuilder or libglade-type object)
-
useropts - a list of strings collected from the gladevcp command line -U [useropts] option
gladevcp then inspects the list of class instances and retrieves their method names. Qualifying method names are connected to the widget tree as signal handlers. Only method names which do not begin with an _ (underscore) are considered.
Note that regardless whether you’re using the libglade or the new GtkBuilder format for your glade UI, widgets can always be referred to as builder.get_object([widgetname]). Also, the complete list of widgets is available as builder.get_objects() regardless of UI format.
Initialization sequence
It is important to know in which state of affairs your get_handlers() function is called so you know what is safe to do there and what not. First, modules are imported and initialized in command line order. After successful import, get_handlers() is called in the following state:
-
the widget tree is created, but not yet realized (no toplevel window.show() has been executed yet)
-
the halcomp HAL component is set up and all HAL widget’s pins have already been added to it
-
it is safe to add more HAL pins because halcomp.ready() has not yet been called at this point, so you may add your own pins, for instance in the class init() method.
Once all modules have been imported and method names extracted, the following steps happen:
-
all qualifying method names will be connected to the widget tree with connect_signals()/signal_autoconnect() (depending on the type of UI imported - GtkBuilder vs the old libglade format).
-
the HAL component is finalized with halcomp.ready()
-
if a window ID was passed as argument, the widget tree is re-parented to run in this window, and glade’s toplevel window1 is abandoned (see FAQ)
-
if a HAL command file was passed with -H halfile, it is executed with halcmd
-
the gtk main loop is run.
So when your handler class is initialized, all widgets are existent but not yet realized (displayed on screen). And the HAL component isn’t ready as well, so its unsafe to access pins values in your __init__() method.
If you want to have a callback to execute at program start after it is safe to access HAL pins, then a connect a handler to the realize signal of the top level window1 (which might be its only real purpose). At this point gladevcp is done with all setup tasks, the halfile has been run, and gladevcp is about to enter the gtk main loop.
Multiple callbacks with the same name
Within a class, method names must be unique. However, it is OK to have multiple class instances passed to gladevcp by get_handlers() with identically named methods. When the corresponding signal occurs, these methods will be called in definition order - module by module, and within a module, in the order class instances are returned by get_handlers().
The gladevcp -U [useropts] flag
Instead of extending gladevcp for any conceivable option which could potentially be useful for a handler class, you may use the -U [useroption] flag (repeatedly if you wish). This flag collects a list of [useroption] strings. This list is passed to the get_handlers() function (useropts argument). Your code is free to interpret these strings as you see fit. An possible usage would be to pass them to the Python exec function in your get_handlers() as follows:
debug = 0

...

def get_handlers(halcomp,builder,useropts):
    global debug # assuming there's a global var
    for cmd in useropts:
        exec cmd in globals()
This way you can pass arbitrary Python statements to your module through the gladevcp -U option, for example:
gladevcp -U debug=42 -U "print 'debug=%d' % debug" ...
This should set debug to 2 and confirm that your module actually did it.
Persistence
If you want any of: GTK widget state, HAL widgets output pin’s values and/or class attributes of your handler class to be retained across invocations, proceed as follows:
-
import the gladevcp.persistence module
-
decide which instance attributes, and their default values you want to have retained, if any
-
decide which widgets should have their state retained
-
describe these decisions in your handler class' init() method through a nested dictionary as follows:
def __init__(self, halcomp,builder,useropts):
    self.halcomp = halcomp
    self.builder = builder
    self.useropts = useropts
    self.defaults = {
        # the following names will be saved/restored as method attributes
        # the save/restore mechanism is strongly typed - the
        # variables type will be derived from the type of the
        # initialization value. Currently supported types are: int,
        # float, bool, string

        IniFile.vars : { 'nhits' : 0, 'a': 1.67, 'd': True ,'c' : "a string"},

        # to save/restore all widget's state which might remotely make sense, add this:

        IniFile.widgets : widget_defaults(builder.get_objects())

        # a sensible alternative might be to retain only all HAL output widgets' state:
        # IniFile.widgets: widget_defaults(select_widgets(self.builder.get_objects(),
        #     hal_only=True,output_only = True)),

    }
and associate an .ini file with this descriptor:
self.ini_filename = __name__ + '.ini'
self.ini = IniFile(self.ini_filename,self.defaults,self.builder)
self.ini.restore_state(self)
after restore_state(), self will have attributes set if as running the following:
self.nhits = 0
self.a = 1.67
self.d = True
self.c = "a string"
Note that types are saved and preserved on restore. This example assumes that the ini file didn’t exist or had the default values from self.defaults.
After this incantation, you can use the following IniFil methods:
-
ini.save_state(obj) - saves objs’s attributes as per IniFil.vars dictionary and the widget state as described in IniFile.widgets in self.defaults
-
ini.create_default_ini() - create a .ini file with default values
-
ini.restore_state(obj) - restore HAL out pins and obj’s attributes as saved/initialized to default as above
To save the widget and/or variable state on exit, connect a signal handler to the window1 (toplevel) destroy event:
def on_destroy(self,obj,data=None):
    self.ini.save_state(self)
Next time you start the gladevcp application, the widgets should come up in the state when the application was closed.
Hand-editing .ini files
You can do that, but note that the values in self.defaults override your edits if there is a syntax or type error in your edit. The error is detected, a console message will hint about that happened, and the bad inifile will be renamed to have the .BAD suffix. Subsequent bad ini files overwrite earlier .BAD files.
Adding HAL pins
If you need HAL pins which are not associated with a specific HAL widget, add them as follows:
import hal_glib

...

# in your handler class __init__():

self.example_trigger = \
    hal_glib.GPin(halcomp.newpin('example-trigger', hal.HAL_BIT, hal.HAL_IN))
To get a callback when this pin’s value changes, associate a value-change callback with this pin, add:
self.example_trigger.connect('value-changed',
self._on_example_trigger_change)
and define a callback method (or function, in this case leave out the self parameter):
# note '_' - this method will not be visible to the widget tree

def _on_example_trigger_change(self,pin,userdata=None):

print "pin value changed to:" % (pin.get())
Adding timers
Since gladevcp uses GTK widgets which rely on the GObject base class, the full glib functionally is available. Here is an example for a timer callback:
def _on_timer_tick(self,userdata=None):
    ...
    return True # to restart the timer; return False for on-shot

# demonstrate a slow background timer - granularity is one second
# for a faster timer (granularity 1msec), use this:
# glib.timeout_add(100, self._on_timer_tick,userdata) # 10Hz

glib.timeout_add_seconds(1, self._on_timer_tick)
Implementation note: Key handling in Axis
We believe key handling works OK, but since it is new code, we’re telling about it you so you can watch out for problems; please let us know of errors or odd behavior. This is the story:
Axis uses the TkInter widget set. GladeVCP applications use Gtk widgets and run in a separate process context. They are hooked into Axis with the Xembed protocol. This allows a child application like gladevcp to properly fit in a parent’s window, and - in theory - have integrated event handling.
However, this assumes that both parent and child application properly support the Xembed protocol, which Gtk does, but TkInter doesn’t. A consequence of this is that certain keys would not be forwarded from a gladevcp panel to Axis properly under all circumstances. One of these situations was the case when an Entry, or SpinButton widget had focus: in this case, for instance an Escape key would not have been forwarded to Axis and cause an abort as it should, with potentially disastrous consequences.
Therefore, key events in gladevcp are explicitly handled, and selectively forwarded to Axis, to assure that such situations cannot arise. For details, see the keyboard_forward() function in lib/python/gladevcp/xembed.py.
FAQ
-
I get an unexpected unmap event in my handler function right after startup. What’s this?: This is a consequence of your glade UI file having the window1 Visible property set to True, together with re-parenting the gladevcp window into Axis or touchy. The gladevcp widget tree is created, including a top level window, and then reparented into Axis, leaving that toplevel window laying around orphaned. To avoid having this useless empty window hanging around, it is unmapped (made invisible), which is the cause of the unmap signal you get. Suggested fix: set window1.visible to False, and ignore an initial unmap event.
-
My gladevcp program starts, but no window appears where I expect it to be?: The window Axis allocates for gladevcp will obtain the natural size of all its child widgets combined. It’s the child widget’s job to request a size (width and/or height). However, not all widgets do request a width greater than 0, for instance the Graph widget in its current form. If there’s such a widget in your glade file and it’s the one which defines the layout you might want to set its width explicitly. Note that setting the window1 width and height properties in glade does not make sense because this window will be orphaned during re-parenting and hence its geometry will have no impact on layout (see above). The general rule is: if you manually run a UI file with gladevcp [uifile] and its window has reasonable geometry, it should come up in Axis properly as well.
Examples, and rolling your own gladevcp application
Visit emc2/configs/gladevcp for running examples. The templates subdirectory has starters for your own projects.