User Manual V2.5
This manual is a work in progress. If you are able to help with writing, editing, or graphic preparation please contact any member of the writing team or join and send an email to emc-users@lists.sourceforge.net.
Copyright (c) 2000-9 LinuxCNC.org
Permission is granted to copy, distribute and/or modify this document under the terms of the GNU Free Documentation License, Version 1.1 or any later version published by the Free Software Foundation; with no Invariant Sections, no Front-Cover Texts, and one Back-Cover Text: This EMC Handbook is the product of several authors writing for linuxCNC.org. As you find it to be of value in your work, we invite you to contribute to its revision and growth.A copy of the license is included in the section entitled GNU Free Documentation License. If you do not find the license you may order a copy from Free Software Foundation, Inc. 59 Temple Place, Suite 330 Boston, MA 02111-1307
Foreword
EMC2 is modular and flexible. These attributes lead many to see it as a confusing jumble of little things and wonder why it is the way it is. This page attempts to answer that question before you get into the thick of things.
EMC started at the National Institute of Standards and Technology in the USA. It grew up using Unix as it’s operating system. Unix made it different. Among early Unix developers there grew a set of code writing ideas that some call the Unix way. These early EMC authors followed those ways.
 Eric S. Raymond, in his book The Art of Unix Programming, summarizes
the Unix philosophy as the widely-used engineering philosophy, "Keep it
Simple, Stupid" (KISS Principle). He then describes how he believes
this overall philosophy is applied as a cultural Unix norm, although
unsurprisingly it is not difficult to find severe violations of most of
the following in actual Unix practice:
-
Rule of Modularity: Write simple parts connected by clean interfaces.
-
Rule of Clarity: Clarity is better than cleverness.
-
Rule of Composition: Design programs to be connected to other programs.
-
Rule of Separation: Separate policy from mechanism; separate interfaces from engines.
[Found at http://en.wikipedia.org/wiki/Unix_philosophy, 07/06/2008 ]
Mr Raymond offered several more rules but these four describe essential characteristics of the EMC2 motion control system.
The Modularity rule is critical. Throughout these handbooks you will find talk of the interpreter or task planner or motion or HAL. Each of these is a module or collection of modules. It’s modularity that allows you to connect together just the parts you need to run your machine.
The Clarity rule is essential. EMC2 is a work in progress — it is not finished nor will it ever be. It is complete enough to run most of the machines we want it to run. Much of that progress is achieved because many users and code developers are able to look at the work of others and build on what they have done.
The Composition rule allows us to build a predictable control system from the many modules available by making them connectable. We achieve connectability by setting up standard interfaces to sets of modules and following those standards.
The Separation rule requires that we make distinct parts that do little things. By separating functions debugging is much easier and replacement modules can be dropped into the system and comparisons easily made.
What does the Unix way mean for you as a user of EMC2. It means that you are able to make choices about how you will use the system. Many of these choices are a part of machine integration, but many also affect the way you will use your machine. As you read you will find many places where you will need to make comparisons. Eventually you will make choices, "I’ll use this interface rather than that” or, “I’ll write part offsets this way rather than that way." Throughout these handbooks we describe the range of abilities currently available.
As you begin your journey into using EMC2 we offer two cautionary
notes:
[Found at http://en.wikipedia.org/wiki/Unix_philosophy,
07/06/2008
]
-
Praphrasing the words of Doug Gwyn on UNIX: "emc2 was not designed to stop its users from doing stupid things, as that would also stop them from doing clever things."
-
Likewise the words of Steven King: "emc2 is user-friendly. It just isn’t promiscuous about which users it’s friendly with."
EMC2
The Enhanced Machine Control
This Manual
The focus of this manual is on using EMC. It is intended to be used once EMC is installed and configured. For standard installations see the Getting Started Guide for step by step instructions to get you up and going. For detailed information on installation and configuration of EMC see the Integrator Manual.
How EMC2 Works
The Enhanced Machine Controller (EMC2) is a lot more than just another CNC mill program. It can control machine tools, robots, or other automated devices. It can control servo motors, stepper motors, relays, and other devices related to machine tools.
There are four main components to the EMC2 software: a motion controller, a discrete I/O controller, a task executor which coordinates them, and graphical user interfaces. In addition there is a layer called HAL (Hardware Abstraction Layer) which allows configuration of EMC2 without the need of recompiling.
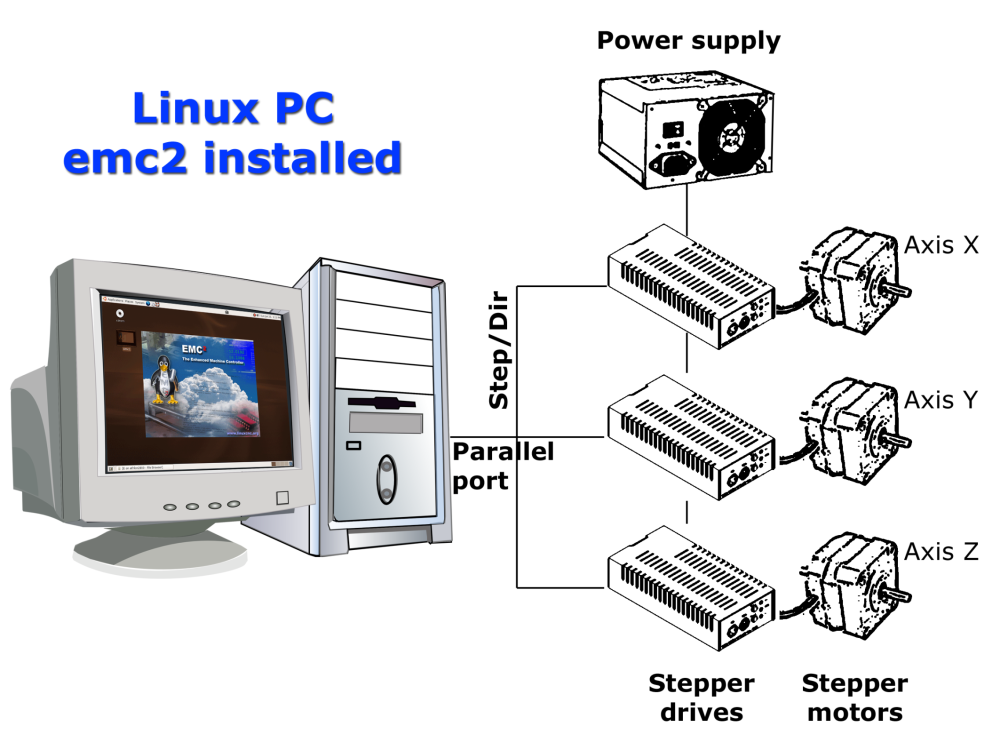
Figure [fig:Typical_machine] shows a simple block diagram showing what a typical 3-axis EMC2 system might look like. This diagram shows a stepper motor system. The PC, running Linux as its operating system, is actually controlling the stepper motor drives by sending signals through the printer port. These signals (pulses) make the stepper drives move the stepper motors. The EMC2 can also run servo motors via servo interface cards or by using an extended parallel port to connect with external control boards. As we examine each of the components that make up an EMC2 system we will remind the reader of this typical machine.
User Interfaces
A user interface is the part of the EMC2 that the machine tool operator interacts with. The EMC2 comes with several types of user interfaces:
-
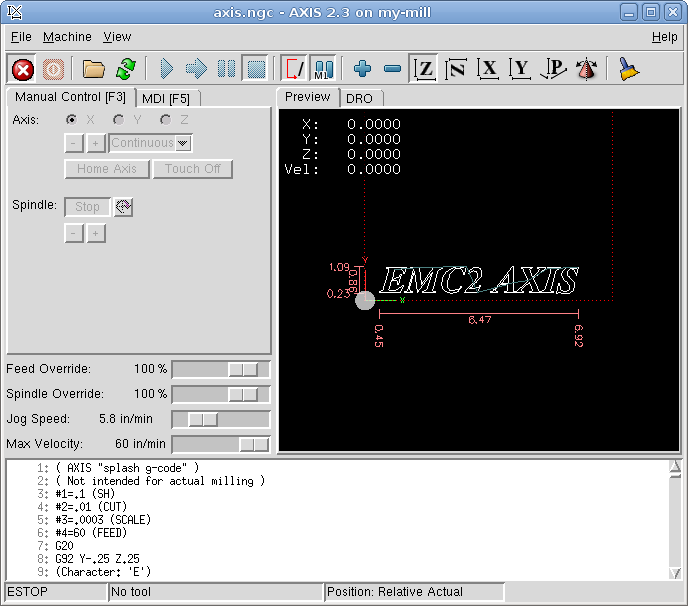
AXIS an OpenGL-based GUI (Graphical User Interface), with an interactive G-Code previewer. This interface is one of the few that are still under active development and improvement.
-
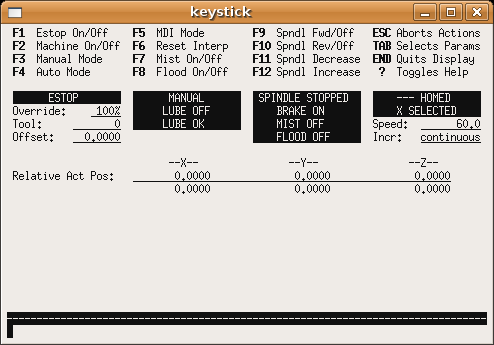
Keystick a character-based screen graphics program suitable for minimal installations (without the X server running).
-
Xemc an X Windows program
-
two Tcl/Tk-based GUIs named TkEMC and Mini
-
a HAL based user interface called halui, which allows to control emc2 using knobs and switches
-
a telnet based user interface called emcrsh, which allows commands to be sent to emc2 from remote computers
Languages
EMC2 uses translation files to translate EMC User Interfaces into many languages. You just need to log in with the language you intend to use and when you start up EMC it comes up in that language. If your language has not been translated contact a developer on the IRC or the mailing list if you can assist in the translation.
Thinking Like a Machine Operator
This book will not even pretend that it can teach you to run a mill or a lathe. Becoming a machinist takes time and hard work. An author once said, "We learn from experience, if at all." Broken tools, gouged vices, and scars are the evidence of lessons taught. Good part finish, close tolerances, and careful work are the evidence of lessons learned. No machine, no computer program, can take the place of human experience.
As you begin to work with the EMC2 program, you will need to place yourself in the position of operator. You need to think of yourself in the role of the one in charge of a machine. It is a machine that is either waiting for your command or executing the command that you have just given it. Throughout these pages we will give information that will help you become a good operator of the EMC2 mill. You will need some information right up front here so that the following pages will make sense to you.
Modes of Operation
When an EMC2 is running, there are three different major modes used for inputting commands. These are Manual, Auto, and MDI. Changing from one mode to another makes a big difference in the way that the EMC2 behaves. There are specific things that can be done in one mode that can not be done in another. An operator can home an axis in manual mode but not in auto or MDI modes. An operator can cause the machine to execute a whole file full of G-codes in the auto mode but not in manual or MDI.
In manual mode, each command is entered separately. In human terms a manual command might be "turn on coolant" or "jog X at 25 inches per minute". These are roughly equivalent to flipping a switch or turning the hand wheel for an axis. These commands are normally handled on one of the graphical interfaces by pressing a button with the mouse or holding down a key on the keyboard. In auto mode, a similar button or key press might be used to load or start the running of a whole program of G-code that is stored in a file. In the MDI mode the operator might type in a block of code and tell the machine to execute it by pressing the <return> or <enter> key on the keyboard.
Some motion control commands are available and will cause the same changes in motion in all modes. These include abort, estop, and feed rate override. Commands like these should be self explanatory.
The AXIS user interface hides some of the distinctions between Auto and the other modes by making Auto-commands available at most times. It also blurs the distinction between Manual and MDI because some Manual commands like Touch Off are actually implemented by sending MDI commands. It does this by automatically changing to the mode that is needed for the action the user has requested.
User Concepts
This chapter covers important user concepts that should be understood before attempting to run a CNC machine with g code.
Trajectory Control
Trajectory Planning
Trajectory planning, in general, is the means by which EMC follows the path specified by your G Code program, while still operating within the limits of your machinery.
A G Code program can never be fully obeyed. For example imagine you specify as a single-line program the following move:
G1 X1 F10 (G1 is linear move, X1 is the destination, F10 is the speed)
In reality, the whole move can’t be made at F10, since the machine must accelerate from a stop, move toward X=1, and then decelerate to stop again. Sometimes part of the move is done at F10, but for many moves, especially short ones, the specified feed rate is never reached at all. Having short moves in your G Code can cause your machine to slow down and speed up for the longer moves if the "naive cam detector" is not employed with G64 Pn.
The basic acceleration and deceleration described above is not complex and there is no compromise to be made. In the INI file the specified machine constraints such as maximum axis velocity and axis acceleration must be obeyed by the trajectory planner.
Path Following
A less straightforward problem is that of path following. When you program a corner in G Code, the trajectory planner can do several things, all of which are right in some cases: it can decelerate to a stop exactly at the coordinates of the corner, and then accelerate in the new direction. It can also do what is called blending, which is to keep the feed rate up while going through the corner, making it necessary to round the corner off in order to obey machine constraints. You can see that there is a trade off here: you can slow down to get better path following, or keep the speed up and have worse path following. Depending on the particular cut, the material, the tooling, etc., the programmer may want to compromise differently.
Rapid moves also obey the current trajectory control. With moves long enough to reach maximum velocity on a machine with low acceleration and no path tolerance specified, you can get a fairly round corner.
Programming the Planner
The trajectory control commands are as follows:
- G61
-
(Exact Path Mode) visits the programmed point exactly, even though that means it might temporarily come to a complete stop in order to change direction to the next programmed point.
- G61.1
-
(Exact Stop Mode) tells the planner to come to an exact stop at every segment’s end.
- G64
-
(Blend Without Tolerance Mode) G64 is the default setting when you start EMC. G64 is just blending and the naive cam detector is not enabled. G64 and G64P0 tell the planner to sacrifice path following accuracy in order to keep the feed rate up. This is necessary for some types of material or tooling where exact stops are harmful, and can work great as long as the programmer is careful to keep in mind that the tool’s path will be somewhat more curvy than the program specifies. When using G0 (rapid) moves with G64 use caution on clearance moves and allow enough distance to clear obstacles based on the acceleration capabilities of your machine.
- G64 P- Q-
-
(Blend With Tolerance Mode) This enables the "naive cam detector" and enables blending with a tolerance. If you program G64 P0.05, you tell the planner that you want continuous feed, but at programmed corners you want it to slow down enough so that the tool path can stay within 0.05 user units of the programmed path. The exact amount of slowdown depends on the geometry of the programmed corner and the machine constraints, but the only thing the programmer needs to worry about is the tolerance. This gives the programmer complete control over the path following compromise. The blend tolerance can be changed throughout the program as necessary. Beware that a specification of G64 P0 has the same effect as G64 alone (above), which is necessary for backward compatibility for old G Code programs. See the G Code Chapter for more information on G64 P- Q-.
- Blending without tolerance
-
The controlled point will touch each specified movement at at least one point. The machine will never move at such a speed that it cannot come to an exact stop at the end of the current movement (or next movement, if you pause when blending has already started). The distance from the end point of the move is as large as it needs to be to keep up the best contouring feed.
- Naive Cam Detector
-
Successive G1 moves that involve only the XYZ axes that deviate less than Q- from a straight line are merged into a single straight line. This merged movement replaces the individual G1 movements for the purposes of blending with tolerance. Between successive movements, the controlled point will pass no more than P- from the actual endpoints of the movements. The controlled point will touch at least one point on each movement. The machine will never move at such a speed that it cannot come to an exact stop at the end of the current movement (or next movement, if you pause when blending has already started) On G2/3 moves in the G17 (XY) plane when the maximum deviation of an arc from a straight line is less than the G64 Q- tolerance the arc is broken into two lines (from start of arc to midpoint, and from midpoint to end). those lines are then subject to the naive cam algorithm for lines. Thus, line-arc, arc-arc, and arc-line cases as well as line-line benefit from the "naive cam detector". This improves contouring performance by simplifying the path.
In the following figure the blue line represents the actual machine velocity. The red lines are the acceleration capability of the machine. The horizontal lines below each plot is the planned move. The upper plot shows how the trajectory planner will slow the machine down when short moves are encountered to stay within the limits of the machines acceleration setting to be able to come to an exact stop at the end of the next move. The bottom plot shows the effect of the Naive Cam Detector to combine the moves and do a better job of keeping the velocity as planned.

Planning Moves
Make sure moves are "long enough" to suit your machine/material. Principally because of the rule that "the machine will never move at such a speed that it cannot come to a complete stop at the end of the current movement", there is a minimum movement length that will allow the machine to keep up a requested feed rate with a given acceleration setting.
The acceleration and deceleration phase each use half the ini file MAX_ACCELERATION. In a blend that is an exact reversal, this causes the total axis acceleration to equal the ini file MAX_ACCELERATION. In other cases, the actual machine acceleration is somewhat less than the ini file acceleration
To keep up feed rate, the move must be longer than the distance it
takes to accelerate from 0 to the desired feed rate and then stop
again. Using A as 1/2 the ini file MAX_ACCELERATION and F as the feed
rate in units per second, the acceleration time is ta = F/A and the
acceleration distance is da=(1/2)*F*ta the deceleration
time and distance are the same, making the critical distance d = da
dd = 2*da = F^2 / A.
For example, for a feed rate of 1 inch per second and an acceleration of 10 inch/sec2, the critical distance is 12 / 10 = .1 inch. For a feed rate of .5 inch per second, the critical distance is .5^2 / 10 = .025 inch.
G Code
Defaults
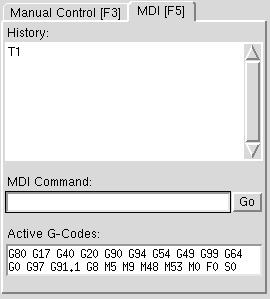
When EMC first starts up many G and M codes are loaded by default. The current active G and M codes can be viewed on the MDI tab in the "Active G-Codes:" window in the AXIS interface. These G and M codes define the behavior of EMC and it is important that you understand what each one does before running EMC. The defaults can be changed when running a G-Code file and left in a different state than when you started your EMC session. The best practice is to set the defaults needed for the job in the preamble of your G-Code file and not assume that the defaults have not changed. Printing out the G-Code Quick Reference ( [sec:Quick-Reference-Table]) page can help you remember what each one is.
Feed Rate
How the feed rate is applied depends on if an axis involved with the move is a rotary axis. Read and understand the Feed Rate section ( [sub:Feed-Rate]) if you have a rotary axis or a lathe.
Tool Radius Offset
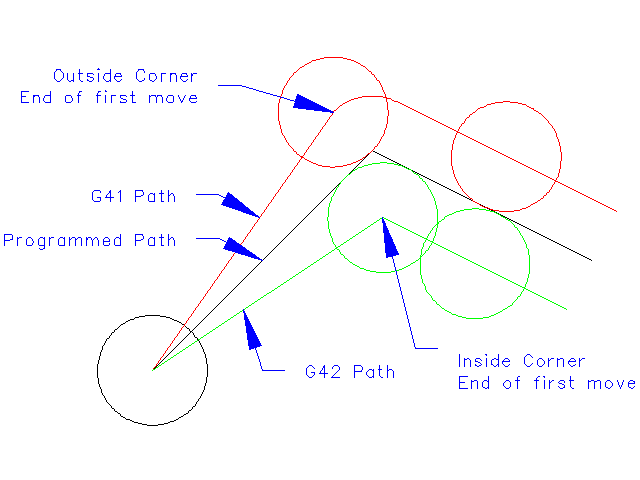
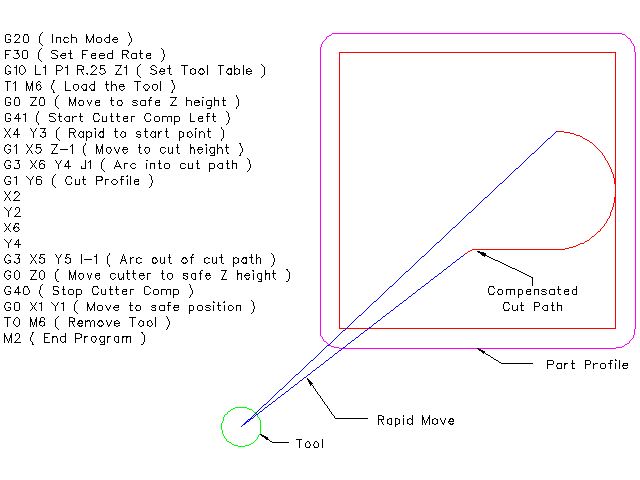
Tool Radius Offset (G41/42) requires that the tool be able to touch somewhere along each programmed move without gouging the two adjacent moves. If that is not possible with the current tool diameter you will get an error. A smaller diameter tool may run without an error on the same path. This means you can program a cutter to pass down a path that is narrower than the cutter without any errors. See the Tool Compensation Section ( [sec:Cutter-Radius-Compensation]) for more information.
Homing
After starting EMC2 each axis must be homed prior to running a program or running a MDI command.
If you want to deviate from the default behavior, or want to use the Mini interface you will need to set the option NO_FORCE_HOMING = 1 in the [TRAJ] section of your ini file. More information on homing can be found in the Integrators Manual.
Tool Changes
There are several options when doing manual tool changes. See the [EMCIO] section of the Integrators Manual for information on configuration of these options. Also see the G28 and G30 section of the User Manual.
Coordinate Systems
The Coordinate Systems can be confusing at first. Before running a CNC machine you must understand the basics of the coordinate systems used by EMC. In depth information on the EMC Coordinate Systems is in the coordinate section [cha:Coordinate-System] of this manual.
G53 Machine Coordinate
When you home EMC you set the G53 Machine Coordinate System to 0 for each axis homed.
-
No other coordinate systems or tool offsets are changed by homing.
The only time you move in the G53 machine coordinate system is when you program a G53 on the same line as a move. Normally you are in the G54 coordinate system.
G54-59.3 User Coordinates
Normally you use the G54 Coordinate System. When an offset is applied to a current user coordinate system a small blue ball with lines will be at the machine origin when your DRO is displaying "Position: Relative Actual" in Axis. If your offsets are temporary use the Zero Coordinate System from the Machine menu or program G10 L2 P1 X0 Y0 Z0 at the end of your G Code file. Change the "P" number to suit the coordinate system you wish to clear the offset in.
-
Offsets stored in a user coordinate system are retained when EMC is shut down.
-
Using the "Touch Off" button in Axis sets an offset for the chosen User Coordinate System.
When You’re Lost
If you’re having trouble getting 0,0,0 on the DRO when you think you should, you may have some offsets programmed in and need to remove them.
-
Move to the Machine origin with
G53 G0 X0 Y0 Z0 -
Clear any G92 offset with
G92.1 -
Use the G54 coordinate system with
G54 -
Set the G54 coordinate system to be the same as the machine coordinate system with
G10 L2 P1 X0 Y0 Z0 -
Turn off tool offsets with
G49 -
Turn on the Relative Coordinate Display from the menu
Now you should be at the machine origin X0 Y0 Z0 and the relative coordinate system should be the same as the machine coordinate system.
Interfaces
AXIS
Introduction
AXIS is a graphical front-end for EMC2 which features a live preview and backplot. It is written in Python and uses Tk and OpenGL to display its user interface.
Getting Started
To select AXIS as the front-end for EMC2, edit the .ini file. In the section [DISPLAY] change the DISPLAY line to read
DISPLAY = axis
Then, start EMC2 and select that ini file. The sample configuration sim/axis.ini is already configured to use AXIS as its front-end.
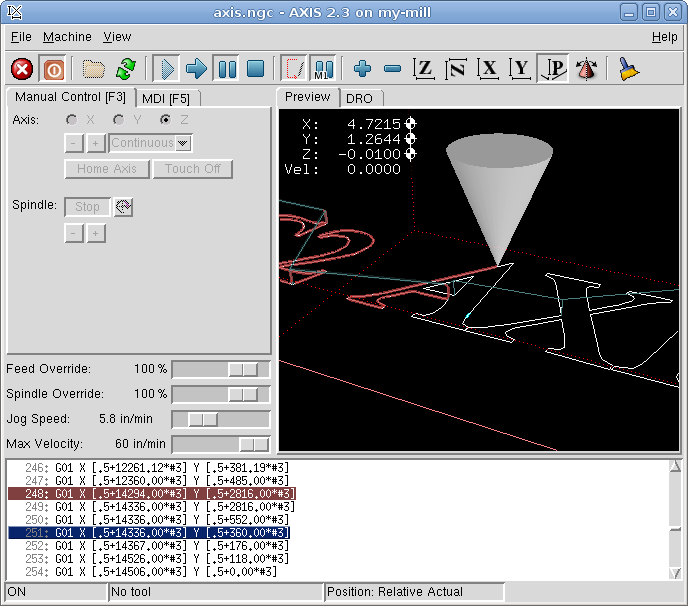
When you start AXIS, a window like the one in Figure [cap:AXIS-Window] is shown.
A Typical Session
-
Start EMC.
-
Clear the E-STOP (F1) and turn the Machine Power (F2) on.
-
Home all axes.
-
Load the g-code file.
-
Use the preview plot to verify that the program is correct.
-
Set the proper offsets for each axis by jogging and using the Touch Off button.
-
Run the program.
-
To run the same file again, return to step 6. To run a different file, return to step 4. When you’re done, exit AXIS.
AXIS Display
The AXIS window contains the following elements:
-
A display area that shows a preview of the loaded file (in this case, "axis.ngc"), as well as the current location of the CNC machine’s "controlled point". Later, this area will display the path the CNC machine has moved through, called the "backplot"
-
A menu bar and toolbar that allow you to perform various actions
-
"Manual Control Tab" , which allows you to make the machine move, turn the spindle on or off, and turn the coolant on or off if included in the ini file.
-
"MDI Tab” , where G-code programs can be entered manually, one line at a time. This also shows the "Active G Codes" which shows which modal G Codes are in effect.
-
"Feed Override" , which allows you to increase or decrease the speed at which EMC executes Feed Moves the selected program. The default maximum is 120% and can be set to a different value in the ini file. See the Integrators Manual for more information on this setting.
-
"Spindle Override" , which allows you to increase or decrease the speed at which EMC commands the spindle to run if spindle control is configured.
-
"Jog Speed" , which allows you to set the jog speed within the limits set in the ini file. See the Integrators Manual for more information on the ini file.
-
"Max Velocity", which allows you to set the maximum velocity for rapids and cap feed rates (except spindle synchronized motion) for dry runs. Currently only AXIS and Halui allow you to set it.
-
A text display area that shows the G-code source of the loaded file.
-
A status bar which shows the state of the machine. In this screen shot, the machine is turned on, does not have a tool inserted, and the displayed position is "Relative” to the machine offset (as opposed to “Absolute”), and the “Actual” (as opposed to “Commanded” position)
Menu Items
Some menu items might be grayed out depending on how you have your .ini file configured. For more information on configuration see the Integrators Manual.
File Menu
- Open…
-
Opens a standard dialog box to open a g code file to load in AXIS. If you have configured EMC to use a filter program you can also open it up. See the Integrators manual for more information on filter programs.
- Recent Files
-
Displays a list of recently opened files.
- Edit…
-
Open the current g code file for editing if you have an editor configured in your ini file. See the Integrators Manual for more information on specifying an editor to use.
- Reload
-
reload the current g code file. If you edited it you must reload it for the changes to take affect. If you stop a file and want to start from the beginning then reload the file. The toolbar reload is the same as the menu.
- Save gcode as…
-
Save the current file with a new name.
- Properties
-
Properties of the current loaded g code file.
- Edit tool table…
-
Same as Edit if you have defined an editor you can open the tool table and edit it.
- Reload tool table
-
After editing the tool table you must reload it.
- Ladder editor
-
If you have loaded Classic Ladder you can edit it from here. See the Integrators Manual on setting up Classic Ladder
- Quit
-
Terminates the current EMC session.
Machine
- Toggle Emergency Stop F1
- Toggle Machine Power F2
- Run Program
- Run From Selected Line
-
Select the line you want to start from first. Use with caution as this will move the tool to the expected position before the line first then it will execute the rest of the code.
- Step
-
Single step through a program.
- Pause
-
Pause a program.
- Resume
-
Resume running from a pause.
- Stop
-
Stop a running program.
- Stop at M1
-
If you have a M1 in your g code and this is checked program execution will stop on the M1 line. Press Resume to continue.
- Skip lines with "/"
-
If a line begins with / and this is checked it will skip that line.
- Clear MDI history
-
Clears the MDI history window.
- Copy from MDI history
-
Copies the MDI history to the clipboard
- Paste to MDI history
-
Paste from the clipboard to the MDI history window
- Calibration
-
This is a servo testing pop up widow for each axis. After making changes and testing them it can save them to your .ini file.
- Show HAL Configuration
-
Opens up the HAL Configuration widow where you can monitor HAL Components, Pins, Parameters, Signals, Functions, and Threads.
- HAL Meter
-
Opens up a window where you can monitor a single HAL Pin, Signal, or Parameter.
- HAL Scope
-
Opens up a Scope window where you can set up and monitor Pins and Signals.
- Show EMC Status
-
Opens up a window showing EMC’s status.
- Set Debug Level
-
Opens a window where debug levels can be viewed and some can be set.
- Homing
-
Home any or all axis.
- Unhoming
-
Unhome any or all axis.
- Zero Coordinate System
-
Zero work offsets.
View
- Top View
- Rotated Top View
- Side View
- Front View
- Perspective View
- Display Inches
- Display MM
- Show Program
- Show Live Plot
- Show Tool
- Show Extents
- Show Machine Limits
- Show Velocity
- Show Distance to Go
- Clear Live Plot
- Show Commanded Position
- Show Actual Position
- Show Machine Position
- Show Relative Position
-
==== Help
- About Axis
- Quick Reference
-
Shows the keyboard shortcut keys.
Toolbar buttons
From left to right, the toolbar buttons (keyboard shortcuts in []).
-
 Toggle Emergency Stop [F1] (also called
E-Stop
-
 Toggle Machine Power [F2]
-
 Open G Code file [O]
-
 Reload current file [Ctrl-R]
-
 Begin executing the current file [R]
-
 Execute next line [T]
-
 Pause Execution [P] Resume Execution[S]
-
 Stop Program Execution [ESC]
-
 Toggle Skip lines with "/" [Alt-M-/]
-
 Toggle Optional Pause [Alt-M-1]
-
 Zoom In
-
 Zoom Out
-
 Top view
-
 Rotated Top view
-
 Front view
-
 Side view
-
 Perspective view
-
 Toggle between Drag and Rotate Mode [D]
-
 Clear live backplot [Ctrl-K]
Graphical Display Area
Coordinate Display
In the upper-left corner of the program display is the coordinate
display. It shows the position of the machine. To the left of the axis
name, an origin symbol (
 ) is shown if the
axis has been properly homed. To the right of the axis name, a limit
symbol (
 ) is shown if the axis is on one
of its limit switches.
To properly interpret these numbers, refer to the "Position:"
indicator in the status bar. If the position is "Absolute", then the
displayed number is in the machine coordinate system. If it is
"Relative", then the displayed number is in the offset coordinate
system. When the coordinates displayed are relative and an offset has
been set, the display will include a cyan "machine origin" marker
(
 ). If the position is
"Commanded", then it is the ideal position—for instance, the exact
coordinate given in a G0 command. If it is "Actual", then it is the
position the machine has
actually been moved to. These values can differ for several reasons:
Following error, dead band, encoder resolution, or step size. For
instance, if you command a movement to X 0.0033 on your mill, but one
step of your stepper motor is 0.00125, then the "Commanded" position
will be 0.0033 but the "Actual" position will be 0.0025 (2 steps) or
0.00375 (3 steps).
Preview Plot
When a file is loaded, a preview of it is shown in the display area. Fast moves (such as those produced by the G0 command) are shown as green lines. Moves at a feed rate (such as those produced by the G1 command) are shown as solid white lines. Dwells (such as those produced by the G4 command) are shown as small "X" marks.
G0 (Rapid) moves prior to a feed move will not show up on the preview plot. Rapid moves after a T<n> (Tool Change) will not show on the AXIS preview until after a feed move. To turn either of these features off program a G1 without any moves prior to the G0 moves.
Program Extents
The "extents" of the program in each axis are shown. At each end, the least or greatest coordinate value is indicated. In the middle, the difference between the coordinates is shown. In Figure ( [cap:AXIS-Window]), the X extent of the file is from 0.00 to 6.92 inches, a total of 6.92 inches.
When some coordinates exceed the "soft limits" in the .ini file, the relevant dimension is shown in a different color and enclosed by a box. In Figure ( [cap:Soft-Limit]) the maximum soft limit is exceeded on the X axis as indicated by the box surrounding the coordinate value.
Tool Cone
The location of the tip of the tool is indicated by the "tool cone". The cone does not indicate anything about the shape, length, or radius of the tool.
When a tool is loaded (for instance, with the MDI command T1M6 ), the cone changes to a cylinder which shows the diameter of the tool given in the tool table file.
Backplot
When the machine moves, it leaves a trail called the backplot. The color of the line indicates the type of motion: Yellow for jogs, faint green for rapid movements, red for straight moves at a feed rate, and magenta for circular moves at a feed rate.
Interacting
By left-clicking on a portion of the preview plot, the line will be highlighted in both the graphical and text displays. By left-clicking on an empty area, the highlighting will be removed.
By dragging with the left mouse button pressed, the preview plot will be shifted (panned).
By dragging with shift and the left mouse button pressed, or by dragging with the mouse wheel pressed, the preview plot will be rotated. When a line is highlighted, the center of rotation is the center of the line. Otherwise, the center of rotation is the center of the file as a whole.
By rotating the mouse wheel, or by dragging with the right mouse button pressed, or by dragging with control and the left mouse button pressed, the preview plot will be zoomed in or out.
By clicking one of the "Preset View" icons, or by pressing "V", several preset views may be selected.
Text Display Area
By left-clicking a line of the program, the line will be highlighted in both the graphical and text displays in blue.
When the program is running, the line currently being executed is highlighted in red. If no line has been selected by the user, the text display will automatically scroll to show the current line.
Manual Control
While the machine is turned on but not running a program, the items in the "Manual Control" tab can be used to move the machining center or turn different parts of it on and off.
When the machine is not turned on, or when a program is running, the manual controls are unavailable.
Many of the items described below are not useful on all machines. When AXIS detects that a particular pin is not connected in HAL, the corresponding item in the Manual Control tab is removed. For instance, if the HAL pin motion.spindle-brake is not connected, then the "Brake" button will not appear on the screen. If the environment variable AXIS_NO_AUTOCONFIGURE is set, this behavior is disabled and all the items will appear.
The "Axis" group
"Axis" allows you to manually move the machine. This action is known as "jogging". First, select the axis to be moved by clicking it. Then, click and hold the "+" or "-" button depending on the desired direction of motion. The first four axes can also be moved by the arrow keys (X and Y), PAGE UP and PAGE DOWN keys (Z) and the [ and ] keys (A).
If "Continuous" is selected, the motion will continue as long as the button or key is pressed. If another value is selected, the machine will move exactly the displayed distance each time the button is clicked or the key is pressed. By default, the available values are:
0.1000, 0.0100, 0.0010, 0.0001
See the Configure section of the Integrators Manual for more information on setting the increments.
Homing
If your machine has home switches and a homing sequence defined for all axes the button will read "Home All". The "Home All" button or the Ctrl-HOME key will home all axes using the homing sequence. Pressing the HOME key will home the current axis, even if a homing sequence is defined.
If your machine has home switches and no homing sequence is defined or not all axes have a homing sequence the button will read "Home" and will home the selected axis only. Each axis must be selected and homed separately.
If your machine does not have home switches defined in the configuration the "Home" button will set the current selected axis current position to be the absolute position 0 for that axis and will set the "is-homed" bit for that axis.
See the Integrators Manual for more information on homing.
Touch Off
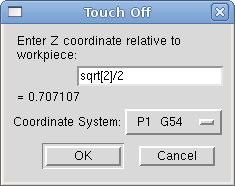
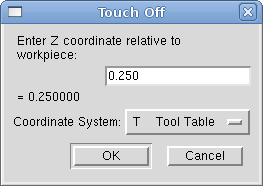
By pressing "Touch Off" or the END key, the "G54 offset" for the current axis is changed so that the current axis value will be the specified value. Expressions may be entered using the rules for rs274ngc programs, except that variables may not be referred to. The resulting value is shown as a number.
Override Limits
By pressing "Override Limits", the machine will temporarily be allowed to jog off of a physical limit switch. This check box is only available if a limit switch is tripped.
The "Spindle" group
The buttons on the first row select the direction for the spindle to rotate: Counterclockwise, Stopped, Clockwise. Counterclockwise will only show up if the pin motion.spindle-reverse is in the hal file (it can be net trick-axis motion.spindle-reverse ). The buttons on the next row increase or decrease the rotation speed. The checkbox on the third row allows the spindle brake to be engaged or released. Depending on your machine configuration, not all the items in this group may appear. Pressing the spindle start button sets the "S" speed to 1.
The "Coolant" group
The two buttons allow the "Mist" and "Flood" coolants to be turned on and off. Depending on your machine configuration, not all the items in this group may appear.
MDI
MDI, allows G-code programs can be entered manually, one line at a time. When the machine is not turned on, or when a program is running, the MDI controls are unavailable.
- History
-
This shows MDI commands that have been typed earlier in this session.
- MDI Command
-
This allows you to enter a g-code command to be executed. Execute the command by pressing Enter or by clicking "Go".
- Active G-Codes
-
This shows the "modal codes" that are active in the interpreter. For instance, "G54" indicates that the "G54 offset" is applied to all coordinates that are entered. When in Auto the Active G-Codes represent the codes after any read ahead by the interpreter.
Feed Override
By moving this slider, the programmed feed rate can be modified. For instance, if a program requests F60 and the slider is set to 120%, then the resulting feed rate will be 72.
Spindle Speed Override
By moving this slider, the programmed spindle feed rate can be modified. For instance, if a program requests F8000 and the slider is set to 80%, then the resulting spindle speed will be 6400. This item only appears when the HAL pin motion.spindle-speed-out is connected.
Jog Speed
By moving this slider, the speed of jogs can be modified. For instance, if the slider is set to 1 in/min, then a .01 inch jog will complete in about .6 seconds, or 1/100 of a minute. Near the left side (slow jogs) the values are spaced closely together, while near the right side (fast jogs) they are spaced much further apart, allowing a wide range of jog speeds with fine control when it is most important.
On machines with a rotary axis, a second jog speed slider is shown. This slider sets the jog rate for the rotary axes (A, B and C).
Max Velocity
By moving this slider, the maximum velocity can be set. This caps the maximum velocity of axis no matter what is programed in the g code file.
Keyboard Controls
Almost all actions in AXIS can be accomplished with the keyboard. A full list of keyboard shortcuts can be found in the AXIS Quick Reference, which can be displayed by choosing Help > Quick Reference. Many of the shortcuts are unavailable when in MDI mode.
Feed Override Keys
The Feed Override keys behave differently when in Manual Mode. The keys `12345678 will select an axis if it is programed. If you have 3 axis then ` will select axis 0, 1 will select axis 1 and 2 will select axis 2. The remainder of the number keys will still set the Feed Override. When running a program `1234567890 will set the Feed Override to 0% - 100%.
The most frequently used keyboard shortcuts are shown in Table [cap:Most-Common-Keyboard].
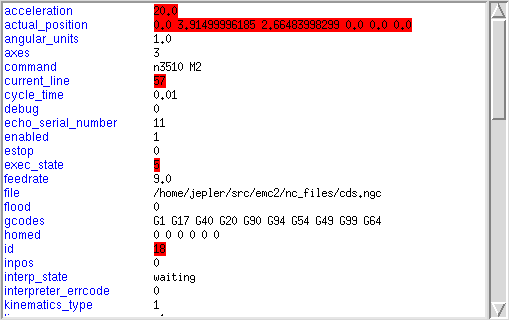
Show EMC Status
AXIS includes a program called "emctop" which shows some of the details of EMC’s state. You can run this program by invoking Machine > Show EMC Status
The name of each item is shown in the left column. The current value is shown in the right column. If the value has recently changed, it is shown on a red background.
MDI interface
AXIS includes a program called "MDI" which allows text-mode entry of MDI commands to a running EMC session. You can run this program by opening a terminal and typing
mdi /path/to/emc.nml
Once it is running, it displays the prompt MDI> . When a blank line is entered, the machine’s current position is shown. When a command is entered, it is sent to EMC to be executed.
This is a sample session of mdi.
$ mdi ~/emc2/configs/sim/emc.nml  +
MDI>  +
(0.0, 0.0, 0.0, 0.0, 0.0, 0.0) +
MDI> G1 F5 X1 +
MDI>  +
(0.5928500000000374, 0.0, 0.0, 0.0, 0.0, 0.0) +
MDI>  +
(1.0000000000000639, 0.0, 0.0, 0.0, 0.0, 0.0)
axis-remote
AXIS includes a program called "axis-remote" which can send certain commands to a running AXIS. The available commands are shown by running axis-remote ---help and include checking whether AXIS is running (---ping), loading a file by name, reloading the currently loaded file (---reload), and making AXIS exit (---quit).
Manual Tool Change
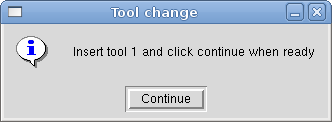
EMC2 includes a userspace hal component called "hal_manualtoolchange", which shows a window (Figure [cap:The-Manual-Toolchange]) when a M6 command is issued. After the OK button is pressed, execution of the program will continue.
The HAL configuration file configs/sim/axis_manualtoolchange.hal shows the HAL commands necessary to use this component.
hal_manualtoolchange can be used even when AXIS is not used as the GUI. This component is most useful if you have presettable tools and you use the tool table.
Important Note: Rapids will not show on the preview after a T<n> is issued until the next feed move after the M6. This can be very confusing to most users. To turn this feature off for the current tool change program a G1 with no move after the T<n>.
Python modules
AXIS includes several Python modules which may be useful to others. For more information on one of these modules, use "pydoc <module name>" or read the source code. These modules include:
-
emc provides access to the emc command, status, and error channels
-
gcode provides access to the rs274ngc interpreter
-
rs274 provides additional tools for working with rs274ngc files
-
hal allows the creation of userspace HAL components written in Python
-
_togl provides an OpenGL widget that can be used in Tkinter applications
-
minigl provides access to the subset of OpenGL used by AXIS
To use these modules in your own scripts, you must ensure that the directory where they reside is on Python’s module path. When running an installed version of EMC2, this should happen automatically. When running "in-place", this can be done by using scripts/emc-environment.
Lathe Mode
By including the line
LATHE=1
in the [DISPLAY] section of the ini file, AXIS selects lathe mode. The "Y" axis is not shown in coordinate readouts, the view is changed to show the Z axis extending to the right and the X axis extending towards the bottom of the screen, and several controls (such as those for preset views) are removed.
Pressing "V" zooms out to show the entire file, if one is loaded.
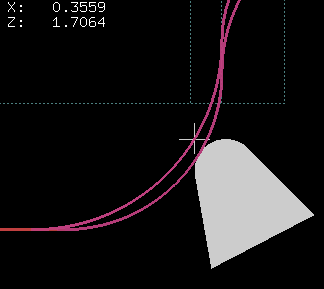
When in lathe mode, the shape of the loaded tool (if any) is shown.
Advanced Configuration
For more information on ini file settings that can change how AXIS works see the INI File/Sections/[DISPLAY] Section of Configuration chapter in the Integrators manual.
Program Filters
AXIS has the ability to send loaded files through a "filter program". This filter can do any desired task: Something as simple as making sure the file ends with 'M2 ', or something as complicated as detecting whether the input is a depth image, and generating g-code to mill the shape it defines.
The [FILTER] section of the ini file controls how filters work. First, for each type of file, write a PROGRAM_EXTENSION line. Then, specify the program to execute for each type of file. This program is given the name of the input file as its first argument, and must write rs274ngc code to standard output. This output is what will be displayed in the text area, previewed in the display area, and executed by EMC when "Run". The following lines add support for the "image-to-gcode" converter included with EMC2:
[FILTER] +
PROGRAM_EXTENSION = .png,.gif Greyscale Depth Image +
png = image-to-gcode +
gif = image-to-gcode
It is also possible to specify an interpreter:
PROGRAM_EXTENSION = .py Python Script +
py = python
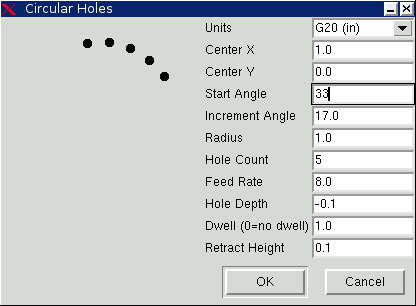
In this way, any Python script can be opened, and its output is treated as g-code. One such example script is available at nc_files/holecircle.py . This script creates g-code for drilling a series of holes along the circumference of a circle.
If the environment variable AXIS_PROGRESS_BAR is set, then lines written to stderr of the form
FILTER_PROGRESS=%d
will set the AXIS progress bar to the given percentage. This feature should be used by any filter that runs for a long time.
The X Resource Database
The colors of most elements of the AXIS user interface can be customized through the X Resource Database. The sample file axis_light_background changes the colors of the backplot window to a "dark lines on white background" scheme, and also serves as a reference for the configurable items in the display area. The sample file axis_big_dro changes the position readout to a larger size font. To use these files:
xrdb -merge /usr/share/doc/emc2/axis_light_background
xrdb -merge /usr/share/doc/emc2/axis_big_dro
For information about the other items which can be configured in Tk applications, see the Tk man pages.
Because modern desktop environments automatically make some settings in the X Resource Database that adversely affect AXIS, by default these settings are ignored. To make the X Resource Database items override AXIS defaults, include the following line in your X Resources:
*Axis*optionLevel: widgetDefault
this causes the built-in options to be created at the option level "widgetDefault", so that X Resources (which are level "userDefault") can override them.
Physical jog wheels
To improve the interaction of AXIS with physical jog wheels, the axis currently selected in the GUI is also reported on a pin with a name like axisui.jog.x . Except for a short time when the active axis has just been changed, exactly one of these pins is TRUE at one time, and the rest are FALSE.
After AXIS has created these HAL pins, it executes the halfile named in [HAL]POSTGUI_HALFILE. Unlike [HAL]HALFILE, only one such file may be used.
axisrc
If it exists, the contents of ~/.axisrc are executed as Python source code just before the AXIS gui is displayed. The details of what may be written in the axisrc are subject to change during the development cycle.
The following adds Control-Q as a keyboard shortcut for Quit and turns on "Distance to go" by default.
root_window.bind("<Control-q>", "destroy .") +
help2.append(("Control-Q", "Quit")) +
vars.show_distance_to_go.set(1)
External Editor
The menu options File > Edit… and File > Edit Tool Table… become available after defining the editor in the ini section [DISPLAY]. Useful values include EDITOR=gedit and EDITOR=gnome-terminal -e vim. For more information, see the DISPLAY section of the INI Configuration Chapter in the Integrators Manual.
Virtual Control Panel
AXIS can display a custom virtual control panel in the right-hand pane. You can program buttons, indicators, data displays and more. For more information, see the Integrators Manual.
Special Comments
Special comments can be inserted into the G Code file to control how the preview of AXIS behaves. In the case where you want to limit the drawing of the preview use these special comments. Anything between the (AXIS,hide) and (AXIS,show) will not be drawn during the preview. The (AXIS,hide) and (AXIS,show) must be used in pairs with the (AXIS,hide) being first. Anything after a (AXIS,stop) will not be drawn during the preview.
These comments are useful to unclutter the preview display (for instance while debugging a larger g-code file, one can disable the preview on certain parts that are already working OK).
-
(AXIS,hide) Stops the preview (must be first)
-
(AXIS,show) Resumes the preview (must follow a hide)
-
(AXIS, stop) Stops the preview from here to the end of the file.
Touchy
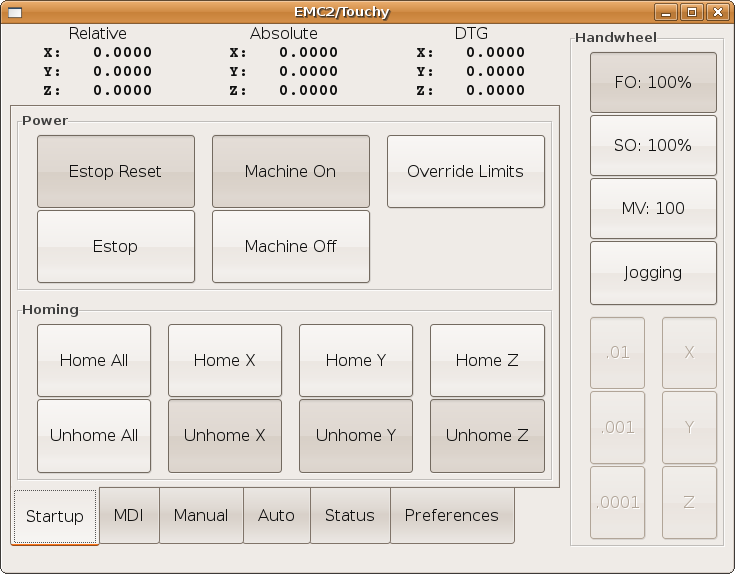
Touchy is a GUI for touch screens. It needs no mouse or keyboard.
Hard Controls
Required Controls
-
Abort button (momentary contact) connected to the hal pin touchy.abort
-
Cycle start button (momentary contact) connected to touchy.cycle-start
-
Wheel/mpg, connected to touchy.wheel-counts
-
Single block (toggle switch) connected to touchy.single-block
Recommended for any setup
-
Estop button hardwired in the estop chain
Optional Controls
-
Continuous Jog needs three center-off bidirectional momentary toggles (or worse, six buttons), hooked to touchy.jog.continuous.x.negative, ….x.positive, … y …, … z …
-
If a quill up button is wanted (to jog Z to the top of travel at top speed), a momentary button connected to touchy.quill-up
-
Optional indicator output: touchy.jog.active can be connected to a panel lamp to show when the panel jogging controls are live
-
Touchy has several output pins that are meant to be connected to the motion controller to control wheel jogging. They are:
-
touchy.jog.wheel.increment ⇒ axis.N.jog-scale (for all relevant N) touchy.jog.wheel.x ⇒ axis.0.jog-enable … y … ⇒ … 1 …, … z …
-
Also be sure to connect the wheel/mpg to axis.N.jog-counts as well as to touchy.wheel-counts. If you use ilowpass to smooth wheel jogging, be sure to smooth only axis.N.jog-counts and not touchy.wheel-counts.
Configuration
Touchy requires you to create a file named "touchy.hal" in the same folder as your ini file to make these connections. Touchy executes the hal commands in this file after it has made its pins available for connection.
To use Touchy in the [DISPLAY] section of your ini file change the DISPLAY = touchy
Font Configuration is done on the Preferences Tab. Changes will be saved to the current computer in a hidden file.
TkEMC
Introduction
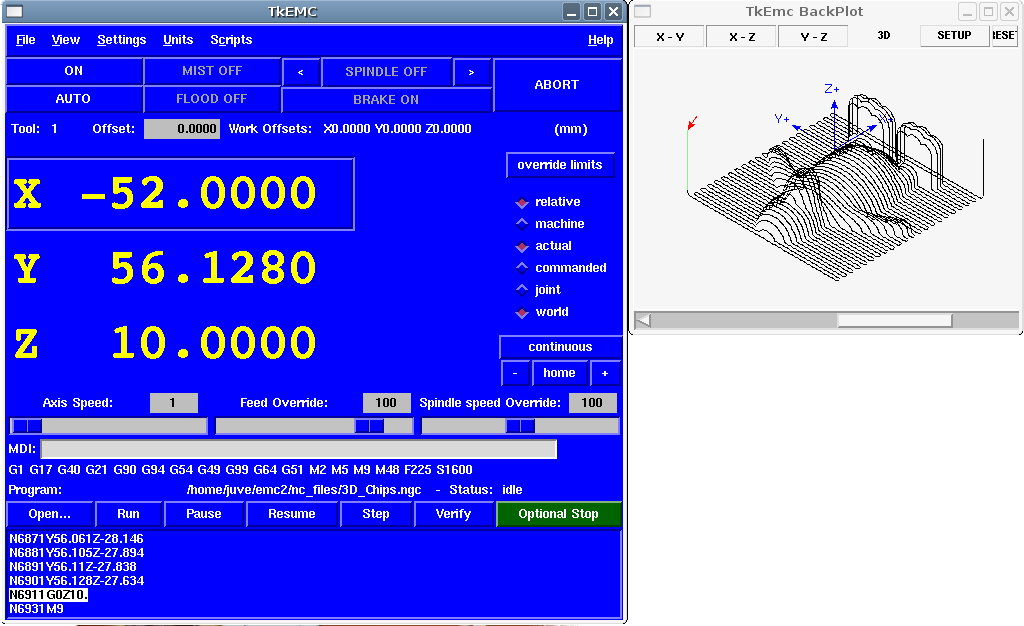
TkEMC is one of the most traditional graphical front-ends for EMC. It is written in Tcl and uses the Tk toolkit for the display. Being written in TCL makes it very portable (runs on a multitude of platforms). A separate backplot window can be displayed as shown in Figure( [cap:TkEMC-Window]).
Getting Started
To select TkEMC as the front-end for EMC2, edit the .ini file. In the section [DISPLAY] change the DISPLAY line to read
DISPLAY = tkemc
Then, start EMC2 and select that ini file. The sample configuration sim/tkemc.ini is already configured to use TkEMC as its front-end.
When you start EMC2 with TkEMC, a window like the one in Figure [cap:TkEMC-Window] is shown.
A typical session with TkEMC
-
Start EMC2 and select a configuration file.
-
Clear the “E-STOP” condition and turn the machine on (by pressing F1 then F2).
-
“Home” each axis.
-
Load the file to be milled.
-
Put the stock to be milled on the table.
-
Set the proper offsets for each axis by jogging and either homing again or right-clicking an axis name and entering an offset value.
[for some of these actions it might be needed to change the mode emc2 currently is in. ]
-
Run the program.
-
To mill the same file again, return to step 6. To mill a different file, return to step 4. When you’re done, exit EMC2.
Elements of the TkEMC window
The TkEMC window contains the following elements:
-
A menubar that allows you to perform various actions ;
-
A set of buttons that allow you to change the current working mode, start/stop spindle and other relevant I/O ;
-
Status bar for various offset related displays ;
-
Coordinate display area ;
-
A set of sliders which control “Jogging speed”, “Feed Override”, and “Spindle speed Override” which allow you to increase or decrease those settings ;
-
Manual data input text box ;
-
Status bar display with active G-codes, M-codes, F- and S-words ;
-
Interpreter related buttons ;
-
A text display area that shows the G-code source of the loaded file.
Main buttons
From left to right, the buttons are:
-
Machine enable: “ESTOP” / “ESTOP RESET” / “ON”
-
Toggle mist
-
Decrease spindle speed
-
Set spindle direction “SPINDLE OFF” / “SPINDLE FORWARD” / “SPINDLE REVERSE”
-
Increase spindle speed
-
Abort
then on the second line:
-
Operation mode: “MANUAL” / “MDI” / “AUTO”
-
Toggle flood
-
Toggle spindle brake control
Offset display status bar
The Offset display status bar displays the currently selected tool (selected with Txx M6), the tool length offset (if active), and the work offsets (set by right clicking the coordinates).
Coordinate Display Area
The main part of the display shows the current position of the tool. The colour of the position readout depends on the state of the axis. If the axis is unhomed the axis will be displayed in yellow letters. Once homed it will be displayed in green letters. If there is an error with the current axis TkEMC will use red letter to show that. (for example if an hardware limit switch is tripped).
To properly interpret these numbers, refer to the radio boxes on the right. If the position is “Machine”, then the displayed number is in the machine coordinate system. If it is “Relative”, then the displayed number is in the offset coordinate system. Further down the choices can be “actual” or “commanded”. Actual refers to the feedback coming from encoders (if you have a servo machine), and the “commanded” refers to the position command send out to the motors. These values can differ for several reasons: Following error, deadband, encoder resolution, or step size. For instance, if you command a movement to X 0.0033 on your mill, but one step of your stepper motor is 0.00125, then the “Commanded” position will be 0.0033 but the “Actual” position will be 0.0025 (2 steps) or 0.00375 (3 steps).
Another set of radio buttons allows you to choose between “joint” and “world” view. These make little sense on a normal type of machine (e.g. trivial kinematics), but helps on machines with non-trivial kinematics like robots or stewart platforms. (you can read more about kinematics in the Integrators Handbook).
Backplot
When the machine moves, it leaves a trail called the backplot. You can start the backplot window by selecting View→Backplot.
Automatic control
Buttons for control
The buttons in the lower part of TkEMC (seen in Figure [cap:TkEMC-Interpreter]) are used to control the execution of a program: “Open” to load a program, “Verify” to check it for errors, “Run” to start the actual cutting, “Pause” to stop it while running, “Resume” to resume an already paused program, “Step” to advance one line in the program and “Optional Stop” to toggle the optional stop switch (if the button is green the program execution will be stopped on any M1 encountered).
Text Program Display Area
When the program is running, the line currently being executed is highlighted in white. The text display will automatically scroll to show the current line.
Manual Control
Implicit keys
TkEMC allows you to manually move the machine. This action is known as “jogging”. First, select the axis to be moved by clicking it. Then, click and hold the “+” or “-” button depending on the desired direction of motion. The first four axes can also be moved by the arrow keys (X and Y), PAGE UP and PAGE DOWN keys (Z) and the [ and ] keys (A).
If “Continuous” is selected, the motion will continue as long as the button or key is pressed. If another value is selected, the machine will move exactly the displayed distance each time the button is clicked or the key is pressed. The available values are:
1.0000 0.1000 0.0100 0.0010 0.0001
By pressing “Home” or the HOME key, the selected axis will be homed. Depending on your configuration, this may just set the axis value to be the absolute position 0.0, or it may make the machine move to a specific home location through use of “home switches”. See the Integrators Manual for more information on homing.
By pressing “Override Limits”, the machine will temporarily be permitted to jog outside the limits defined in the .ini file. (Note: if “Override Limits” is active the button will be displayed using a red colour).
-
TkEMC Override Limits & Jogging increments example
![[cap:Override-Limits]](gui/tkemc_override_limits.png)
The “Spindle ” group
The button on the first row select the direction for the spindle to rotate: Counterclockwise, Stopped, Clockwise. The buttons next to it allow the user to increase or decrease the rotation speed. The button on the second row allows the spindle brake to be engaged or released. Depending on your machine configuration, not all the items in this group may have an effect.
The “Coolant ” group
The two buttons allow the “Mist” and “Flood” coolants to be turned on and off. Depending on your machine configuration, not all the items in this group may appear.
Code Entry
Manual Data Input (also called MDI), allows G-code programs to be entered manually, one line at a time. When the machine is not turned on, and not set to MDI mode, the code entry controls are unavailable.
MDI:
This allows you to enter a g-code command to be executed. Execute the command by pressing Enter.
Active G-Codes
This shows the “modal codes” that are active in the interpreter. For instance, “G54” indicates that the “G54 offset” is applied to all coordinates that are entered.
Jog Speed
By moving this slider, the speed of jogs can be modified. The numbers above refer to axis units / second. The text box with the number is clickable. Once clicked a popup window will appear, allowing for a number to be entered.
Feed Override
By moving this slider, the programmed feed rate can be modified. For instance, if a program requests F60 and the slider is set to 120%, then the resulting feed rate will be 72. The text box with the number is clickable. Once clicked a popup window will appear, allowing for a number to be entered.
Spindle speed Override
The spindle speed override slider works exactly like the feed override slider, but it controls to the spindle speed. If a program requested S500 (spindle speed 500 RPM), and the slider is set to 80%, then the resulting spindle speed will be 400 RPM. This slider has a minimum and maximum value defined in the ini file. If those are missing the slider is stuck at 100%. The text box with the number is clickable. Once clicked a popup window will appear, allowing for a number to be entered.
Keyboard Controls
Almost all actions in TkEMC can be accomplished with the keyboard. Many of the shortcuts are unavailable when in MDI mode.
The most frequently used keyboard shortcuts are shown in Table [cap:Most-Common-Keyboard].
MINI
Introduction
[Much of this chapter quotes from a chapater of the Sherline CNC operators manual. ]
Mini was designed to be a full screen graphical interface. It was first written for the Sherline CNC but is available for anyone to use, copy, and distribute under the terms of the GPL copyright.
Rather than popup new windows for each thing that an operator might want to do, Mini allows you to display these within the regular screen. Parts of this chapter are copied from the instructions that were written for that mill by Joe Martin and Ray Henry.
Screen layout
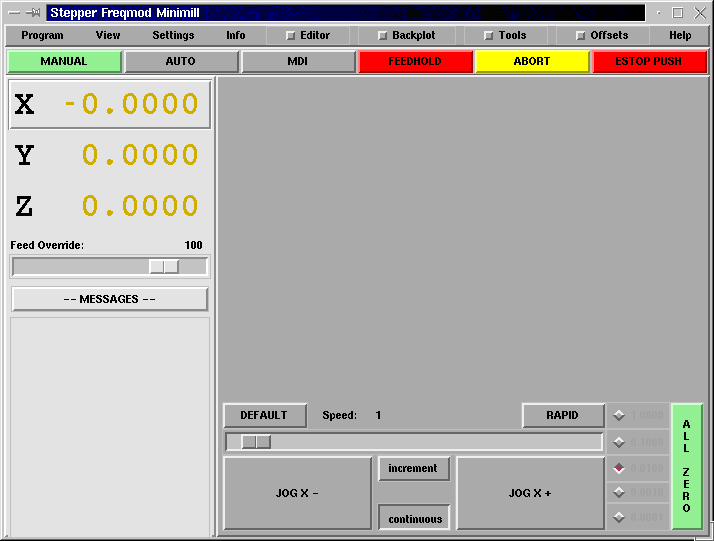
 The Mini screen is laid out in several sections. (See Figure
<<fig:startmini>> ) These include a menu across the top, a set of main
control buttons just below the menu and two rather large columns of
information that show the state of your machine and allow you to enter
commands or programs.
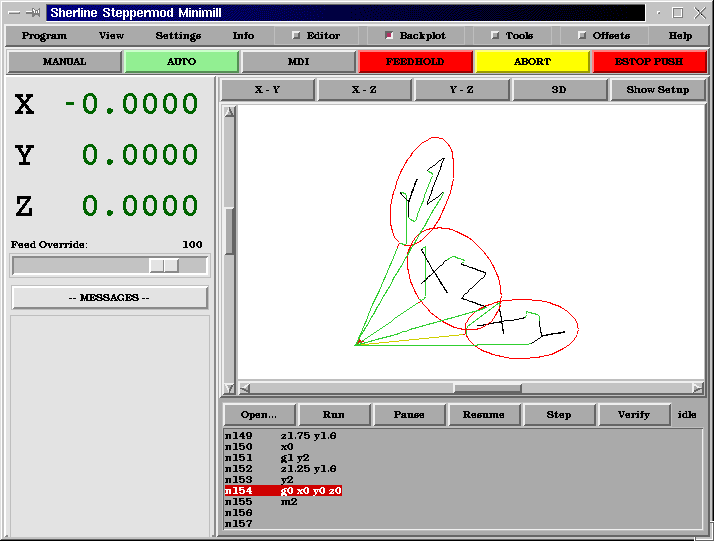
When you compare figure [fig:startmini] with figure [fig:runmini] you will see many differences. In the second figure
-
each axis has been homed — the display numbers are dark green
-
the EMC mode is auto — the auto button has a light green background
-
the backplotter has been turned on — backplot is visible in the pop-in window
-
the tool path from the program is showing in the display.
Once you start working with Mini you will quickly discover how easily it shows the conditions of the EMC and allows you to make changes to it.
Menu Bar
The first row is the menu bar across the top. Here you can configure the screen to display additional information. Some of the items in this menu are very different from what you may be acustomed to with other programs. You should take a few minutes and look under each menu item in order to familiarize yourself with the features that are there.
The menu includes each of the following sections and subsections.
- Program
-
This menu includes both reset and exit functions. Reset will return the EMC to the condition that it was in when it started. Some startup configuration items like the normal program units can be specified in the ini file.
- View
-
This menu includes several screen elements that can be added so that you can see additional information during a run. These include
- Position_Type
-
This menu item adds a line above the main position displays that shows whether the displays are in inches or metric and whether they are Machine or Relative location and if they are Actual positions or Commanded positions. These can be changed using the Settings menu described below.
- Tool_Info
-
This adds a line immediately below the main position displays that shows which tool has been selected and the length of offset applied.
- Offset_Info
-
adds a line immediately below the tool info that shows what offsets have been applied. This is a total distance for each axis from machine zero.
- Show_Restart
-
adds a block of buttons to the right of the program display in auto mode. These allow the operator to restart a program after an abort or estop. These will pop in whenever estop or abort is pressed but can be shows by the operator anytime auto mode is active by selecting this menu item.
- Hide_Restart
-
removes the block of buttons that control the restart of a program that has been aborted or estopped.
- Show_Split_Right
-
changes the nature of the right hand column so that it shows both mode and pop-in information.
- Show_Mode_Full
-
changes the right hand column so that the mode buttons or displays fill the entire right side of the screen. In manual mode, running with mode full you will see spindle and lube control buttons as well as the motion buttons.
- Show_Popin_Full
-
changes the right hand column so that the popin fills the entire right side of the screen.
- Settings
-
These menu items allow the operator to control certain parameters during a run.
- Actual_Position
-
sets the main position displays to actual(machine based) values.
- Commanded_Position
-
sets the main position displays to the values that they were commanded to.
- Machine_Position
-
sets the main position displays to the absolute distance from where the machine was homed.
- Relative_Position
-
sets the main position displays to show the current position including any offsets like part zeros that are active. For more information on offsets see the chapter on coordinate systems.
- Info
-
lets you see a number of active things by writing their values into the MESSAGE pad.
- Program_File
-
will write the currently active program file name.
- Editor_File
-
will write the currently active file if the editor pop in is active and a file has been selected for editing.
- Parameter_File
-
will write the name of the file being used for program parameters. You can find more on this in the chapters on offsets and using variables for programming.
- Tool_File
-
will write the name of the tool file that is being used during this run.
- Active_G-Codes
-
will write a list of all of the modal program codes that are active whenever this item is selected. For more information about modal codes see the introductory part programming chapter.
- Help
-
opens a text window pop in that displays the contents of the help file.
You will notice between the info menu and the help menu there are a set of four buttons. These are called check buttons because they have a small box that shows red if they have been selected. These four buttons, Editor, Backplot, Tools, and Offsets pop in each of these screens. If more than one pop-in is active (button shown as red) you can toggle between these pop-ins by right clicking your mouse.
Control Button Bar
Below the menu line is a horizontal line of control buttons. These are the primary control buttons for the interface. Using these buttons you can change mode from [MANUAL] to [AUTO] to [MDI] (Manual Data Input). These buttons show a light green background whenever that mode is active.
You can also use the [FEEDHOLD], [ABORT], and [ESTOP] buttons to control a programmed move.
MANUAL
This button or pressing <F3> sets the EMC to Manual mode and displays an abreviated set of buttons the operator can use to issue manual motion commands. The labels of the jog buttons change to match the active axis. Whenever Show_Mode_Full is active in in manual mode, you will see spindle and lube control buttons as well as the motion buttons. A keyboard <i> or <I> will switch from continuous jog to incremental jog. Pressing that key again will toggle the increment size through the available sizes.
 A button has been added to designate the present position as the home
position. We felt that a machine of this type (Sherline 5400) would be
simpler to operate if it didn't use a machine home position. This
button will zero out any offsets and will home all axes right where
they are.
 Axis focus is important here. Notice (in figure  <<fig:startmini>>)
that in manual mode you see a line or 'groove'  around the X axis to
highlight its position display. This groove says
that X is the active axis. It will be the target for jog moves made
 with the 'plus' and 'minus'  jog buttons. You can change axis focus by
clicking on any other axis
display. You can also change axis focus in manual mode if you press its
name key on your keyboard. Case is not important here. [Y] or [y] will
shift the focus to the Y axis. [A] or [a] will shift the focus to the A
axis. To help you remember which axis will jog when you press the jog
buttons, the active axis name is displayed on them.
 The EMC can jog (move a particular axis) as long as you hold the
button down when it is set for 'continuous', or it can jog for a preset
distance when it is set for 'incremental' . You can also jog the active
axis by pressing the plus [+] or minus
[-] keys on the keyboard. Again, case is not important for keyboard
jogs. The two small buttons between the large jog buttons let you set
which kind of jog you want. When you are in incremental mode, the
distance buttons come alive. You can set a distance by pressing it with
the mouse. You can toggle between distances by pressing [i] or [I] on
the keyboard. Incremental jog has an interesting and often unexpected
effect. If you press the jog button while a jog is in progress, it will
add the distance to the position it was at when the second jog command
was issued. Two one-inch jog presses in close succession will not get
you two inches of movement. You have to wait until the first one is
complete before jogging again.
 Jog speed is displayed above the slider. It can be set using the
slider by clicking in the slider's open slot on the side you want it to
move toward, or by clicking on the [Default] or [Rapid] buttons. This
setting only affects the jog move while in manual mode. Once a jog move
is initiated, jog speed has no effect on the jog. As an example of
this, say you set jog mode to 'incremental'  and the increment to 1
inch. Once you press the [Jog] button it will
travel that inch at the rate at which it started.
AUTO
When the Auto button is pressed, or <F4> on the keyboard, the EMC is changed into that mode, a set of the traditional auto operation buttons is displayed, and a small text window opens to show a part program. During run the active line will be displayed as white lettering on a red background.
In the auto mode, many of the keyboard keys are bound to controls. For example the numbers above the querty keys are bound to feed rate override. The 0 sets 100%, 9 sets 90% and such. Other keys work much the same as they do with the tkemc graphical interface.
Auto mode does not normally display the active or modal codes. If the operator wishes to check these, use menu Info → Active_G-Codes. This will write all modal codes onto the message scratch pad.
If abort or estop is pressed during a run a set of buttons displays to the right of the text that allows the operator to shift the restart line forward or backwards. If the restart line is not the last active line, it will be highlighted as white letters on a blue background. Caution, a very slow feed rate, and a finger poised over the pause button is advised during any program restart.
 The real heart of CNC machine tool work is the auto mode. Sherline's
auto mode displays the typical functions that people have come to
expect from the EMC. Along the top are a set of buttons which control
what is happening in auto mode. Below them is the window that shows the
part of the program currently being executed. As the program runs, the
active line shows in white letters on a red background. The first three
buttons, [Open], [Run], and [Pause] do about what you'd expect. [Pause]
will stop the run right where it is. The next button, [Resume], will
restart motion. They are like feedhold if used this way. Once [Pause]
is pressed and motion has stopped, [Step] will resume motion and
continue it to the end of the current block. Press [Step] again to get
the motion of the next block. Press [Resume] and the interpreter goes
back to reading ahead and running the program. The combination of
[Pause] and [Step] work a lot like single block mode on many
controllers. The difference is that [Pause] does not let motion
continue to the end of the current block. Feed rate Override ... can be
very handy as you approach a first cut. Move in quickly at 100 percent,
throttle back to 10% and toggle between [Feedhold] and 10% using the
pause button. When you are satisfied that you've got it right, hit the
zero to the right of nine and go.
 The [Verify] button runs the interpreter through the code without
initiating any motion. If Verify finds a problem it will stop the read
near the problem block and put up some sort of message. Most of the
time you will be able to figure out the problem with your program by
reading the message and looking in the program window at the
highlighted line. Some of the messages are not very helpful. Sometimes
you will need to read a line or two ahead of the highlight to see the
problem. Occasionally the message will refer to something well ahead of
the highlight line. This often happens if you forget to end your
program with an acceptable code like %, m2, m30, or m60.
MDI
The MDI button or <F5> sets the Manual Data Input mode. This mode displays a single line of text for block entry and shows the currently active modal codes for the interpreter.
 MDI mode allows you to enter single blocks and have the interpreter
execute them as if they were part of a program (kind of like a one-line
program). You can execute circles, arcs, lines and such. You can even
test sets of program lines by entering one block, waiting for that
motion to end, and then enter the next block. Below the entry window,
there is a listing of all of the current modal codes. This listing can
be very handy. I often forget to enter a g00 before I command a motion.
If nothing happens I look down there to see if g80 is in effect. G80
stops any motion. If it's there I remember to issue a block like g00 x0
y0 z0. In MDI you are entering text from the keyboard so none of the
main keys work for commands to the running machine. [F1] will Estop the
control.
Since many of the keyboard keys are needed for entry, most of the bindings that were available in auto mode are not available here.
[FEEDHOLD] — [CONTINUE]
Feedhold is a toggle. When the EMC is ready to handle or is handling a motion command this button shows the feedhold label on a red backgrouund. If feedhold has been pressed then it will show the continue label. Using it to pause motion has the advantage of being able to restart the program from where you stopped it. Feedhold will toggle between zero speed and whatever feed rate override was active before it was pressed. This button and the function that it activates is also bound to the pause button on most keyboards.
[ABORT]
The abort button stops any motion when it is pressed. It also removes the motion command from the EMC. No further motions are cued up after this button is pressed. If you are in auto mode, this button removes the rest of the program from the motion cue. It also records the number of the line that was executing when it was pressed. You can use this line number to restart the program after you have cleared up the reasons for pressing it.
[ESTOP ]
The estop button is also a toggle but it works in three possible settings.
-
When Mini starts up it will show a raised button with red background with black letters that say “ESTOP PUSH.” This is the correct state of the machine when you want to run a program or jog an axis. Estop is ready to work for you when it looks like this.
-
If you push the estop button while a motion is being executed, you will see a recessed gray button that says “ESTOPPED.” You will not be able to move an axis or do any work from the Mini gui when the estop button displays this way. Pressing it with your mouse will return Mini to normal ready condition.
-
A third view is possible here. A recessed green button means that estop has been take off but the machine has not been turned on. Normally this only happens when <F1> estop has been pressed but <F2> has not been pressed.
Joe Martin says, “When all else fails press a software [ESTOP].” This does everything that abort does but adds in a reset so that the EMC returns to the standard settings that it wakes up on. If you have an external estop circuit that watches the relevant parallel port or DIO pin, a software estop can turn off power to the motors.
 Most of the time, when we abort or E-Stop it's because something went
wrong. Perhaps we broke a tool and want to change it. We switch to
manual mode and raise the spindle, change tools, and assuming that we
got the length the same, get ready to go on. If we return the tool to
the same place where the abort was issued, the EMC will work perfectly.
It is possible to move the restart line back or ahead of where the
abort happened. If you press the [Back] or [Ahead] buttons you will see
a blue highlight that shows the relationship between the abort line and
the one on which the EMC will start up again. By thinking through what
is happening at the time of the restart you can place the tool tip
where it will resume work in an acceptable manner. You will need to
think through things like tool offsets barriers to motion along a
diagonal line and such before you press the [Restart] button.
Left Column
There are two columns below the control line. The left side of the screen displays information of interest to the operator. There are very few buttons to press here.
Axis Position Displays
The axis position displays work exactly like they do with tkemc. The color of the letters is important.
-
Red indicates that the machine is sitting on a limit switch or the polarity of a min or max limit is set wrong in the ini file.
-
Yellow indicates that the machine is ready to be homed.
-
Green indicates that the machine has been homed.
The position can be changed to display any one of several values by using the menu settings. The startup or default settings can be changed in the ini file so these displays wake up just the way that you want them.
Feed rate Override
Immediately below the axis position displays is the feed rate override slider. You can operate feed rate override and feedhold in any mode of operation. Override will change the speed of jogs or feed rate in manual or MDI modes. You can adjust feed rate override by grabbing the slider with your mouse and dragging it along the groove. You can also change feed rate a percent at a time by clicking in the slider’s groove. In auto mode you can also set feed override in 10% increments by pressing the top row of numbers. This slider is a handy visual reference to how much override is being applied to programmed feed rate.
Messages
The message display located under the axis positions is a sort of scratch pad for the EMC. If there are problems it will report them there. If you try to home or move an axis when the [ESTOP] button is pressed, you’ll get a message that says something about commanding motion when the EMC is not ready. If an axis faults out for something like falling behind, the message pad will show what happened. If you want to remind an operator to change a tool, for example, you can add a line of code to your program that will display in the message box. An example might be (msg, change to tool #3 and press resume). This line of code, included in a program, will display “change to tool #3 and press resume” in the message box. The word msg, (with comma included) is the command to make this happen; without msg, the message wouldn’t be displayed. It will still show in the auto modes' display of the program file.
To erase messages simply click the message button at the top of the pad or on the keyboard hold down the [Alt] key and press the [m] key.
Right Column
The right column is a general purpose place to display and work. Here you can see the modal buttons and text entry or displays. Here you can view a plot of the tool path that will be commanded by your program. You can also write programs and control tools and offsets here. The modal screens have been described above. Each of the popin displays are described in detail below.
Program Editor
The editor is rather limited compared to many modern text editors. It does not have undo nor paste between windows with the clipboard.These were eliminated because of interaction with a running program. Future releases will replace these functions so that it will work the way you’ve come to expect from a text editor. It is included because it has the rather nice feature of being able to number and renumber lines in the way that the interpreter expects of a file. It will also allow you to cut and paste from one part of a file to another. In addition, it will allow you to save your changes and submit them to the EMC interpreter with the same menu click. You can work on a file in here for a while and then save and load if the EMC is in Auto mode. If you have been running a file and find that you need to edit it, that file will be placed in the editor when you click on the editor button on the top menu.
Backplot Display
 Backplot [Backplot] will show the tool path that can be viewed from a
chosen direction. '3-D' is the default. Other choices and controls are
displayed along the top and right side of the pop-in. If you are in the
middle of a cut when you press one of these control buttons the machine
will pause long enough to re-compute the view.
Along the right side of the pop-in there is a small pyramid shaped graphic that tries to show the angle you are viewing the tool path from. Below it are a series of sliders that allow you to change the angle of view and the size of the plot. You can rotate the little position angle display with these. They take effect when you press the [Refresh] button. The [Reset] button removes all of the paths from the display and readies it for a new run of the program but retains your settings for that session.
If backplot is started before a program is started, it will try to use some color lines to indicate the kind of motion that was used to make it. A green line is a rapid move. A black line is a feed rate move. Blue and red indicate arcs in counterclockwise and clockwise directions.
The backplotter with Mini allows you to zoom and rotate views after you have run your program but it is not intended to store a tool path for a long period of time.
Tool Page
The tool page is pretty much like the others. You can set length and diameter values here and they become effective when you press the [Enter] key. You will need to set up your tool information before you begin to run a program. You can’t change tool offsets while the program is running or when the program is paused.
The [Add Tools] and [Remove Tools] buttons work on the bottom of the tool list so you will want to fill in tool information in decending order. Once a new tool has been added, you can use it in a program with the usual G-code commands. There is a 32 tool limit in the current EMC configuration files but you will run out of display space in Mini long before you get there. (Hint You can use menu → view → show popin full to see more tools if you need.)
Offset Page
The offset page can be used to display and setup work offsets. The coordinate system is selected along the left hand side of the window. Once you have selected a coordinate system you can enter values or move an axis to a teach position. .Mini Offset Display
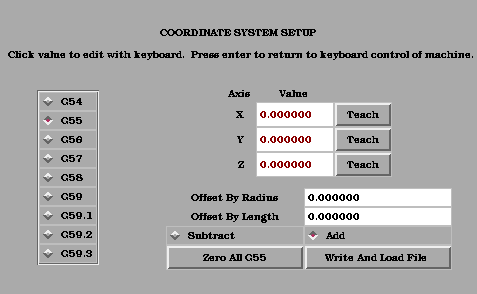
 You can also teach using an edgefinder by adding the radius and length
to the offset_by widgets. When you do this you may need to add or
subtract the radius depending upon which surface you choose to touch
from. This is selected with the add or subtract radiobuttons below the
offset windows.
The zero all for the active coordinate system button will remove any offsets that you have showing but they are not set to zero in the variable file until you press the write and load file button as well. This write and load file button is the one to use when you have set all of the axis values that you want for a coordinate system.
Keyboard Bindings
A number of the bindings used with tkemc have been preserved with mini. A few of the bindings have been changed to extend that set or to ease the operation of a machine using this interface. Some keys operate the same regradless of the mode. Others change with the mode that EMC is operating in.
Common Keys
- Pause
-
Toggle feedhold
- Escape
-
abort motion
- F1
-
toggle estop/estop reset state
- F2
-
toggle machine off/machine on state
- F3
-
manual mode
- F4
-
auto mode
- F5
-
MDI mode
- F6
-
reset interpreter
The following only work for machines using auxiliary I/O
- F7
-
toggle mist on/mist off
- F8
-
toggle flood on/flood off
- F9
-
toggle spindle forward/off
- F10
-
toggle spindle reverse/off
- F11
-
decrease spindle speed
- F12
-
increase spindle speed
Manual Mode
- 1-9 0
-
set feed override to 10%-90%, 0 is 100%
- ~
-
set feed override to 0 or feedhold
- x
-
select X axis
- y
-
select Y axis
- z
-
select Z axis
- a
-
select A axis
- b
-
select B axis
- c
-
select C axis
- Left Right Arrow
-
jog X axis
- Up Down Arrow
-
jog Y axis
- Page Up Down
-
jog Z axis
- - _
-
jog the active axis in the minus direction
- + =
-
jog the active axis in the plus direction.
- Home
-
home selected axis
- i I
-
toggle through jog increments
The following only work with a machine using auxiliary I/O
- b
-
take spindle brake off
- Alt-b
-
put spindle brake on
Auto Mode
- 1-9,0
-
set feed override to 10%-90%, 0 is 100%
- ~
-
set feed override to 0 or feedhold
- o/O
-
open a program
- r/R
-
run an opened program
- p/P
-
pause an executing program
- s/S
-
resume a paused program
- a/A
-
step one line in a paused program
Misc
One of the features of Mini is that it displays any axis above number 2 as a rotary and will display degree units for it. It also converts to degree units for incremental jogs when a rotary axis has the focus.
KEYSTICK
Installing
To use keystick change the DISPLAY ini file setting to:
[DISPLAY]

DISPLAY = keystick
Using
Keystick is very simple to use. In the MDI Mode you simply start typing the g code and it shows up in the bottom text area. The “?” key toggles help.
Using EMC
CNC Machine Overview
This section gives a brief description of how a CNC machine is viewed from the input and output ends of the Interpreter.
Mechanical Components
A CNC machine has many mechanical components that may be controlled or may affect the way in which control is exercised. This section describes the subset of those components that interact with the Interpreter. Mechanical components that do not interact directly with the Interpreter, such as the jog buttons, are not described here, even if they affect control.
Axes
Any CNC machine has one or more Axes. Different types of CNC machines have different combinations. For instance, a "4-axis milling machine" may have XYZA or XYZB axes. A lathe typically has XZ axes. A foam-cutting machine may have XYUZ axes. In EMC, the case of a XYYZ "gantry" machine with two motors for one axis is better handled by kinematics rather than by a second linear axis.
[If the motion of mechanical components is not independent,
as with
hexapod machines, the RS274/NGC language and the canonical machining
functions will still be usable, as long as the lower levels of control
know how to control the actual mechanisms to produce the same relative
motion of tool and workpiece as would be produced by independent axes.
This is called kinematics.
]
Primary Linear Axes
The X, Y, and Z axes produce linear motion in three mutually orthogonal directions.
Secondary Linear Axes
The U, V, and W axes produce linear motion in three mutually orthogonal directions. Typically, X and U are parallel, Y and V are parallel, and Z and W are parallel.
Rotational Axes
The A, B and C axes produce angular motion (rotation). Typically, A rotates around a line parallel to X, B rotates around a line parallel to Y, and C rotates around a line parallel to Z.
Spindle
A CNC machine typically has a spindle which holds one cutting tool, probe, or the material in the case of a lathe. The spindle may or may not be controlled by the CNC software.
Coolant
If a CNC machine has components to provide mist coolant and/or flood coolant they can be controlled by G-Codes.
Feed and Speed Override
A CNC machine can have separate feed and speed override controls, which let the operator specify that the actual feed rate or spindle speed used in machining at some percentage of the programmed rate. See Section [sub:Feed-Interaction].
Block Delete Switch
A CNC machine can have a block delete switch. See Section [sub:Block-Delete-Switch-Interaction].
Optional Program Stop Switch
A CNC machine can have an optional program stop switch. See Section [sub:Optional-Program-Stop-Interaction].
Control and Data Components
Linear Axes
The X, Y, and Z axes form a standard right-handed coordinate system of orthogonal linear axes. Positions of the three linear motion mechanisms are expressed using coordinates on these axes.
The U, V and W axes also form a standard right-handed coordinate system. X and U are parallel, Y and V are parallel, and Z and W are parallel.
Rotational Axes
The rotational axes are measured in degrees as wrapped linear axes in which the direction of positive rotation is counterclockwise when viewed from the positive end of the corresponding X, Y, or Z-axis. By “wrapped linear axis,” we mean one on which the angular position increases without limit (goes towards plus infinity) as the axis turns counterclockwise and deceases without limit (goes towards minus infinity) as the axis turns clockwise. Wrapped linear axes are used regardless of whether or not there is a mechanical limit on rotation.
Clockwise or counterclockwise is from the point of view of the
workpiece. If the workpiece is fastened to a turntable which turns on a
rotational axis, a counterclockwise turn from the point of view of the
workpiece is accomplished by turning the turntable in a direction that
(for most common machine configurations) looks clockwise from the point
of view of someone standing next to the machine.
[If the
parallelism requirement is violated, the system builder will
have to say how to distinguish clockwise from counterclockwise.
]
Controlled Point
The controlled point is the point whose position and rate of motion are controlled. When the tool length offset is zero (the default value), this is a point on the spindle axis (often called the gauge point) that is some fixed distance beyond the end of the spindle, usually near the end of a tool holder that fits into the spindle. The location of the controlled point can be moved out along the spindle axis by specifying some positive amount for the tool length offset. This amount is normally the length of the cutting tool in use, so that the controlled point is at the end of the cutting tool. On a lathe, tool length offsets can be specified for X and Z axes, and the controlled point is either at the tool tip or slightly outside it (where the perpendicular, axis-aligned lines touched by the “front” and “side” of the tool intersect).
Coordinated Linear Motion
To drive a tool along a specified path, a machining center must often coordinate the motion of several axes. We use the term “coordinated linear motion” to describe the situation in which, nominally, each axis moves at constant speed and all axes move from their starting positions to their end positions at the same time. If only the X, Y, and Z axes (or any one or two of them) move, this produces motion in a straight line, hence the word “linear” in the term. In actual motions, it is often not possible to maintain constant speed because acceleration or deceleration is required at the beginning and/or end of the motion. It is feasible, however, to control the axes so that, at all times, each axis has completed the same fraction of its required motion as the other axes. This moves the tool along same path, and we also call this kind of motion coordinated linear motion.
Coordinated linear motion can be performed either at the prevailing feed rate, or at traverse rate, or it may be synchronized to the spindle rotation. If physical limits on axis speed make the desired rate unobtainable, all axes are slowed to maintain the desired path.
Feed Rate
The rate at which the controlled point or the axes move is nominally a steady rate which may be set by the user. In the Interpreter, the interpretation of the feed rate is as follows unless “inverse time feed” or “feed per revolution” modes are being used (see Section [sub:G93,-G94:-Set]).
-
If any of XYZ are moving, F is in units per minute in the XYZ cartesian system, and all other axes (UVWABC) move so as to start and stop in coordinated fashion
-
Otherwise, if any of UVW are moving, F is in units per minute in the UVW cartesian system, and all other axes (ABC) move so as to start and stop in coordinated fashion
-
Otherwise, the move is pure rotary motion and the F word is in rotary units in the ABC “pseudo-cartesian” system.
Coolant
Flood coolant and mist coolant may each be turned on independently. The RS274/NGC language turns them off together (see Section [sub:M7,-M8,-M9:]).
Dwell
A machining center may be commanded to dwell (i.e., keep all axes unmoving) for a specific amount of time. The most common use of dwell is to break and clear chips, so the spindle is usually turning during a dwell. Regardless of the Path Control Mode (see Section [sub:Path-Control-Mode]) the machine will stop exactly at the end of the previous programmed move, as though it was in exact path mode.
Units
Units used for distances along the X, Y, and Z axes may be measured in millimeters or inches. Units for all other quantities involved in machine control cannot be changed. Different quantities use different specific units. Spindle speed is measured in revolutions per minute. The positions of rotational axes are measured in degrees. Feed rates are expressed in current length units per minute, or degrees per minute, or length units per spindle revolution, as described in Section [sub:Feed-Rate].
Current Position
The controlled point is always at some location called the “current position,” and the controller always knows where that is. The numbers representing the current position must be adjusted in the absence of any axis motion if any of several events take place:
-
Length units are changed.
-
Tool length offset is changed.
-
Coordinate system offsets are changed.
Selected Plane
There is always a “selected plane”, which must be the XY-plane, the YZ-plane, or the XZ-plane of the machining center. The Z-axis is, of course, perpendicular to the XY-plane, the X-axis to the YZ-plane, and the Y-axis to the XZ-plane.
Tool Carousel
Zero or one tool is assigned to each slot in the tool carousel.
Tool Change
A machining center may be commanded to change tools.
Pallet Shuttle
The two pallets may be exchanged by command.
Feed and Speed Override Switches
The feed and speed override switches may be enabled (so they work as expected) or disabled (so they have no effect on the feed rate or spindle speed). The RS274/NGC language has one command that enables both switches and one command that disables both (see Section [sub:M48,-M49:-Override]). See Section [sub:Feed-Interaction] for further details.
Path Control Mode
The machining center may be put into any one of three path control modes: (1) exact stop mode, (2) exact path mode, or (3) continuous mode with optional tolerance. In exact stop mode, the machine stops briefly at the end of each programmed move. In exact path mode, the machine follows the programmed path as exactly as possible, slowing or stopping if necessary at sharp corners of the path. In continuous mode, sharp corners of the path may be rounded slightly so that the feed rate may be kept up (but by no more than the tolerance, if specified). See Section [sub:G61,-G61.1,-G64:].
Interpreter Interaction with Switches
The Interpreter interacts with several switches. This section describes the interactions in more detail. In no case does the Interpreter know what the setting of any of these switches is.
Feed and Speed Override Switches
The Interpreter will interpret RS274/NGC commands which enable (M48) or disable (M49 ) the feed and speed override switches. For certain moves, such as the traverse out of the end of a thread during a threading cycle, the switches are disabled automatically.
EMC2 reacts to the speed and feed override settings when these switches are enabled.
Tool File
A tool file is required to use the Interpreter. The file tells which tools are in which carousel slots and what the length and diameter of each tool are.
The file consists of any number of header lines, followed by one blank line, followed by any number of lines of data. The header lines are ignored by the interpreter. It is important that there be exactly one blank line (with no spaces or tabs, even) before the data. The header line shown in Table [cap:Sample-Tool-File] describes the data columns, so it is suggested (but not required) that such a line always be included in the header.
Each data line of the file contains the data for one tool. The line may contain 4 or 5 elements (“mill format”) or 8 or 9 elements (“lathe format”).
The units used for the length and diameter are in machine units.
The lines do not have to be in any particular order. Switching the order of lines has no effect unless the same slot number is used on two or more lines, which should not normally be done, in which case the data for only the last such line will be used.
In emc, the location of the tool file is specified in the ini file. See the Integrator Manual for more details.
A tool file may have a mixture of “mill format” and “lathe format” lines, though usually the “lathe format” lines are only required for lathe-type tooling.
Mill Format Tool Files
The “mill format” of a tool file is shown in Table [cap:Sample-Tool-File].
| FMS | TLO | Diameter | Comment | |
|---|---|---|---|---|
1 |
1 |
2.0 |
1.0 |
|
2 |
2 |
1.0 |
0.2 |
|
5 |
5 |
1.5 |
0.25 |
endmill |
10 |
10 |
2.4 |
-0.3 |
for testing |
Each line has five entries. The first four entries are required. The last entry (a comment) is optional. It makes reading easier if the entries are arranged in columns, as shown in the table, but the only format requirement is that there be at least one space or tab after each of the first three entries on a line and a space, tab, or newline at the end of the fourth entry. The meanings of the columns and the type of data to be put in each are as follows.
The “Pocket” column contains the number (unsigned integer) which represents the pocket number (slot number) of the tool carousel slot in which the tool is placed. The entries in this column must all be different.
The “FMS” column contains the number (unsigned integer) which represents a code number for the tool. The user may use any code for any tool, as long as the codes are unsigned integers. This is typically the same as the pocket number.
The “TLO” column contains a real number which represents the tool length offset. This number will be used if tool length offsets are being used and this pocket is selected. This is normally a positive real number, but it may be zero or any other number if it is never to be used.
The “Diameter” column contains a real number. This number is used only if tool radius compensation is turned on using this pocket. If the programmed path during compensation is the edge of the material being cut, this should be a positive real number representing the measured diameter of the tool. If the programmed path during compensation is the path of a tool whose diameter is nominal, this should be a small number (positive, negative, or zero) representing the difference between the measured diameter of the tool and the nominal diameter. If cutter radius compensation is not used with a tool, it does not matter what number is in this column.
The “Comment” column may optionally be used to describe the tool. Any type of description is OK. This column is for the benefit of human readers only.
Lathe Format Tool Files
The “lathe format” of a tool file is shown in Table [cap:Lathe-Tool-File].
| FMS | ZOFFSET | XOFFSET | DIA | FRONTANGLE | BACKANGLE | ORIENTATION | |
|---|---|---|---|---|---|---|---|
Comment |
|||||||
1 |
1 |
0.0 |
0.0 |
0.1 |
95.0 |
||
155.0 |
1 |
2 |
2 |
0.5 |
0.5 |
0.1 |
The Pocket, FMS, DIA and Comment fields are as for mill format tool files. The ZOFFSET field is the same as the TLO field of mill format tool files. The DIA is also used by the AXIS gui display.
The XOFFSET field gives an offset for the X coordinate when tool length offsets are in effect.
The ORIENTATION field gives the orientation of the lathe tool, as illustrated in [cap:Tool-Orientations]. The red cross is the controlled point. See [sub:Controlled-Point].
The FRONTANGLE and BACKANGLE fields are used by some user interfaces to display a fancy representation of the lathe tool.
Parameters
In the RS274/NGC language view, a machining center maintains an array of numerical parameters defined by a system definition (RS274NGC_MAX_PARAMETERS). Many of them have specific uses especially in defining coordinate systems. The number of numerical parameters can increase as development adds support for new parameters. The parameter array persists over time, even if the machining center is powered down. EMC2 uses a parameter file to ensure persistence and gives the Interpreter the responsibility for maintaining the file. The Interpreter reads the file when it starts up, and writes the file when it exits.
All parameters are avalible for use in G Code programs.
- 1-30
-
Subroutine local parameters of call arguments. These parameters are local to the subroutine. See [cha:O-Codes]
- 1-5000
-
G-Code user parameters. These parameters are global in the G Code file.
- 5061-5070
-
Result of "G38.2" Probe for X, Y, Z, A, B, C, U, V & W.
- 5161-5169
-
"G28" Home for X, Y, Z, A, B, C, U, V & W.
- 5181-5189
-
"G30" Home for X, Y, Z, A, B, C, U, V & W.
- 5211-5219
-
"G92" offset for X, Y, Z, A, B, C, U, V & W.
- 5220
-
Coordinate System number 1 - 9 for G54 - G59.3.
- 5221-5229
-
Coordinate System 1, G54 for X, Y, Z, A, B, C, U, V & W.
- 5241-5249
-
Coordinate System 2, G55 for X, Y, Z, A, B, C, U, V & W.
- 5261-5269
-
Coordinate System 3, G56 for X, Y, Z, A, B, C, U, V & W.
- 5281-5289
-
Coordinate System 4, G57 for X, Y, Z, A, B, C, U, V & W.
- 5301-5309
-
Coordinate System 5, G58 for X, Y, Z, A, B, C, U, V & W.
- 5321-5329
-
Coordinate System 6, G59 for X, Y, Z, A, B, C, U, V & W.
- 5341-5349
-
Coordinate System 7, G59.1 for X, Y, Z, A, B, C, U, V & W.
- 5361-5369
-
Coordinate System 8, G59.2 for X, Y, Z, A, B, C, U, V & W.
- 5381-5389
-
Coordinate System 9, G59.3 for X, Y, Z, A, B, C, U, V & W.
- 5399
-
Result of M66 - Check or wait for input
- 5400
-
Tool Number
- 5401
-
Tool X Offset
- 5402
-
Tool Y Offset
- 5403
-
Tool Z Offset
- 5404
-
Tool A Offset
- 5405
-
Tool B Offset
- 5406
-
Tool C Offset
- 5407
-
Tool U Offset
- 5408
-
Tool V Offset
- 5409
-
Tool W Offset
- 5410
-
Tool Diameter
- 5411
-
Tool Front Angle
- 5412
-
Tool Back Angle
- 5413
-
Tool Orientation
- 5420-5428
-
Current Position including all offsets and in the current program units for X, Y, Z, A, B, C, U, V & W.
The format of a parameter file is shown in Table [cap:Parameter-File-Format]. The file consists of any number of header lines, followed by one blank line, followed by any number of lines of data. The Interpreter skips over the header lines. It is important that there be exactly one blank line (with no spaces or tabs, even) before the data. The header line shown in Table [cap:Parameter-File-Format] describes the data columns, so it is suggested (but not required) that that line always be included in the header.
The Interpreter reads only the first two columns of the table. The third column, "Comment," is not read by the Interpreter.
Each line of the file contains the index number of a parameter in the first column and the value to which that parameter should be set in the second column. The value is represented as a double-precision floating point number inside the Interpreter, but a decimal point is not required in the file. All of the parameters shown in Table [cap:Parameter-File-Format] are required parameters and must be included in any parameter file, except that any parameter representing a rotational axis value for an unused axis may be omitted. An error will be signalled if any required parameter is missing. A parameter file may include any other parameter, as long as its number is in the range 1 to 5400. The parameter numbers must be arranged in ascending order. An error will be signalled if not. Any parameter included in the file read by the Interpreter will be included in the file it writes as it exits. The original file is saved as a backup file when the new file is written. Comments are not preserved when the file is written.
G Code Overview
The EMC2 G Code language is based on the RS274/NGC language. The G Code language is based on lines of code. Each line (also called a "block") may include commands to do several different things. Lines of code may be collected in a file to make a program.
A typical line of code consists of an optional line number at the beginning followed by one or more "words". A word consists of a letter followed by a number (or something that evaluates to a number). A word may either give a command or provide an argument to a command. For example, "G1 X3" is a valid line of code with two words. "G1 " is a command meaning "move in a straight line at the programmed feed rate to the programmed end point", and "X3 " provides an argument value (the value of X should be 3 at the end of the move). Most EMC2 G Code commands start with either G or M (for General and Miscellaneous). The words for these commands are called "G codes" and "M codes."
The EMC2 language has no indicator for the start of a program. The Interpreter, however, deals with files. A single program may be in a single file, or a program may be spread across several files. A file may demarcated with percents in the following way. The first non-blank line of a file may contain nothing but a percent sign, "%", possibly surrounded by white space, and later in the file (normally at the end of the file) there may be a similar line. Demarcating a file with percents is optional if the file has an M2 or M30 in it, but is required if not. An error will be signalled if a file has a percent line at the beginning but not at the end. The useful contents of a file demarcated by percents stop after the second percent line. Anything after that is ignored.
The EMC2 G Code language has two commands (M2 or M30 ), either of which ends a program. A program may end before the end of a file. Lines of a file that occur after the end of a program are not to be executed. The interpreter does not even read them.
Format of a line
A permissible line of input code consists of the following, in order, with the restriction that there is a maximum (currently 256) to the number of characters allowed on a line.
-
an optional block delete character, which is a slash "/" .
-
an optional line number.
-
any number of words, parameter settings, and comments.
-
an end of line marker (carriage return or line feed or both).
Any input not explicitly allowed is illegal and will cause the Interpreter to signal an error.
Spaces and tabs are allowed anywhere on a line of code and do not change the meaning of the line, except inside comments. This makes some strange-looking input legal. The line "G0X +0. 12 34Y 7" is equivalent to "G0 x+0.1234 Y7", for example.
Blank lines are allowed in the input. They are to be ignored.
Input is case insensitive, except in comments, i.e., any letter outside a comment may be in upper or lower case without changing the meaning of a line.
Line Number
A line number is the letter N followed by an integer (with no sign) between 0 and 99999 written with no more than five digits (000009 is not OK, for example). Line numbers may be repeated or used out of order, although normal practice is to avoid such usage. Line numbers may also be skipped, and that is normal practice. A line number is not required to be used, but must be in the proper place if used.
Word
A word is a letter other than N followed by a real value.
Words may begin with any of the letters shown in Table [cap:Words-and-their]. The table includes N for completeness, even though, as defined above, line numbers are not words. Several letters (I, J, K, L, P, R) may have different meanings in different contexts. Letters which refer to axis names are not valid on a machine which does not have the corresponding axis.
| Letter | Meaning |
|---|---|
A |
A axis of machine |
B |
B axis of machine |
C |
C axis of machine |
D |
Tool radius compensation number |
F |
Feed rate |
G |
General function (See table [cap:Modal-Groups]) |
H |
Tool length offset index |
I |
X offset for arcs and G87 canned cycles |
J |
Y offset for arcs and G87 canned cycles |
K |
Z offset for arcs and G87 canned cycles. |
Spindle-Motion Ratio for G33 synchronized movements. |
|
M |
Miscellaneous function (See table [cap:Modal-Groups]) |
N |
Line number |
P |
Dwell time in canned cycles and with G4. |
Key used with G10. |
|
Q |
Feed increment in G73, G83 canned cycles |
R |
Arc radius or canned cycle plane |
S |
Spindle speed |
T |
Tool selection |
U |
U axis of machine |
V |
V axis of machine |
W |
W axis of machine |
X |
X axis of machine |
Y |
Y axis of machine |
Z |
Z axis of machine |
Number
The following rules are used for (explicit) numbers. In these rules a digit is a single character between 0 and 9.
-
A number consists of (1) an optional plus or minus sign, followed by (2) zero to many digits, followed, possibly, by (3) one decimal point, followed by (4) zero to many digits - provided that there is at least one digit somewhere in the number.
-
There are two kinds of numbers: integers and decimals. An integer does not have a decimal point in it; a decimal does.
-
Numbers may have any number of digits, subject to the limitation on line length. Only about seventeen significant figures will be retained, however (enough for all known applications).
-
A non-zero number with no sign as the first character is assumed to be positive.
Notice that initial (before the decimal point and the first non-zero digit) and trailing (after the decimal point and the last non-zero digit) zeros are allowed but not required. A number written with initial or trailing zeros will have the same value when it is read as if the extra zeros were not there.
Numbers used for specific purposes in RS274/NGC are often restricted to some finite set of values or some to some range of values. In many uses, decimal numbers must be close to integers; this includes the values of indexes (for parameters and carousel slot numbers, for example), M codes, and G codes multiplied by ten. A decimal number which is supposed be close to an integer is considered close enough if it is within 0.0001 of an integer.
Numbered Parameters
A numbered parameter is the pound character # followed by an integer between 1 and 5399. The parameter is referred to by this integer, and its value is whatever number is stored in the parameter.
A value is stored in a parameter with the = operator; for example "#3 = 15 " means "set parameter 3 to 15." A parameter setting does not take effect until after all parameter values on the same line have been found. For example, if parameter 3 has been previously set to 15 and the line "#3=6 G1 x#3 " is interpreted, a straight move to a point where x equals 15 will occur and the value of parameter 3 will be 6.
The # character takes precedence over other operations, so that, for example, "#1+2 " means the number found by adding 2 to the value of parameter 1, not the value found in parameter 3. Of course, #[1+2] does mean the value found in parameter 3. The # character may be repeated; for example ##2 means the value of the parameter whose index is the (integer) value of parameter 2.
The interpreter maintains a number of readonly parameters for a loaded tool:
-
#5400 tool number
-
#5401 tool x offset
-
#5402 tool y offset
-
#5403 tool z offset
-
#5404 tool a offset
-
#5405 tool b offset
-
#5406 tool c offset
-
#5407 tool u offset
-
#5408 tool v offset
-
#5409 tool w offset
-
#5410 tool diameter
-
#5411 tool frontangle
-
#5412 tool backangle
-
#5413 tool orientation
Named Parameters
Named parameters work like numbered parameters but are easier to read. All parameter names are converted to lower case and have spaces and tabs removed. Named parameters must be enclosed with < > marks.
#<named parameter here> is a local named parameter. By default, a named parameter is local to the scope in which it is assigned. You can’t access a local parameter outside of its subroutine - this is so that two subroutines can use the same parameter names without fear of one subroutine overwriting the values in another.
#<_global named parameter here> is a global named parameter. They are accessible from within called subroutines and may set values within subroutines that are accessible to the caller. As far as scope is concerned, they act just like regular numeric parameters. They are not stored in files.
Examples:
-
Declaration of named global variable
`#<_endmill_dia> = 0.049`
-
Reference to previously declared global variable
`#<_endmill_rad> = [#<_endmill_dia>/2.0]`
-
Mixed literal and named parameters
` o100 call [0.0] [0.0] [#<_inside_cutout>-#<_endmill_dia>] [#<_Zcut>]
[#<_feedrate>]`
Notes:
The global parameters _a, _b, _c, … _z have been reserved for special use. In the future, they may provide access to the last Aword, Bword, Cword, etc.
System Parameters
Two global read only named parameters are available to check which version is running from G Code.
- #<_vmajor>
-
Major package version. If current version was 2.6.2 would return 2.6.
- #<_vminor>
-
Minor package version. If current version was 2.6.2 would return 0.2.
Expressions
An expression is a set of characters starting with a left bracket [ and ending with a balancing right bracket ] . In between the brackets are numbers, parameter values, mathematical operations, and other expressions. An expression is evaluated to produce a number. The expressions on a line are evaluated when the line is read, before anything on the line is executed. An example of an expression is [1 + acos[0] - [#3 ** [4.0/2]]].
Binary Operators
Binary operators only appear inside expressions. There are four basic mathematical operations: addition (+), subtraction (-), multiplication (*), and division (/). There are three logical operations: non-exclusive or (OR), exclusive or (XOR), and logical and (AND). The eighth operation is the modulus operation (MOD). The ninth operation is the "power" operation (** ) of raising the number on the left of the operation to the power on the right. The relational operators are equality (EQ), inequality (NE), strictly greater than (GT), greater than or equal to (GE), strictly less than (LT), and less than or equal to (LE).
The binary operations are divided into several groups according to their precedence. (see table [cap:Operator-Precedence]) If operations in different precedence groups are strung together (for example in the expression [2.0 / 3 * 1.5 - 5.5 / 11.0] ), operations in a higher group are to be performed before operations in a lower group. If an expression contains more than one operation from the same group (such as the first / and * in the example), the operation on the left is performed first. Thus, the example is equivalent to: [[[2.0 / 3] * 1.5] - [5.5 / 11.0]] , which is equivalent to to [1.0 - 0.5] , which is 0.5.
The logical operations and modulus are to be performed on any real numbers, not just on integers. The number zero is equivalent to logical false, and any non-zero number is equivalent to logical true.
Functions
A function is either "ATAN " followed by one expression divided by another expression (for example "ATAN[2]/[1+3]") or any other function name followed by an expression (for example "SIN[90] "). The available functions are shown in table [cap:Functions]. Arguments to unary operations which take angle measures (COS, SIN, and TAN ) are in degrees. Values returned by unary operations which return angle measures (ACOS, ASIN, and ATAN) are also in degrees.
The FIX function rounds towards the left (less positive or more negative) on a number line, so that FIX[2.8] =2 and FIX[-2.8] = -3, for example. The FUP operation rounds towards the right (more positive or less negative) on a number line; FUP[2.8] = 3 and FUP[-2.8] = -2, for example.
The EXISTS function checks for the existence of a single named parameter. It takes only one named parameter and returns 1 if it exists and 0 if it does not exist. It is an error if you use a numbered parameter or an expression.
Repeated Items
A line may have any number of G words, but two G words from the same modal group (see Section [sec:Modal-Groups]) may not appear on the same line.
A line may have zero to four M words. Two M words from the same modal group may not appear on the same line.
For all other legal letters, a line may have only one word beginning with that letter.
If a parameter setting of the same parameter is repeated on a line, "#3=15 #3=6 ", for example, only the last setting will take effect. It is silly, but not illegal, to set the same parameter twice on the same line.
If more than one comment appears on a line, only the last one will be used; each of the other comments will be read and its format will be checked, but it will be ignored thereafter. It is expected that putting more than one comment on a line will be very rare.
Item order
The three types of item whose order may vary on a line (as given at the beginning of this section) are word, parameter setting, and comment. Imagine that these three types of item are divided into three groups by type.
The first group (the words) may be reordered in any way without changing the meaning of the line.
If the second group (the parameter settings) is reordered, there will be no change in the meaning of the line unless the same parameter is set more than once. In this case, only the last setting of the parameter will take effect. For example, after the line "#3=15 #3=6 " has been interpreted, the value of parameter 3 will be 6. If the order is reversed to "#3=6 #3=15" and the line is interpreted, the value of parameter 3 will be 15.
If the third group (the comments) contains more than one comment and is reordered, only the last comment will be used.
If each group is kept in order or reordered without changing the meaning of the line, then the three groups may be interleaved in any way without changing the meaning of the line. For example, the line "g40 g1 #3=15 (foo) #4=-7.0 " has five items and means exactly the same thing in any of the 120 possible orders (such as "#4=-7.0 g1 #3=15 g40 (foo)") for the five items.
Commands and Machine Modes
Many commands cause the controller to change from one mode to another, and the mode stays active until some other command changes it implicitly or explicitly. Such commands are called "modal". For example, if coolant is turned on, it stays on until it is explicitly turned off. The G codes for motion are also modal. If a G1 (straight move) command is given on one line, for example, it will be executed again on the next line if one or more axis words is available on the line, unless an explicit command is given on that next line using the axis words or canceling motion.
"Non-modal" codes have effect only on the lines on which they occur. For example, G4 (dwell) is non-modal.
Modal Groups
Modal commands are arranged in sets called "modal groups", and only one member of a modal group may be in force at any given time. In general, a modal group contains commands for which it is logically impossible for two members to be in effect at the same time - like measure in inches vs. measure in millimeters. A machining center may be in many modes at the same time, with one mode from each modal group being in effect. The modal groups are shown in Table [cap:Modal-Groups].
For several modal groups, when a machining center is ready to accept commands, one member of the group must be in effect. There are default settings for these modal groups. When the machining center is turned on or otherwise re-initialized, the default values are automatically in effect.
Group 1, the first group on the table, is a group of G codes for motion. One of these is always in effect. That one is called the current motion mode.
It is an error to put a G-code from group 1 and a G-code from group 0 on the same line if both of them use axis words. If an axis word-using G-code from group 1 is implicitly in effect on a line (by having been activated on an earlier line), and a group 0 G-code that uses axis words appears on the line, the activity of the group 1 G-code is suspended for that line. The axis word-using G-codes from group 0 are G10, G28, G30, and G92.
It is an error to include any unrelated words on a line with O- flow control.
Comments
Comments can be added to lines of G code to help clear up the intention of the programmer. Comments can be embedded in a line using parentheses () or for the remainder of a line using a semi-colon. The semi-colon is not treated as the start of a comment when enclosed in parentheses.
G0 (Rapid to start) X1 Y1 +
G0 X1 Y1 (Rapid to start; but don't forget the coolant) +
M2 ; End of program.
File Size
The interpreter and task are carefully written so that the only limit on part program size is disk capacity. The TkEMC and Axis interface both load the program text to display it to the user, though, so RAM becomes a limiting factor. In Axis, because the preview plot is drawn by default, the redraw time also becomes a practical limit on program size. The preview can be turned off in Axis to speed up loading large part programs. In Axis sections of the preview can be turned off using special comments.
G Code Order of Execution
The order of execution of items on a line is defined not by the position of each item on the line, but by the following list:
-
Comment (including message)
-
Set feed rate mode (G93, G94).
-
Set feed rate (F).
-
Set spindle speed (S).
-
Select tool (T).
-
Change tool (M6).
-
Spindle on or off (M3, M4, M5).
-
Coolant on or off (M7, M8, M9).
-
Enable or disable overrides (M48, M49).
-
Dwell (G4).
-
Set active plane (G17, G18, G19).
-
Set length units (G20, G21).
-
Cutter radius compensation on or off (G40, G41, G42)
-
Cutter length compensation on or off (G43, G49)
-
Coordinate system selection (G54, G55, G56, G57, G58, G59, G59.1, G59.2, G59.3).
-
Set path control mode (G61, G61.1, G64)
-
Set distance mode (G90, G91).
-
Set retract mode (G98, G99).
-
Go to reference location (G28, G30) or change coordinate system data (G10) or set axis offsets (G92, G92.1, G92.2, G94).
-
Perform motion (G0 to G3, G33, G73, G76, G80 to G89), as modified (possibly) by G53.
-
Stop (M0, M1, M2, M30, M60).
G Code Best Practices
Use an appropriate decimal precision
Use at least 3 digits after the decimal when milling in millimeters, and at least 4 digits after the decimal when milling in inches. In particular, arc tolerance checks are made to .001 and .0001 depending on the active units.
Use consistent white space
G-code is most legible when at least one space appears before words. While it is permitted to insert white space in the middle of numbers, there is no reason to do so.
Use "Center-format" arcs
Center-format arcs (which use I- J- K- instead of R- ) behave more consistently than R-format arcs, particularly for included angles near 180 or 360 degrees.
Put important modal settings at the top of the file
When correct execution of your program depends on modal settings, be sure to set them at the beginning of the part program. Modes can carry over from previous programs and from the MDI commands.
As a good preventative measure, put a line similar to the following at the top of all your programs:
G17 G20 G40 G49 G54 G80 G90 G94
(XY plane, inch mode, cancel diameter compensation, cancel length offset, coordinate system 1, cancel motion, non-incremental motion, feed/minute mode)
Perhaps the most critical modal setting is the distance units—If you do not include G20 or G21, then different machines will mill the program at different scales. Other settings, such as the return mode in canned cycles may also be important.
Don’t put too many things on one line
Ignore everything in Section [sec:Order-of-Execution], and instead write no line of code that is the slightest bit ambiguous.
Don’t set & use a parameter on the same line
Don’t use and set a parameter on the same line, even though the semantics are well defined. Updating a variable to a new value, such as #1=[#1+#2] is ok.
Don’t use line numbers
Line numbers offer no benefits. When line numbers are reported in error messages, the numbers refer to the line number in the file, not the N-word value.
When moving more than one coordinate system, consider inverse time feed mode
Because the meaning of an F-word in feed-per-minute mode varies depending on which axes are commanded to move, and because the amount of material removed does not depend only on the feed rate, it may be easier to use G93 inverse time feed mode to achieve the desired material removal rate.
Coordinate System
Introduction
You have seen how handy a tool length offset can be. Having this allows the programmer to ignore the actual tool length when writing a part program. In the same way, it is really nice to be able to find a prominent part of a casting or block of material and work a program from that point rather than having to take account of the location at which the casting or block will be held during the machining.
This chapter introduces you to offsets as they are used by the EMC. These include;
-
machine coordinates (G53)
-
nine fixture offsets (G54-G59.3)
-
global offsets (G92)
The Machine Position Command (G53)
Regardless of any offsets that may be in effect, putting a G53 in a block of code tells the interpreter to go to the real or absolute axis positions commanded in the block. For example
g53 g0 x0 y0 z0
will get you to the actual position where these three axes are zero. You might use a command like this if you have a favorite position for tool changes or if your machine has an auto tool changer. You might also use this command to get the tool out of the way so that you can rotate or change a part in a vice.
G53 is not a modal command. It must be used on each line where motion based upon absolute machine position is desired.
Fixture Offsets (G54-G59.3)
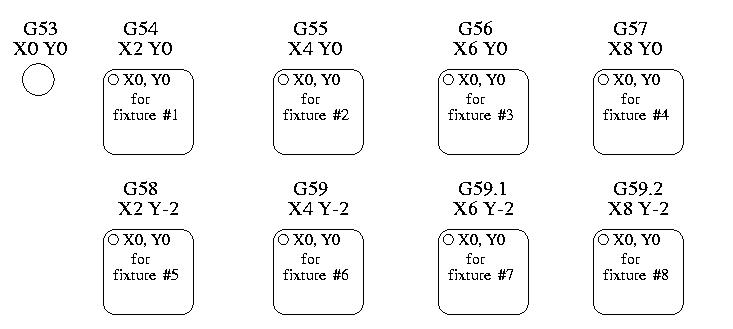
Work or fixture offset are used to make a part home that is different from the absolute, machine coordinate system. This allows the part programmer to set up home positions for multiple parts. A typical operation that uses fixture offsets would be to mill multiple copies of parts on multiple part holders or vises.
The values for offsets are stored in the VAR file that is requested by the INI file during the startup of an EMC. In our example below we’ll use G55. The values for each axis for G55 are stored as variable numbers.
5241 0.000000
5242 0.000000
5243 0.000000
5244 0.000000
5245 0.000000
5246 0.000000
In the VAR file scheme, the first variable number stores the X offset, the second the Y offset and so on for all six axes. There are numbered sets like this for each of the fixture offsets.
Each of the graphical interfaces has a way to set values for these offsets. You can also set these values by editing the VAR file itself and then restarting EMC so that the EMC reads the new values however this is not the recommended way. G10, G92, G28.1, etc are better ways to affect variables. For our example let’s directly edit the file so that G55 takes on the following values.
5241 2.000000
5242 1.000000
5243 -2.000000
5244 0.000000
5245 0.000000
5246 0.000000
You should read this as moving the zero positions of G55 to X = 2 units, Y= 1 unit, and Z = -2 units away from the absolute zero position.
Once there are values assigned, a call to G55 in a program block would shift the zero reference by the values stored. The following line would then move each axis to the new zero position. Unlike G53, G54 through G59.3 are modal commands. They will act on all blocks of code after one of them has been set. The program that might be run using figure [cap:Fixture-Offsets] would require only a single coordinate reference for each of the locations and all of the work to be done there. The following code is offered as an example of making a square using the G55 offsets that we set above.
G55 G0 x0 y0 z0
g1 f2 z-0.2000
x1
y1
x0
y0
g0 z0
g54 x0 y0 z0
m2
"But," you say, "why is there a G54 in there near the end." Many programmers leave the G54 coordinate system with all zero values so that there is a modal code for the absolute machine based axis positions. This program assumes that we have done that and use the ending command as a command to machine zero. It would have been possible to use g53 and arrive at the same place but that command would not have been modal and any commands issued after it would have returned to using the G55 offsets because that coordinate system would still be in effect.
(((G54)))G54 use preset work coordinate system 1
(((G55)))G55 use preset work coordinate system 2
(((G56)))G56 use preset work coordinate system 3
(((G57)))G57 use preset work coordinate system 4
(((G58)))G58 use preset work coordinate system 5
(((G59)))G59 use preset work coordinate system 6
G59.1(((G59.1))) use preset work coordinate system 7
G59.2(((G59.2))) use preset work coordinate system 8
G59.3(((G59.3))) use preset work coordinate system 9
Default coordinate system
One other variable in the VAR file becomes important when we think about offset systems. This variable is named 5220. In the default files its value is set to 1.00000. This means that when the EMC starts up it should use the first coordinate system as its default. If you set this to 9.00000 it would use the ninth offset system as its default for start up and reset. Any value other than an integer (decimal really) between 1 and 9, or a missing 5220 variable will cause the EMC to revert to the default value of 1.00000 on start up.
Setting coordinate system values within G-code.
In the general programming chapter we listed a G10 command word. This command can be used to change the values of the offsets in a coordinate system. (add here)
G92 Offsets
The way that it works has changed just a bit from the early days to the current releases. It should be thought of as a temporary offset that is applied to all other offsets.
The G92 commands
This set of commands include;
- G92
-
This command, when used with axis names, sets values to offset variables.
- G92.1
-
This command sets zero values to the g92 variables.
- G92.2
-
This command suspends but does not zero out the g92 variables.
- G92.3
-
This command applies offset values that have been suspended.
When the commands are used as described above, they will work pretty much as you would expect.
 A user must understand the correct ways that the g92 values work. They
are set based upon the location of each axis when the g92 command is
invoked. The NIST document is clear that, "To make the  current point
have the coordinates" x0, y0, and z0 you would use g92
 x0 y0 z0. G92 'does not work from absolute machine coordinates'. It
works from 'current location'.
 G92 also works from current location as modified by any other offsets
that are in effect when the g92 command is invoked. While testing for
differences between work offsets and actual offsets it was found that a
g54 offset could cancel out a g92 and thus give the appearance that no
offsets were in effect. However, the g92 was still in effect for all
coordinates and did produce expected work offsets for the other
coordinate systems.
 It is likely that the absence of home switches and proper home
procedures will result in very large errors in the application of g92
values if they exist in the var file. Many EMC users do not have home
switches in place on their machines. For them home should be found by
moving each axis to a location and issuing the home command. When each
axis is in a known location, the home command will recalculate how the
g92 values are applied and will produce consistent results. Without a
home sequence, the values are applied to the position of the machine
when the EMC begins to run.
Setting G92 values
There are at least two ways to set G92 values.
-
right mouse click on position displays of tkemc will popup a window into which you can type a value.
-
the g92 command
Both of these work from the current location of the axis to which the offset is to be applied.
 Issuing g92 x y z a b c does in fact set values to the g92 variables
such that each axis takes on the value associated with its name. These
values are assigned to the current position of the machine axis. These
results satisfy paragraphs one and two of the NIST document.
 G92 commands work from current axis location and add and subtract
correctly to give the current axis position the value assigned by the
g92 command. The effects work even though previous offsets are in.
So if the X axis is currently showing 2.0000 as its position a G92 x0 will set an offset of -2.0000 so that the current location of X becomes zero. A G92 X2 will set an offset of 0.0000 and the displayed position will not change. A G92 X5.0000 will set an offset of 3.0000 so that the current displayed position becomes 5.0000.
G92 Cautions
Sometimes the values of a G92 offset will remain in the VAR file. This can happen when a file is aborted during processing that has G92 offsets in effect. When this happens reset or a startup will cause them to become active again. The variables are named
5211 0.000000
5212 0.000000
5213 0.000000
5214 0.000000
5215 0.000000
5216 0.000000
where 5211 is the X axis offset and so on. If you are seeing unexpected positions as the result of a commanded move, as a result of storing an offset in a previous progam and not clearing them at the end then issue a G92.1 in the MDI widow to clear the stored offsets.
If G92 values exist in the VAR file when the EMC starts up the g92 values in the var file is that it will apply the values to current location of each axis. If this is home position and home position is set as machine zero everything will be correct. Once home has been established using real machine switches or moving each axis to a known home position and issuing an axis home command any G92 offsets will be applied. If you have a G92 X1 in effect when you home the X axis the DRO will read "X: 1.000" instead of the expected "X: 0.000" because the G92 was applied to the machine origin. If you issue a G92.1 and the DRO now reads all zeros then you had a G92 offset in effect when you last ran EMC.
Unless your intention is to use the same G92 offsets in the next program best practice is to issue a G92.1 at the end of any G Code files where you use G92 offsets.
Sample Program Using Offsets
This sample engraving project mills a set of four .1 radius circles in roughly a star shape around a center circle. We can setup the individual circle pattern like this.
G10 L2 P1 x0 y0 z0 (ensure that g54 is set to machine zero)
g0 x-.1 y0 z0
g1 f1 z-.25
g3 x-.1 y0 i.1 j0
g0 z0
m2
We can issue a set of commands to create offsets for the four other circles like this.
G10 L2 P2 x0.5 (offsets g55 x value by 0.5 inch)
G10 L2 P3 x-0.5 (offsets g56 x value by -0.5 inch)
G10 L2 P4 y0.5 (offsets g57 y value by 0.5 inch)
G10 L2 P5 y-0.5 (offsets g58 y value by -0.5 inch)
We put these together in the following program.
(a program for milling five small circles in a diamond shape)
G10 L2 P1 x0 y0 z0 (ensure that g54 is machine zero)
G10 L2 P2 x0.5 (offsets g55 x value by 0.5 inch)
G10 L2 P3 x-0.5 (offsets g56 x value by -0.5 inch)
G10 L2 P4 y0.5 (offsets g57 y value by 0.5 inch)
G10 L2 P5 y-0.5 (offsets g58 y value by -0.5 inch)
g54 g0 x-.1 y0 z0 (center circle)
g1 f1 z-.25
g3 x-.1 y0 i.1 j0
g0 z0
g55 g0 x-.1 y0 z0 (first offset circle)
g1 f1 z-.25
g3 x-.1 y0 i.1 j0
g0 z0
g56 g0 x-.1 y0 z0 (second offset circle)
g1 f1 z-.25
g3 x-.1 y0 i.1 j0
g0 z0
g57 g0 x-.1 y0 z0 (third offset circle)
g1 f1 z-.25
g3 x-.1 y0 i.1 j0
g0 z0
g58 g0 x-.1 y0 z0 (fourth offset circle)
g1 f1 z-.25
g3 x-.1 y0 i.1 j0
g54 g0 x0 y0 z0
m2
Now comes the time when we might apply a set of G92 offsets to this program. You’ll see that it is running in each case at z0. If the mill were at the zero position, a g92 z1.0000 issued at the head of the program would shift everything down an inch. You might also shift the whole pattern around in the XY plane by adding some x and y offsets with g92. If you do this you should add a G92.1 command just before the m2 that ends the program. If you do not, other programs that you might run after this one will also use that g92 offset. Furthermore it would save the g92 values when you shut down the EMC and they will be recalled when you start up again.
Tool Compensation
Tool Length Offsets
Touch Off
Using the Touch Off Screen in the AXIS interface you can update the tool table automatically.
Typical steps for updating the tool table:
-
After homing load a tool with "TnM6" where "n" is the tool number.
-
Move tool to an extablished point using a gauge or take a test cut and measure.
-
Select "Tool Table" in the Coordinate System drop down box.
-
Enter the gauge or measured dimension and select OK.
The Tool Table will be changed with the correct Z length to make the DRO display the correct Z position and a G43 command will be issued so the new tool Z length will be in effect. Tool table touch off is only available when a tool is loaded with "TnM6".
Using G10 L1
By using "G10 L1 Pn Zx" where "n" is the tool number and "x" is the offset from the MDI window or in your program you can also set the tool table.
Tool Table
The "Tool Table" is a text file that contains information about each tool. The file is located in the same directory as your configuration and is called "tool.tbl". The tools might be in a tool changer or just changed manually. The file can be edited with a text editor or be updated using G10 L1. See the Lathe Specifics Section for lathe tool table example. The maximum number of entries in the tool table is 56. The maximum tool and pocket number is 99999.
| T1 | P1 | D0.125000 | Z+0.511000 | ;1/8” End Mill |
|---|---|---|---|---|
T2 |
P2 |
D0.062500 |
Z+0.100000 |
;1/16” End Mill |
T99999 |
P99999 |
D23.75000 |
Z-0.3000000 |
;You have a lot of tools |
In general new tool table line format is:
-
T - integer tool number
-
P - integer pocket number
-
D - float tool diameter
-
X..W - float tool length offset on specified axis
-
I - float front angle (lathe tools)
-
J - float back angle (lathe tools)
-
Q - int tool orientation (lathe)
-
; - begin of comment
Tool Changers
EMC supports three types of tool changers "manual", "random location" and "fixed location". Information about configuring an EMC tool changer is in the Integrators Manual.
Manual Tool Changer
Manual tool changer (you change the tool by hand) is treated like a fixed location tool changer and the P number is ignored. Using the manual tool changer only makes sense if you have tool holders that remain with the tool (Cat, NMTB, Kwik Switch etc.) when changed thus preserving the location of the tool to the spindle. Machines with R-8 or router collet type tool holders do not preserve the location of the tool and the manual tool changer should not be used.
Fixed Location Tool Changers
Fixed location tool changers like lathe turrets the tools are in a fixed position in the tool changer. When EMC is configured for a fixed location tool changer the "P" number is ignored (but read, preserved and rewritten) by EMC, so you can use P for any bookkeeping number you want.
Random Location Tool Changers
Random location tool changers swaps the tool in the spindle with the one in the changer. This type of tool changer the tool location will always be in a different pocket after a tool change. When a tool is changed EMC rewrites the pocket number to keep track of where the tool are. T can be any number but P must be a number that makes sense for the machine.
Cutter Radius Compensation
Cutter Radius Compensation allows the programmer to program the tool path without knowing the exact tool diameter. The only caveat is the programmer must program the lead in move to be at least as long as the largest tool radius that might be used.
There are two possible paths the cutter can take while cutter radius compensation is on to the left or right side of a line when facing the direction of cutter motion from behind the cutter. To visualize this imagine you were standing on the part walking behind the tool as it progresses across the part. G41 is your left side of the line and G42 is the right side of the line.
The end point of each move depends on the next move. If the next move creates an outside corner the move will be to the end point of the compensated cut line. If the next move creates in an inside corner the move will stop short so to not gouge the part. The following figure shows how the compensated move will stop at different points depending on the next move.
Overview
Tool Table
Cutter radius compensation uses the data from the tool table to determine the offset needed. The data can be set at run time with G10 L1.
Programming Entry Moves
Any move that is long enough to perform the compensation will work as the entry move. The minimum lenght is the cutter radius. This can be a rapid move above the work piece. If several rapid moves are issued after a G41/42 only the last one will move the tool to the compensated position.
In the following figure you can see that the entry move is compensated to the right of the line. This puts the center of the tool to the right of X0 in this case. If you were to program a profile and the end is at X0 the resulting profile would leave a bump due to the offset of the entry move.
Z Motion
Z axis motion may take place while the contour is being followed in the XY plane. Portions of the contour may be skipped by retracting the Z axis above the part and by extending the Z-axis at the next start point.
Rapid Moves
Rapid moves may be programed while compensation is turned on.
Good Practices
-
Start a program with G40 to make sure compensation is off.
G Code Reference
Conventions used in this section
In the G Code prototypes the hyphen (-) stands for a real value.
A real value may be :
-
An explicit number, 4
-
An expression, [2+2]
-
A parameter value, #88
-
A unary function value, acos[0]
In most cases, if axis words (any or all of X-, Y-, Z-, A-, B-, C-, U-, V-, W-) are given, they specify a destination point.
Axis numbers are in the currently active coordinate system, unless explicitly described as being in the absolute coordinate system. Where axis words are optional, any omitted axes will have their current value.
Any items in the G Code prototypes not explicitly described as optional are required.
The values following letters are often given as explicit numbers. Unless stated otherwise, the explicit numbers can be real values. For example, G10 L2 could equally well be written G[2*5] L[1+1]. If the value of parameter 100 were 2, G10 L#100 would also mean the same.
If L- is written in a prototype the "- " will often be referred to as the "L number", and so on for any other letter.
Polar Coordinates
Polar Coordinates can be used to specify the XY coordinate of a move. The @n is the distance and ^n is the angle. The advantage of this is for things like bolt hole circles which can be done very simply by moving to a point in the center of the circle, setting the offset and then moving out to the first hole then run the drill cycle. Polar Coordinates always are from the current XY zero position. To shift the Polar Coordinates from machine zero use an offset or select a coordinate system.
In Absolute Mode the distance and angle is from the XY zero position and the angle starts with 0 on the X Positive axis and rotates in a CCW direction about the Z axis. The code G1 @1^90 is the same as G1 Y1.
In Relative Mode the distance and angle is also from the XY zero position but it is cumulative. This can be confusing at first how this works in incremental mode.
For example if you have the following program you might expect it to be a square pattern.
F100 G1 @.5 ^90
G91 @.5 ^90
@.5 ^90
@.5 ^90
@.5 ^90
G90 G0 X0 Y0 M2
You can see from the following figure that the output is not what you might expect. Because we added .5 to the distance each time the distance from the XY zero position increased with each line.
The following code will produce our square pattern.
F100 G1 @.5 ^90
G91 ^90
^90
^90
^90
G90 G0 X0 Y0 M2
As you can see by only adding to the angle by 90 degrees each time the end point distance is the same for each line.
It is an error if:
-
An incremental move is started at the origin
-
A mix of Polar and and X or Y words are used
Quick Reference Table
| Code | Description | Section |
|---|---|---|
G0 |
Coordinated Straight Motion Rapid |
|
G1 |
Coordinated Straight Motion Feed Rate |
|
G2, G3 |
Coordinated Helical Motion Feed Rate |
|
G4 |
Dwell |
|
G5.2, G5.3 |
NURBs Block |
|
G7, G8 |
Diameter or Radius Mode |
|
G10 L1 |
Set Tool Table Entry |
|
G10 L10 |
Set Tool Table Entry Calculated |
|
G10 L2 |
Coordinate System Origin Setting |
|
G10 L20 |
Coordinate System Origin Setting Calculated |
|
G17 - G19.1 |
Plane Select |
|
G20, G21 |
Units of Measure |
|
G28 - G30.1 |
Go to Predefined Position |
|
G33 |
Spindle Synchronized Motion |
|
G33.1 |
Rigid Tapping |
|
G38.2 - G38.5 |
Probing |
|
G40 |
Cancel Cutter Compensation |
|
G41, G42 |
Cutter Compensation |
|
G41.1, G42.1 |
Cutter Compensation Transient |
|
G43, G43.1 |
Use Tool Length Offset from Tool Table |
|
G49 |
Cancel Tool Length Offset |
|
G53 |
Motion in Machine Coordinate System |
|
G54-G59 |
Select Coordinate System |
|
G59.1-G59.3 |
Select Coordinate System |
|
G61, G61.1 |
Path Control Mode |
|
G64 |
Path Control Mode with Optional Tolerance |
|
G73 |
Drilling Cycle with Chip Breaking |
|
G76 |
Multipass Threading Cycle (Lathe) |
|
G80 |
Cancel Motion Modes |
|
G81 |
Canned Drilling Cycle |
|
G82-G89 |
Other Canned Cycles |
|
G90, G91 |
Distance Mode |
|
G90.1, G91.1 |
Arc Distance Mode |
|
G92 |
Offset Coordinate Systems & Set Parameters |
|
G92.1, G92.2 |
Cancel Offsets |
|
G92.3 |
Apply Parameters to Offset Coordinate Systems |
|
G93, G94, G95 |
Feed Modes |
|
G96 |
Constant Surface Speed |
|
G97 |
RPM Mode |
|
G98, G99 |
Canned Cycle Z Retract Mode |
| Code | Description | Section |
|---|---|---|
M0, M1, M2 |
Program Control |
|
M3, M4, M5 |
Spindle Control |
|
M6 |
Tool Change |
|
M7, M8, M9 |
Coolant Control |
|
M30, M60 |
Pallet Shuttle |
|
M48 - M53 |
Override Controls |
|
M61 |
Set Current Tool Number |
|
M62-65 |
Output Control |
|
M66 |
Input Control |
|
M67 |
Analog Output Control |
|
M68 |
Analog Output Control |
|
M100-M199 |
User Defined M-Codes |
|
O |
O Codes |
|
F |
Feed |
|
S |
Spindle Speed |
|
T |
Tool Select |
G0 Rapid Linear Motion
G0 axes
For rapid linear (straight line) motion, program G0 axes, where all the axis words are optional. The G0 is optional if the current motion mode is G0 . This will produce coordinated linear motion to the destination point at the current traverse rate (or slower if the machine will not go that fast). It is expected that cutting will not take place when a G0 command is executing.
If cutter radius compensation is active, the motion will differ from the above; see Section [sec:Cutter-Radius-Compensation].
If G53 is programmed on the same line, the motion will also differ; see Section [sub:G53:-Move-in].
It is an error if:
-
An axis letter is without a real value.
G1 Linear Motion
G1 axes
For linear (straight line) motion at programed feed rate (for cutting or not), program G1 axes, where all the axis words are optional. The G1 is optional if the current motion mode is G1 . This will produce coordinated linear motion to the destination point at the current feed rate (or slower if the machine will not go that fast).
If cutter radius compensation is active, the motion will differ from the above; see Section [sec:Cutter-Radius-Compensation].
If G53 is programmed on the same line, the motion will also differ; see Section [sub:G53:-Move-in].
It is an error if:
-
No feed rate has been set.
G2, G3 Arc
A circular or helical arc is specified using either G2 (clockwise arc) or G3 (counterclockwise arc). The direction (CW, CCW) is as viewed from the positive end of the axis about which the rotation occours. The axis of the circle or helix must be parallel to the X, Y, or Z-axis of the machine coordinate system. The axis (or, equivalently, the plane perpendicular to the axis) is selected with G17 (Z-axis, XY-plane), G18 (Y-axis, XZ-plane), or G19 (X-axis, YZ-plane). Planes 17.1, 18.1, and 19.1 are not currently supported. If the arc is circular, it lies in a plane parallel to the selected plane.
If a line of code makes an arc and includes rotational axis motion, the rotational axes turn at a constant rate so that the rotational motion starts and finishes when the XYZ motion starts and finishes. Lines of this sort are hardly ever programmed.
If cutter radius compensation is active, the motion will differ from what is described here. See Section [sec:Cutter-Radius-Compensation].
Two formats are allowed for specifying an arc: Center Format and Radius Format.
It is an error if:
-
No feed rate has been set.
Center format arcs (preferred format)
In the center format, the coordinates of the end point of the arc in the selected plane are specified along with the offsets of the center of the arc from the current location. In this format, it is OK if the end point of the arc is the same as the current point.
It is an error if:
-
When the arc is projected on the selected plane, the distance from the current point to the center differs from the distance from the end point to the center by more than 0.0002 inch (if inches are being used) or 0.002 millimeter (if millimeters are being used).
When the XY-plane is selected program:
`G2 or G3` `axes` `I- J-`
The axis words are all optional except that at least one of X and Y must be used to program an arc of less than 360 degrees. I and J are the offsets from the current location (in the X and Y directions, respectively) of the center of the circle. I and J are optional except that at least one of the two must be used. If only one is specified, the value of the other is taken as 0. If you include the Z word it will spiral.
It is an error if:
-
I and J are both omitted.
When the XZ-plane is selected program:
`G2 or G3` `axes` `I- K-`
The axis words are all optional except that at least one of X and Z must be used to program an arc of less than 360 degrees. I and K are the offsets from the current location (in the X and Z directions, respectively) of the center of the circle. I and K are optional except that at least one of the two must be used. If only one is specified, the value of the other is taken as 0. In Diameter Mode G7 I & K are still radius dimensions.
It is an error if:
-
I and K are both omitted.
When the YZ-plane is selected program:
`G2 or G3` `axes` `J- K-`
The axis words are all optional except that at least one of Y and Z must be used to program an arc of less than 360 degrees. J and K are the offsets from the current location (in the Y and Z directions, respectively) of the center of the circle. J and K are optional except that at least one of the two must be used. If only one is specified, the value of the other is taken as 0.
It is an error if:
-
J and K are both omitted.
Examples
Calculating arcs by hand can be difficult at times. One option is to draw the arc with a cad program to get the coordinates and offsets. Keep in mind the tolerance mentioned above, you may have to change the precision of your cad program to get the desired results. Another option is to calculate the coordinates and offset using formulas. As you can see in the following figures a triangle can be formed from the current position the end position and the arc center.
In the following figure you can see the start position is X0 Y0, the end position is X1 Y1. The arc center position is at X1 Y0. This gives us an offset from the start position of 1 in the X axis and 0 in the Y axis. In this case only an I offset is needed.
The code for the example:
G2 X1 Y1 I1 F10
In the next example we see the difference between the offsets for Y if we are doing a G2 or a G3 move. For the G2 move the start position is X0 Y0, for the G3 move it is X0 Y1. The arc center is at X1 Y0.5 for both moves. The G2 move the J offset is 0.5 and the G3 move the J offset is -0.5.
The g code for the following example:
G2 X0 Y1 I1 J0.5 F25
G3 X0 Y0 I1 J-0.5 F25
Here is an example of a center format command to mill a spiral arc:
That means to make a clockwise (as viewed from the positive z-axis) circular or helical arc whose axis is parallel to the Z-axis, ending where X=10, Y=16, and Z=9, with its center offset in the X direction by 3 units from the current X location and offset in the Y direction by 4 units from the current Y location. If the current location has X=7, Y=7 at the outset, the center will be at X=10, Y=11. If the starting value of Z is 9, this is a circular arc; otherwise it is a helical arc. The radius of this arc would be 5.
In the center format, the radius of the arc is not specified, but it may be found easily as the distance from the center of the circle to either the current point or the end point of the arc.
Full Circles
G2 or G3 I- J- K-
To do a full 360 circle from the current location only program the I, J or K offset from the current location for the G2/3. To program a 360 degree spiral in the XY plane just include the Z word.
It is an error if:
-
The K offset is used in the XY plane
-
The J offset is used in the XZ plane
-
the I offset is used in the YZ plane
Radius format arcs (discouraged format)
In the radius format, the coordinates of the end point of the arc in the selected plane are specified along with the radius of the arc. Program G2 axes R- (or use G3 instead of G2 ). R is the radius. The axis words are all optional except that at least one of the two words for the axes in the selected plane must be used. The R number is the radius. A positive radius indicates that the arc turns through less than 180 degrees, while a negative radius indicates a turn of more than 180 degrees. If the arc is helical, the value of the end point of the arc on the coordinate axis parallel to the axis of the helix is also specified.
It is an error if:
-
both of the axis words for the axes of the selected plane are omitted
-
the end point of the arc is the same as the current point.
It is not good practice to program radius format arcs that are nearly full circles or nearly semicircles because a small change in the location of the end point will produce a much larger change in the location of the center of the circle (and, hence, the middle of the arc). The magnification effect is large enough that rounding error in a number can produce out-of-tolerance cuts. For instance, a 1% displacement of the endpoint of a 180 degree arc produced a 7% displacement of the point 90 degrees along the arc. Nearly full circles are even worse. Other size arcs (in the range tiny to 165 degrees or 195 to 345 degrees) are OK.
Here is an example of a radius format command to mill an arc: G17 G2 x 10 y 15 r 20 z 5.
That means to make a clockwise (as viewed from the positive Z-axis) circular or helical arc whose axis is parallel to the Z-axis, ending where X=10, Y=15, and Z=5, with a radius of 20. If the starting value of Z is 5, this is an arc of a circle parallel to the XY-plane; otherwise it is a helical arc.
G4 Dwell
G4 P[seconds]
For a dwell, program G4 P- . This will keep the axes unmoving for the period of time in seconds specified by the P number.
It is an error if:
-
the P number is negative.
G5.1 Quadratic B-spline
G5.1 Xn Yn I[X offset] J[Y offset]
G5.1 creates a quadratic B-spline in the XY plane with the X and Y axis only.
It is an error if:
-
I and J offset is not specified
-
An axis other than X or Y is specified
-
The active plane is not G17
G5.2 G5.3 NURBs Block
Warning: G5.2, G5.3 is experimental and not fully tested.
G5.2 is for opening the data block defining a NURBs and G5.3 for closing the data block. In the lines between these two codes the curve control points are defined with both their related "weights" (P) and their parameter (L) which determines the order of the curve (k) and subsequently its degree (k-1).
Using this curve definition the knots of the NURBs curve are not defined by the user they are calculated by the inside algorithm, in the same way as it happens in a great number of graphic applications, where the curve shape can be modified only acting on either control points or weights.
Sample NURBs Code
G0 X0 Y0
F10
G5.2 X0 Y1 P1 L3
     X2 Y2 P1
     X2 Y0 P1
     X0 Y0 P2
G5.3
/ The rapid moves show the same path without the NURBs Block
G0 X0 Y1
   X2 Y2
   X2 Y0
   X0 Y0
M2
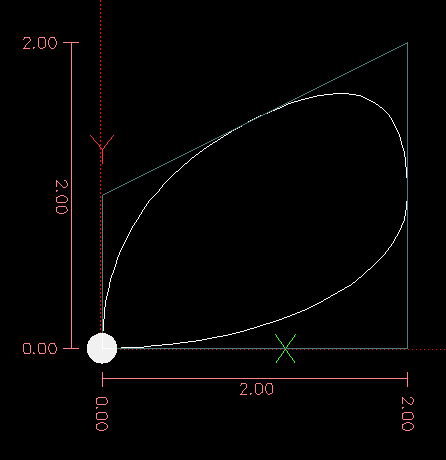
More information on NURBs can be found here:
G7 Diameter Mode
Program G7 to enter the diameter mode for axis X on a lathe. When in the Diameter mode the X axis moves on a lathe will be 1/2 the distance to the center of the lathe. For example X1 would move the cutter to 0.500” from the center of the lathe thus giving a 1” diameter part.
G8 Radius Mode
Program G8 to enter the radius mode for axis X on a lathe. When in Radius mode the X axis moves on a lathe will be the distance from the center. Thus a cut at X1 would result in a part that is 2" in diameter. G8 is default at power up.
G10 L1 Set Tool Table
G10 L1 P[tool number] R[radius] X[offset] Y[offset] Z[offset] A[offset] B[offset] C[offset] U[offset] V[offset] W[offset] I[frontangle] J[backangle] Q[orientation]
Program a G10 L1 to set a tool table entry from a program or the MDI window. G10 L1 reloads the tool table.
It is an error if:
-
Cutter Compensation is on
For more information on tool orientation see figure ( [cap:Tool-Orientations])
G10 L2 Set Coordinate System
G10 L2 P[coordinate system] R[rotation about Z]
The coordinate system is described in Section [cha:Coordinate-System].
To set the origin of a coordinate system, program G10 L2 P- R- axes , where the P number is in the range 0 to 9. For the currently active coordinate system program P0. To specify a coordinate system program 1 to 9 corresponding to G54 to G59.3 . Optionally program R to indicate the rotation of the XY axis around the Z and all axis words are optional. The origin of the coordinate system specified by the P number is set to the given values (in terms of the not offset machine coordinate system). Only those coordinates for which an axis word is included on the line will be set. Being in incremental distance mode (G91) has no effect on G10 L2. The direction of rotation is CCW as viewed from the Top View.
Important Concepts:
-
G10 L2 Pn does not change from the current coordinate system to the one specified by P, you have to use G54-59.3 to select a coordinate system.
-
When a rotation is in effect jogging an axis will only move that axis in a positive or negative direction and not along the rotated axis.
It is an error if:
-
The P number does not evaluate to an integer in the range 0 to 9.
-
An axis is programmed that is not defined in the configuration.
If a G92 origin offset was in effect before G10 L2, it will continue to be in effect afterwards.
The coordinate system whose origin is set by a G10 command may be active or inactive at the time the G10 is executed. If it is currently active, the new coordinates take effect immediately.
Examples:
- G10 L2 P1 X 3.5 Y 17.2
-
sets the origin of the first coordinate system (the one selected by G54 ) to be X=3.5 and Y=17.2. Because only X and Y are specified, the origin point is only moved in X and Y; the other coordinates are not changed.
- G10 L2 P1 X0 Y0 Z0
-
sets the G54 coordinate back to the origin.
G10 L10 Set Tool Table
G10 L10 P[tool number] R[radius] X[offset] Z[offset] Q[orientation]
G10 L10 is just like G10 L1 except that instead of setting the offset/entry to the given value, it is set to a calculated value that makes the current coordinates become the given value.
It is an error if:
-
Cutter Compensation is on
G10 L20 Set Coordinate System
G10 L20 P[coordinate system]
G10 L20 is similar to G10 L2 except that instead of setting the offset/entry to the given value, it is set to a calculated value that makes the current coordinates become the given value.
It is an error if:
-
The P number does not evaluate to an integer in the range 0 to 9.
-
An axis is programmed that is not defined in the configuration.
G17, G18, G19, G17.1, G18.1, G19.1 Plane Selection
These codes set the current plane as follows:
| G17 | XY (default) |
|---|---|
G18 |
ZX |
G19 |
YZ |
G17.1 |
UV |
G18.1 |
WU |
G19.1 |
VW |
The effects of having a plane selected are discussed in Section [sub:G2,-G3:-Arc] and Section [sub:G81-to-G89:]
G20, G21 Length Units
Program G20 to use inches for length units.
Program G21 to use millimeters for lenght units.
It is usually a good idea to program either G20 or G21 near the beginning of a program before any motion occurs, and not to use either one anywhere else in the program.
G28, G28.1 Go to Predefined Position
G28 uses the values in parameters 5161-5166 as the absolute values to make a rapid traverse move to from the current position. The parameter values are in terms of the absolute coordinate system and the machine’s native coordinate system.
G28 axes will make a rapid traverse move to the position specified by axes , then will make a rapid traverse move to the predefined position in parameters 5161-5166.
G28.1 stores the current absolute position into parameters 5161-5166.
It is an error if :
-
Radius compensation is turned on
G30, G30.1 Go to Predefined Position
G30 uses the values in parameters 5181-5186 as the absolute values to make a rapid traverse move to from the current position. The parameter values are in terms of the absolute coordinate system and the machine’s native coordinate system.
G30 axes will make a rapid traverse move to the position specified by axes , then will make a rapid traverse move to the predefined position in parameters 5181-5186.
G30.1 stores the current absolute position into parameters 5181-5186.
G30 parameters will be used to move the tool when a M6 is programmed if [TOOL_CHANGE_AT_G30]=1 is in the [EMCIO] section of the ini file.
It is an error if :
-
Radius compensation is turned on
G33 Spindle-Synchronized Motion
G33 X- Y- Z- K-
For spindle-synchronized motion in one direction, code G33 X- Y- Z- K- where K gives the distance moved in XYZ for each revolution of the spindle. For instance, if starting at Z=0, G33 Z-1 K.0625 produces a 1 inch motion in Z over 16 revolutions of the spindle. This command might be part of a program to produce a 16TPI thread.
Note: K follows the drive line described by X- Y- Z- and is not parallel to the Z axis.
Spindle-synchronized motions wait for spindle index, so multiple passes line up. G33 moves end at the programmed endpoint.
All the axis words are optional, except that at least one must be used.
It is an error if:
-
All axis words are omitted.
-
The spindle is not turning when this command is executed
-
The requested linear motion exceeds machine velocity limits due to the spindle speed
G33.1 Rigid Tapping
G33.1 X- Y- Z- K-
For rigid tapping (spindle synchronized motion with return) code G33.1 X- Y- Z- K- where K- gives the distance moved for each revolution of the spindle. A rigid tapping move consists of the following sequence:
-
A move to the specified coordinate, synchronized with the spindle at the given ratio and starting with a spindle index pulse
-
When reaching the endpoint, a command to reverse the spindle (e.g., from clockwise to counterclockwise)
-
Continued synchronized motion beyond the specified end coordinate until the spindle actually stops and reverses
-
Continued synchronized motion back to the original coordinate
-
When reaching the original coordinate, a command to reverse the spindle a second time (e.g., from counterclockwise to clockwise)
-
Continued synchronized motion beyond the original coordinate until the spindle actually stops and reverses
-
An unsynchronized move back to the original coordinate.
Spindle-synchronized motions wait for spindle index, so multiple passes line up. G33.1 moves end at the original coordinate.
All the axis words are optional, except that at least one must be used.
It is an error if:
-
All axis words are omitted.
-
The spindle is not turning when this command is executed
-
The requested linear motion exceeds machine velocity limits due to the spindle speed
Example:
;move to starting position
G0 X1.000 Y1.000 Z0.100
;rigid tapping a 20 TPI thread
G33.1 Z-0.750 K0.05
G38.x Straight Probe
Program G38.2 axes, G38.3 axes, G38.4 axes, or G38.5 axes to perform a straight probe operation. The axis words are optional, except that at least one of them must be used. The tool in the spindle must be a probe.
It is an error if:
-
the current point is the same as the programmed point.
-
no axis word is used
-
cutter radius compensation is enabled
-
the feed rate is zero
-
the probe is already in the target state
In response to this command, the machine moves the controlled point (which should be at the end of the probe tip) in a straight line at the current feed rate toward the programmed point. In inverse time feed mode, the feed rate is such that the whole motion from the current point to the programmed point would take the specified time. The move stops (within machine acceleration limits) when the programmed point is reached, or when the requested change in the probe input takes place.
After successful probing, parameters 5061 to 5069 will be set to the coordinates of X, Y, Z, A, B, C, U, V, W of the location of the controlled point at the time the probe changed state. After unsuccessful probing, they are set to the coordinates of the programmed point. Parameter 5070 is set to 1 if the probe succeeded and 0 if the probe failed. If the probe failed, G38.2 and G38.4 will signal an error.
A comment of the form (PROBEOPEN filename.txt`)` will open filename.txt and store the 9-number coordinate consisting of X, Y, Z, A, B, C, U, V, W of each successful straight probe in it. The file must be closed with (PROBECLOSE).
G40 Compensation Off
Program G40 to turn cutter radius compensation off. The next move must be a straight move. It is OK to turn compensation off when it is already off.
It is an error if:
-
A G2/3 arc move is programmed next after a G40.
G41, G42 Cutter Radius Compensation
G41 or G42 D[tool]
G41 start cutter radius compensation to the left of the programmed line as viewed from the positive end of the axis perpendicular to the plane.
G42 start cutter radius compensation to the right of the programmed line as viewed from the positive end of the axis perpendicular to the plane.
The lead in move must be at least as long as the tool radius and can be a rapid move.
Cutter radius compensation may be performed if the XY-plane or XZ-plane is active.
User M100- commands are allowed when Cutter Compensation is on.
The behavior of the machining center when cutter radius compensation is on is described in Section [sec:Cutter-Radius-Compensation]
Cutter Radius Compensation from Tool Table
To turn cutter radius compensation on left (i.e., the cutter stays to the left of the programmed path when the tool radius is positive), program G41 D- . To turn cutter radius compensation on right (i.e., the cutter stays to the right of the programmed path when the tool radius is positive), program G42 D- . The D word is optional; if there is no D word, the radius of the tool currently in the spindle will be used. If used, the D number should normally be the slot number of the tool in the spindle, although this is not required. It is OK for the D number to be zero; a radius value of zero will be used.
It is an error if:
-
the D number is not an integer, is negative or is larger than the number of carousel slots,
-
the YZ plane is active,
-
or cutter radius compensation is commanded to turn on when it is already on.
G41.1, G42.1 Dynamic Cutter Radius Compensation
G41.1 or G42.1 D[diameter] <L[orientation]>
To turn cutter radius compensation on left, program G41.1 D- L-.
To turn cutter compensation on right, program G42.1 D- L-.
The D word specifies the cutter diameter. The L word specifies the cutter orientation, and defaults to 0 if unspecified. For more information on cutter orientation see Section ( [cap:Tool-Orientations]).
It is an error if:
-
the YZ plane is active,
-
the L number is not in the range from 0 to 9 inclusive.
-
or cutter compensation is commanded to turn on when it is already on
G43, G43.1, G49 Tool Length Offsets
G43 , G43.1: Activate Tool length compensation
G43 and G43.1 change subsequent motions by offsetting the Z and/or X coordinates by the length of the tool. G43 and G43.1 do not cause any motion. The next time a compensated axis is moved, that axis’s endpoint is the compensated location.
G43: Use current tool loaded
To use the currently loaded tool from the last Tn M6 program a G43
G43 Hn: Offsets from tool table
To use a tool length offset from the tool table, program G43 H n, where the n number is the desired index in the tool table. The H number will typically be, but does not have to be, the same as the slot number of the tool currently in the spindle. It is OK for the H number to be zero; an offset value of zero will be used.
It is an error if:
-
the H number is not an integer, is negative, or is larger than the number of carousel slots.
G43.1: Dynamic tool compensation
To use a tool length offset from the program, use G43.1 Xn Yn … Wn to set any axis tlo at run time.
It is an error if:
-
motion is commanded on the same line as G43.1
G53 Move in Absolute Coordinates
To move in absolute coordinates from the machine origin, program G53 on the same line as a linear move. G53 is not modal and must be programmed on each line. G0 or G1 does not have to be programmed on the same line if one is currently active. For example G53 G0 X0 Y0 Z0 will move the axes to the home position even if the currently selected coordinate system has offsets in effect.
It is an error if:
-
G53 is used without G0 or G1 being active,
-
or G53 is used while cutter radius compensation is on.
G54 G59.3 Select Coordinate System
To select coordinate system 1, program G54, and similarly for other coordinate systems. The system-number-G-code pairs are: (1-G54), (2-G55), (3-G56), (4-G57), (5-G58), (6-G59), (7-G59.1), (8-G59.2), and (9-G59.3 ). The coordinate systems store the values for each system in the variables shown in the following table.
It is an error if:
-
one of these G-codes is used while cutter radius compensation is on.
See Section [cha:Coordinate-System] for an overview of coordinate systems.
G61, G61.1, G64 Set Path Control Mode
G61 Exact Path Mode
G61.1 Exact Stop Mode
G64 Best Possible Speed
G64 P- (motion blending tolerance) Q- (naive cam tolerance)
G61 visits the programmed point exactly, even though that means temporarily coming to a complete stop.
G64 without P means to keep the best speed possible, no matter how far away from the programmed point you end up.
G64 P- Q- is a way to fine tune your system for best compromise between speed and accuracy. The P- tolerance means that the actual path will be no more than P- away from the programmed endpoint. The velocity will be reduced if needed to maintain the path. In addition, when you activate G64 P- Q- it turns on the "naive cam detector"; when there are a series of linear XYZ feed moves at the same feed rate that are less than Q- away from being collinear, they are collapsed into a single linear move. On G2/3 moves in the G17 (XY) plane when the maximum deviation of an arc from a straight line is less than the G64 P- tolerance the arc is broken into two lines (from start of arc to midpoint, and from midpoint to end). those lines are then subject to the naive cam algorithm for lines. Thus, line-arc, arc-arc, and arc-line cases as well as line-line benefit from the "naive cam detector". This improves contouring performance by simplifying the path. It is OK to program for the mode that is already active. See also Section [sub:Path-Control-Mode] for a discussion of these modes. If Q is not specified then it will have the same behavior as before and use the value of P-.
G73 Drilling Cycle with Chip Breaking
`G73 X- Y- Z- A- B- C- R- L- Q-`
The G73 cycle is intended for deep drilling or milling with chip breaking. The retracts in this cycle cut off any long stringers (which are common when drilling in aluminum). This cycle takes a Q number which represents a "delta" increment along the Z axis.
-
Preliminary motion, as described above.
-
Move the Z-axis only at the current feed rate downward by delta or to the Z position, whichever is less deep.
-
Rapid up a bit.
-
Repeat steps 2 and 3 until the Z position is reached at step 2.
-
Retract the Z-axis at traverse rate to clear Z.
It is an error if:
-
the Q number is negative or zero.
G76 Threading Cycle
`G76 P- Z- I- J- R- K- Q- H- E- L- `
It is an error if:
-
The active plane is not the ZX plane
-
Other axis words, such as X- or Y-, are specified
-
The R- degression value is less than 1.0.
-
All the required words are not specified
-
P-, J-, K- or H- is negative
-
E- is greater than half the drive line length
- Drive Line
-
A line through the initial X position parallel to the Z.
- P-
-
The "thread pitch" in distance per revolution.
- Z-
-
The final position of threads. At the end of the cycle the tool will be at this Z position.
- I-
-
The "thread peak" offset from the "drive line". Negative I values are external threads, and positive I values are internal threads. Generally the material has been turned to this size before the G76 cycle.
- J-
-
A positive value specifying the "initial cut depth". The first threading cut will be J beyond the "thread peak" position.
- K-
-
A positive value specifying the "full thread depth". The final threading cut will be K beyond the "thread peak" position.
Optional settings
- R-
-
The "depth degression". R1.0 selects constant depth on successive threading passes. R2.0 selects constant area. Values between 1.0 and 2.0 select decreasing depth but increasing area. Values above 2.0 select decreasing area. Beware that unnecessarily high degression values will cause a large number of passes to be used. (degression = a descent by stages or steps.)
- Q-
-
The "compound slide angle" is the angle (in degrees) describing to what extent successive passes should be offset along the drive line. This is used to cause one side of the tool to remove more material than the other. A positive Q value causes the leading edge of the tool to cut more heavily. Typical values are 29, 29.5 or 30.
- H-
-
The number of "spring passes". Spring passes are additional passes at full thread depth. If no additional passes are desired, program H0.
Tapered entry and exit moves can be programmed using E- and L-.
- E-
-
Specifies the distance along the drive line used for the taper. The angle of the taper will be so the last pass tapers to the thread crest over the distance specified with E.` E0.2` will give a taper for the first/last 0.2 length units along the thread. For a 45 degree taper program E the same as K
- L-
-
Specifies which ends of the thread get the taper. Program L0 for no taper (the default), L1 for entry taper, L2 for exit taper, or L3 for both entry and exit tapers. Entry tapers will pause at the drive line to synchronize with the index pulse then feed in to the beginning of the taper. No entry taper and the tool will rapid to the cut depth then synchronize and begin the cut.
The tool is moved to the initial X and Z positions prior to issuing the G76. The X position is the "drive line" and the Z position is the start of the threads.
The tool will pause briefly for synchronization before each threading pass, so a relief groove will be required at the entry unless the beginning of the thread is past the end of the material or an entry taper is used.
Unless using an exit taper, the exit move (traverse to original X) is not synchronized to the spindle speed. With a slow spindle, the exit move might take only a small fraction of a revolution. If the spindle speed is increased after several passes are complete, subsequent exit moves will require a larger portion of a revolution, resulting in a very heavy cut during the exit move. This can be avoided by providing a relief groove at the exit, or by not changing the spindle speed while threading.
The final position of the tool will be at the end of the "drive line". A safe Z move will be needed with an internal thread to remove the tool from the hole.
The sample program g76.ngc shows the use of the G76 canned cycle, and can be previewed and executed on any machine using the sim/lathe.ini configuration.
The following example shows the result of running this G-Code:
G0 Z-.5 X .2
G76 P0.05 Z-1 I-.075 J0.008 K0.045 Q29.5 L2 E0.045
The tool is in the final position after the G76 cycle is completed. You can see the entry path on the right from the Q29.5 and the exit path on the left from the L2 E0.045. The white lines are the cutting moves.
G80 Cancel Modal Motion
Program G80 to ensure no axis motion will occur. It is an error if:
-
Axis words are programmed when G80 is active, unless a modal group 0 G code is programmed which uses axis words.
Canned Cycles
The canned cycles G81 through G89 are described in this section. Two examples are given with the description of G81 below.
All canned cycles are performed with respect to the currently-selected plane. Any of the six planes may be selected. Throughout this section, most of the descriptions assume the XY-plane has been selected. The behavior is analogous if another plane is selected, and the correct words must be used. For instance, in the G17.1 plane, the action of the canned cycle is along W, and the locations or increments are given with U and V. In this case substitute U,V,W for X,Y,Z in the instructions below.
Rotational axis words are not allowed in canned cycles. When the active plane is one of the XYZ family, the UVW axis words are not allowed. Likewise, when the active plane is one of the UVW family, the XYZ axis words are not allowed.
Common Words
All canned cycles use X, Y, Z, or U, V, W groups depending on the plane selected and R words. The R (usually meaning retract) position is along the axis perpendicular to the currently selected plane (Z-axis for XY-plane, etc.) Some canned cycles use additional arguments.
Sticky Words
For canned cycles, we will call a number "sticky" if, when the same cycle is used on several lines of code in a row, the number must be used the first time, but is optional on the rest of the lines. Sticky numbers keep their value on the rest of the lines if they are not explicitly programmed to be different. The R number is always sticky.
In incremental distance mode X, Y, and R numbers are treated as increments from the current position and Z as an increment from the Z-axis position before the move involving Z takes place. In absolute distance mode, the X, Y, R, and Z numbers are absolute positions in the current coordinate system.
Repeat Cycle
The L number is optional and represents the number of repeats. L=0 is not allowed. If the repeat feature is used, it is normally used in incremental distance mode, so that the same sequence of motions is repeated in several equally spaced places along a straight line. When L- is greater than 1 in incremental mode with the XY-plane selected, the X and Y positions are determined by adding the given X and Y numbers either to the current X and Y positions (on the first go-around) or to the X and Y positions at the end of the previous go-around (on the repetitions). Thus, if you program L10 , you will get 10 cycles. The first cycle will be distance X,Y from the original location. The R and Z positions do not change during the repeats. The L number is not sticky. In absolute distance mode, L>1 means "do the same cycle in the same place several times", Omitting the L word is equivalent to specifying L=1.
Retract Mode
The height of the retract move at the end of each repeat (called "clear Z" in the descriptions below) is determined by the setting of the retract mode: either to the original Z position (if that is above the R position and the retract mode is G98 , OLD_Z), or otherwise to the R position. See Section [sub:G98,-G99:-Set]
Canned Cycle Errors
It is an error if:
-
X, Y, and Z words are all missing during a canned cycle,
-
Axis words from different groups (XYZ) (UVW) are used together,
-
a P number is required and a negative P number is used,
-
an L number is used that does not evaluate to a positive integer,
-
rotational axis motion is used during a canned cycle,
-
inverse time feed rate is active during a canned cycle,
-
or cutter radius compensation is active during a canned cycle.
If the XY plane is active, the Z number is sticky, and it is an error if:
-
the Z number is missing and the same canned cycle was not already active,
-
or the R number is less than the Z number.
If other planes are active, the error conditions are analogous to the XY conditions above.
Preliminary and In-Between Motion
At the very beginning of the execution of any of the canned cycles, if the current Z position is below the R position, the Z-axis is traversed to the R position. This happens only once, regardless of the value of L.
In addition, at the beginning of the first cycle and each repeat, the following one or two moves are made
-
a straight traverse parallel to the XY-plane to the given XY-position,
-
a straight traverse of the Z-axis only to the R position, if it is not already at the R position.
If another plane is active, the preliminary and in-between motions are analogous.
G81 Drilling Cycle
The G81 cycle is intended for drilling.
-
Preliminary motion, as described above.
-
Move the Z-axis only at the current feed rate to the Z position.
-
Retract the Z-axis at traverse rate to clear Z.
Example 1. Suppose the current position is (1, 2, 3) and the XY-plane has been selected, and the following line of NC code is interpreted.
G90 G81 G98 X4 Y5 Z1.5 R2.8
This calls for absolute distance mode (G90) and OLD_Z retract mode (G98) and calls for the G81 drilling cycle to be performed once. The X number and X position are 4. The Y number and Y position are 5. The Z number and Z position are 1.5. The R number and clear Z are 2.8. Old Z is 3. The following moves take place.
-
a traverse parallel to the XY-plane to (4,5,3)
-
a traverse parallel to the Z-axis to (4,5,2.8)
-
a feed parallel to the Z-axis to (4,5,1.5)
-
a traverse parallel to the Z-axis to (4,5,3)
Example 2. Suppose the current position is (1, 2, 3) and the XY-plane has been selected, and the following line of NC code is interpreted.
G91 G81 G98 X4 Y5 Z-0.6 R1.8 L3
This calls for incremental distance mode (G91) and OLD_Z retract mode (G98) and calls for the G81 drilling cycle to be repeated three times. The X number is 4, the Y number is 5, the Z number is -0.6 and the R number is 1.8. The initial X position is 5 (=1+4), the initial Y position is 7 (=2+5), the clear Z position is 4.8 (=1.8+3), and the Z position is 4.2 (=4.8-0.6). Old Z is 3.
The first move is a traverse along the Z-axis to (1,2,4.8), since old Z < clear Z.
The first repeat consists of 3 moves.
-
a traverse parallel to the XY-plane to (5,7,4.8)
-
a feed parallel to the Z-axis to (5,7, 4.2)
-
a traverse parallel to the Z-axis to (5,7,4.8)
The second repeat consists of 3 moves. The X position is reset to 9 (=5+4) and the Y position to 12 (=7+5).
-
a traverse parallel to the XY-plane to (9,12,4.8)
-
a feed parallel to the Z-axis to (9,12, 4.2)
-
a traverse parallel to the Z-axis to (9,12,4.8)
The third repeat consists of 3 moves. The X position is reset to 13 (=9+4) and the Y position to 17 (=12+5).
-
a traverse parallel to the XY-plane to (13,17,4.8)
-
a feed parallel to the Z-axis to (13,17, 4.2)
-
a traverse parallel to the Z-axis to (13,17,4.8)
G82 Drilling Cycle with Dwell
The G82 cycle is intended for drilling with a dwell at the bottom of the hole.
-
Preliminary motion, as described above.
-
Move the Z-axis only at the current feed rate to the Z position.
-
Dwell for the P number of seconds.
-
Retract the Z-axis at traverse rate to clear Z.
G83 Peck Drilling
The G83 cycle (often called peck drilling) is intended for deep drilling or milling with chip breaking. The retracts in this cycle clear the hole of chips and cut off any long stringers (which are common when drilling in aluminum). This cycle takes a Q number which represents a "delta" increment along the Z-axis.
-
Preliminary motion, as described above.
-
Move the Z-axis only at the current feed rate downward by delta or to the Z position, whichever is less deep.
-
Rapid back out to the clear_z.
-
Rapid back down to the current hole bottom, backed off a bit.
-
Repeat steps 2, 3, and 4 until the Z position is reached at step 2.
-
Retract the Z-axis at traverse rate to clear Z.
It is an error if:
-
the Q number is negative or zero.
G84 Right-Hand Tapping
This code is currently unimplemented in EMC2. It is accepted, but the behavior is undefined. See section [sec:G33,-G33.1:-Spindle-Synchronized]
G85 Boring, No Dwell, Feed Out
The G85 cycle is intended for boring or reaming, but could be used for drilling or milling.
-
Preliminary motion, as described above.
-
Move the Z-axis only at the current feed rate to the Z position.
-
Retract the Z-axis at the current feed rate to clear Z.
G86 Boring, Spindle Stop, Rapid Out
The G86 cycle is intended for boring. This cycle uses a P number for the number of seconds to dwell.
-
Preliminary motion, as described above.
-
Move the Z-axis only at the current feed rate to the Z position.
-
Dwell for the P number of seconds.
-
Stop the spindle turning.
-
Retract the Z-axis at traverse rate to clear Z.
-
Restart the spindle in the direction it was going.
The spindle must be turning before this cycle is used. It is an error if:
-
the spindle is not turning before this cycle is executed.
G87 Back Boring
This code is currently unimplemented in EMC2. It is accepted, but the behavior is undefined.
G88 Boring, Spindle Stop, Manual Out
This code is currently unimplemented in EMC2. It is accepted, but the behavior is undefined.
G89 Boring, Dwell, Feed Out
The G89 cycle is intended for boring. This cycle uses a P number, where P specifies the number of seconds to dwell.
-
Preliminary motion, as described above.
-
Move the Z-axis only at the current feed rate to the Z position.
-
Dwell for the P number of seconds.
-
Retract the Z-axis at the current feed rate to clear Z.
G90, G91 Set Distance Mode
G90 is Absolute Distance Mode
G91 is Incremental Distance Mode
Interpretation of G Code can be in one of two distance modes: absolute or incremental.
To go into absolute distance mode, program G90 . In absolute distance mode, axis numbers (X, Y, Z, A, B, C, U, V, W) usually represent positions in terms of the currently active coordinate system. Any exceptions to that rule are described explicitly in this Section [sub:G81-to-G89:].
To go into incremental distance mode, program G91 . In incremental distance mode, axis numbers usually represent increments from the current coordinate.
G90.1, G91.1 Arc Distance Mode
G90.1 Absolute Distance Mode for I, J & K offsets.
-
I and J both must be specified or it is an error
G91.1 Incremental Distance Mode for I, J & K offsets.
-
Returns I, J & K to their normal behavior.
G92, G92.1, G92.2, G92.3 Coordinate System Offsets
G92 X- Y- Z- A- B- C- U- V- W-
See Section [cha:Coordinate-System] for an overview of coordinate systems.
See Section [sec:G92-Offsets] for more information on Offsets.
To make the current point have the coordinates you want (without motion), program G92 X- Y- Z- A- B- C- U- V- W- , where the axis words contain the axis numbers you want. All axis words are optional, except that at least one must be used. If an axis word is not used for a given axis, the coordinate on that axis of the current point is not changed. It is an error if:
-
all axis words are omitted.
When G92 is executed, the origins of all coordinate systems move. They move such that the value of the current controlled point, in the currently active coordinate system, becomes the specified value. All coordinate system’s origins are offset this same distance.
For example, suppose the current point is at X=4 and there is currently no G92 offset active. Then G92 x7 is programmed. This moves all origins -3 in X, which causes the current point to become X=7. This -3 is saved in parameter 5211.
Being in incremental distance mode has no effect on the action of G92.
G92 offsets may be already be in effect when the G92 is called. If this is the case, the offset is replaced with a new offset that makes the current point become the specified value.
To reset axis offsets to zero, program G92.1 or G92.2. G92.1 sets parameters 5211 to 5219 to zero, whereas G92.2 leaves their current values alone.
To set the axis offset to the values saved in parameters 5211 to 5219, program G92.3.
You can set axis offsets in one program and use the same offsets in another program. Program G92 in the first program. This will set parameters 5211 to 5219. Do not use G92.1 in the remainder of the first program. The parameter values will be saved when the first program exits and restored when the second one starts up. Use G92.3 near the beginning of the second program. That will restore the offsets saved in the first program.
EMC2 stores the G92 offsets and reuses them on the next run of a program. To prevent this, one can program a G92.1 (to erase them), or program a G92.2 (to remove them - they are still stored).
G93, G94, G95: Set Feed Rate Mode
G93 is Inverse Time Mode
G94 is Units per Minute Mode
G95 is Units per Revolution Mode.
Three feed rate modes are recognized: units per minute, inverse time, and units per revolution. Program G94 to start the units per minute mode. Program G93 to start the inverse time mode. Program G95 to start the units per revolution mode.
In units per minute feed rate mode, an F word is interpreted to mean the controlled point should move at a certain number of inches per minute, millimeters per minute, or degrees per minute, depending upon what length units are being used and which axis or axes are moving.
In units per revolution mode, an F word is interpreted to mean the controlled point should move a certain number of inches per revolution of the spindle, depending on what length units are being used and which axis or axes are moving. G95 is not suitable for threading, for threading use G33 or G76.
In inverse time feed rate mode, an F word means the move should be completed in [one divided by the F number] minutes. For example, if the F number is 2.0, the move should be completed in half a minute.
When the inverse time feed rate mode is active, an F word must appear on every line which has a G1, G2, or G3 motion, and an F word on a line that does not have G1, G2, or G3 is ignored. Being in inverse time feed rate mode does not affect G0 (rapid traverse) motions.
It is an error if:
-
inverse time feed rate mode is active and a line with G1, G2, or G3 (explicitly or implicitly) does not have an F word.
-
A new feed rate is not specified after switching to G94 or G95
G96, G97 Spindle Control Mode
 G96 D[max spindle speed] S[units per minute] is Constant Surface Speed
Mode
G97 is RPM Mode
Two spindle control modes are recognized: revolutions per minute, and CSS (constant surface speed). Program G96 D- S- to select constant surface speed of S feet per minute (if G20 is in effect) or meters per minute (if G21 is in effect). The maximum spindle speed is set by the D- number in revolutions per minute. When using G96, ensure that X0 in the current coordinate system (including offsets and tool lengths) is the center of rotation or emc will not give the desired spindle speed. G96 is not affected by radius or diameter mode.
Program G97 to select RPM mode.
It is an error if:
-
S is not specified with G96
-
A feed move is specified in G96 mode while the spindle is not turning
G98, G99 Set Canned Cycle Return Level
When the spindle retracts during canned cycles, there is a choice of how far it retracts: (1) retract perpendicular to the selected plane to the position indicated by the R word, or (2) retract perpendicular to the selected plane to the position that axis was in just before the canned cycle started (unless that position is lower than the position indicated by the R word, in which case use the R word position).
To use option (1), program G99. To use option (2), program G98 . Remember that the R word has different meanings in absolute distance mode and incremental distance mode.
M Codes
M0, M1, M2, M30, M60 Program Stopping and Ending
To pause a running program temporarily (regardless of the setting of the optional stop switch), program M0. EMC2 remains in the Auto Mode so MDI and other manual actions are not enabled.
To pause a running program temporarily (but only if the optional stop switch is on), program M1. EMC2 remains in the Auto Mode so MDI and other manual actions are not enabled.
It is OK to program M0 and M1 in MDI mode, but the effect will probably not be noticeable, because normal behavior in MDI mode is to stop after each line of input, anyway.
To exchange pallet shuttles and then stop a running program temporarily (regardless of the setting of the optional stop switch), program M60.
If a program is stopped by an M0, M1, or M60 , pressing the cycle start button will restart the program at the following line.
To end a program, program M2. To exchange pallet shuttles and then end a program, program M30. Both of these commands have the following effects.
-
Change from Auto mode to MDI mode.
-
Origin offsets are set to the default (like G54).
-
Selected plane is set to CANON_PLANE_XY (like G17).
-
Distance mode is set to MODE_ABSOLUTE (like G90).
-
Feed rate mode is set to UNITS_PER_MINUTE (like G94).
-
Feed and speed overrides are set to ON (like M48).
-
Cutter compensation is turned off (like G40).
-
The spindle is stopped (like M5).
-
The current motion mode is set to G_1 (like G1).
-
Coolant is turned off (like M9).
No more lines of code in an RS274/NGC file will be executed after the M2 or M30 command is executed. Pressing cycle start will start the program back at the beginning of the file.
M3, M4, M5 Spindle Control
To start the spindle turning clockwise at the currently programmed speed, program M3.
To start the spindle turning counterclockwise at the currently programmed speed, program M4.
To stop the spindle from turning, program M5.
It is OK to use M3 or M4 if the spindle speed is set to zero. If this is done (or if the speed override switch is enabled and set to zero), the spindle will not start turning. If, later, the spindle speed is set above zero (or the override switch is turned up), the spindle will start turning. It is OK to use M3 or M4 when the spindle is already turning or to use M5 when the spindle is already stopped.
M6 Tool Change
Manual Tool Change
If the Hal component hal_manualtoolchange is loaded M6 will stop the spindle and prompt the user to change the tool. For more information on hal_manualtoolchange see Section ( [sec:Manual-Tool-Change])
Tool Changer
To change a tool in the spindle from the tool currently in the spindle to the tool most recently selected (using a T word - see Section [sub:T:-Select-Tool]), program M6. When the tool change is complete:
-
The spindle will be stopped.
-
The tool that was selected (by a T word on the same line or on any line after the previous tool change) will be in the spindle. The T number is an integer giving the changer slot of the tool (not its id).
-
If the selected tool was not in the spindle before the tool change, the tool that was in the spindle (if there was one) will be in its changer slot.
-
If configured in the .ini file some axis positions may move when a M6 is issued. See the EMCIO section of the Integrators Manual for more information on tool change options.
-
No other changes will be made. For example, coolant will continue to flow during the tool change unless it has been turned off by an M9 . The tool length offset is not changed, use G43 to change the tool length offset.
The tool change may include axis motion. It is OK (but not useful) to program a change to the tool already in the spindle. It is OK if there is no tool in the selected slot; in that case, the spindle will be empty after the tool change. If slot zero was last selected, there will definitely be no tool in the spindle after a tool change.
M7, M8, M9 Coolant Control
To turn mist coolant on, program M7.
To turn flood coolant on, program M8.
To turn all coolant off, program M9.
It is always OK to use any of these commands, regardless of what coolant is on or off.
Overrides
M48, M49 Override Control
To enable the spindle speed and feed rate override switches, program M48. To disable both switches, program M49 . See Section [sub:Feed-Interaction] for more details. It is OK to enable or disable the switches when they are already enabled or disabled. These switches can also be toggled individually using M50 and M51 as described in the sections [sec:M50:-Feed-Override] and [sec:M51:-Spindle-Speed-Override-Control].
M50 Feed Override Control
To enable the feed rate override switch, program M50 or M50 P1. To disable the switch program M50 P0 . While disabled the feed override will have no influence, and the motion will be executed at programmed feed rate. (unless there is an adaptive feed rate override active).
M51 Spindle Speed Override Control
To enable the spindle speed override switch, program M51 or M51 P1. To disable the switch program M51 P0 . While disabled the spindle speed override will have no influence, and the spindle speed will have the exact program specified value (using the S-word as described in [sub:S:-Set-Spindle]).
M52 Adaptive Feed Control
To use an adaptive feed, program M52 or M52 P1. To stop using adaptive feed, program M52 P0 . When adaptive feed is enabled, some external input value is used together with the user interface feed override value and the commanded feed rate to set the actual feed rate. In EMC2, the HAL pin motion.adaptive-feed is used for this purpose. Values on motion.adaptive-feed should range from 0 (feed hold) to 1 (full speed).
M53 Feed Stop Control
To enable the feed stop switch, program M53 or M53 P1. To disable the switch program M53 P0 . Enabling the feed stop switch will allow motion to be interrupted by means of the feed stop control. In EMC2, the HAL pin motion.feed-hold is used for this purpose. Values of 1 will cause the motion to stop (if M53 is active).
M61 Set Current Tool Number
To change the current tool number while in MDI or Manual mode program a M61 Qxx in the MDI window. One use is when you power up EMC with a tool currently in the spindle you can set that tool number without doing a tool change.
It is an error if:
-
Q- is not 0 or greater
M62 to M65 Output Control
To control a digital output bit, program M- P- , where the M-word ranges from 62 to 65, and the P-word ranges from 0 to a default value of 3. If needed the the number of I/O can be increased by using the num_dio parameter when loading the motion controller. See the Integrators Manual Configuration Section EMC and HAL section for more information.
-
The P- word specifies the digital output number.
- M62
-
Turn on digital output synchronized with motion
- M63
-
Turn off digital output synchronized with motion
- M64
-
Turn on digital output immediately
- M65
-
Turn off digital output immediately
The M62 & M63 commands will be queued. Subsequent commands referring to the same output number will overwrite the older settings. More than one output change can be specified by issuing more than one M62/M63 command.
The actual change of the specified outputs will happen at the beginning of the next motion command. If there is no subsequent motion command, the queued output changes won’t happen. It’s best to always program a motion g-code (G0, G1, etc) right after the M62/63.
M64 & M65 happen immediately as they are received by the motion controller. They are not synchronized with movement, and they will break blending.
M66 Input Control
To read the value of an analog or digital input pin, program M66 P- E- L- Q- , where the P-word and the E-word ranges from 0 to 3. If needed the the number of I/O can be increased by using the num_dio or num_aio parameter when loading the motion controller. See the Integrators Manual Configuration Section EMC and HAL section for more information.Only one of the P or E words must be present. It is an error if they are both missing.
- M66
-
Wait on an input
-
The P- word specifies the digital input number.
-
The E- word specifies the analog input number.
-
The L- word specifies the wait type:
-
- 0
-
WAIT_MODE_IMMEDIATE - no waiting, returns immediately. The current value of the input is stored in parameter #5399
- 1
-
WAIT_MODE_RISE - waits for the selected input to perform a rise event.
- 2
-
WAIT_MODE_FALL - waits for the selected input to perform a fall event.
- 3
-
WAIT_MODE_HIGH - waits for the selected input to go to the HIGH state.
- 4
-
WAIT_MODE_LOW - waits for the selected input to go to the LOW state.
-
The Q-word specifies the timeout for the waiting. If the timeout is exceeded, the wait is interrupt, and the variable #5399 will be holding the value -1. The Q value is ignored if the L-word is zero (IMMEDIATE). A Q value of zero is an error if the L-word is non-zero.
-
Mode 0 is the only one permitted for an analog input.
-
M66 wait on an input stops further execution of the program, until the selected event (or the programmed timeout) occurs.
It is an error to program M66 with both a P-word and an E-word (thus selecting both an analog and a digital input).In EMC2 these inputs are not monitored in real time and thus should not be used for timing-critical applications.
M67 Analog Output
To control an analog output synchronized with motion, program M67 E- Q- , where the E word ranges from 0 to the default maximum of 3 and Q is the value to set. The number of I/O can be increased by using the num_aio parameter when loading the motion controller. See the "EMC2 and HAL" chapter in the Configuration Section of the Integrators Manual for more information on the Motion Controller. M67 functions the same as M62-63. See the M62-65 section for information about queuing output commands synchronized with motion.
M68 Analog Output
To control an analog output immediately, program `M68 E- Q-, ` where the E word ranges from 0 to the default maximum of 3 and Q is the value to set. The number of I/O can be increased by using the num_aio parameter when loading the motion controller. See the "EMC2 and HAL" chapter in the Configuration Section of the Integrators Manual for more information on the Motion Controller. M68 functions the same as M64-65. See the M62-65 section for information about immediate output commands.
M100 to M199 User Defined Commands
To invoke a user-defined command, program M1nn P- Q- where P- and Q- are both optional and must be a number. The external program "M1nn" must be in the directory named in [DISPLAY]PROGRAM_PREFIX in the ini file and is executed with the P and Q values as its two arguments. Execution of the RS274NGC file pauses until the invoked program exits. Any valid executable file can be used.
The error "Unknown M code used" denotes one of the following
-
The specified User Defined Command does not exist
-
The file is not an executable file
For example to open and close a collet closer that is controlled by a paraport pin using a bash script file using M101 and M102. Create two files called M101 and M102. Set them as executable files (typically right click/properties/permissions) before running EMC2. Make sure the paraport pin is not connected to anything in a hal file.
M101 (file name)
#!/bin/sh
# file to turn on paraport pin 14 to open the collet closer
halcmd setp parport.0.pin-14-out True
exit 0
M102 (file name)
#!/bin/sh
# file to turn off paraport pin 14 to open the collet closer
halcmd setp parport.0.pin-14-out False
exit 0
To pass a variable to a M1nn file you use the P and Q option like this
M100 P123.456 Q321.654
In your M100 file it might look like this:
#!/bin/sh
voltage=$1
feedrate=$2
halcmd setp thc.voltage $voltage
halcmd setp thc.feedrate $feedrate
exit 0
O Codes
O-codes provide for flow control in NC programs. Each block has an associated number, which is the number used after O. Care must be taken to properly match the O-numbers. O codes use the letter "O" not the number zero as the first character in the number like O100.
The behavior is undefined if:
-
Other words are used on a line with an O- word
-
Comments are used on a line with an O-word
Subroutines: sub, endsub, return, call
Subroutines extend from a O- sub to an O- endsub . The lines inside the subroutine (the "body") are not executed in order; instead, they are executed each time the subroutine is called with O- call.
O100 sub (subroutine to move to machine home)
G0 X0 Y0 Z0
O100 endsub
(many intervening lines)
O100 call
Inside a subroutine, O- return can be executed. This immediately returns to the calling code, just as though O- endsub was encountered.
O- call takes up to 30 optional arguments, which are passed to the subroutine as #1, #2 , …, #N. Parameters from #N+1 to #30 have the same value as in the calling context. On return from the subroutine, the values of parameters #1 through #30 (regardless of the number of arguments) will be restored to the values they had before the call. Parameters #1 - #30 are local to the subroutine.
Because "1 2 3 " is parsed as the number 123, the parameters must be enclosed in square brackets. The following calls a subroutine with 3 arguments:
O200 call [1] [2] [3]
Subroutine bodies may not be nested. They may only be called after they are defined. They may be called from other functions, and may call themselves recursively if it makes sense to do so. The maximum subroutine nesting level is 10.
Subroutines do not have "return values", but they may change the value of parameters above #30 and those changes will be visible to the calling code. Subroutines may also change the value of global named parameters.
Looping: do, while, endwhile, break, continue
The "while loop" has two structures: while/endwhile, and do/while. In each case, the loop is exited when the "while" condition evaluates to false.
(draw a sawtooth shape)
F100
#1 = 0
O101 while [#1 lt 10]
G1 X0
G1 Y[#1/10] X1
#1 = [#1+1]
O101 endwhile
Inside a while loop, O- break immediately exits the loop, and O- continue immediately skips to the next evaluation of the while condition. If it is still true, the loop begins again at the top. If it is false, it exits the loop.
Conditional: if, else, endif
The "if" conditional executes one group of statements if a condition is true and another if it is false.
(Set feed rate depending on a variable)
O102 if [#2 GT 5]
F100
O102 else
F200
O102 endif
Repeat
The "repeat" will execute the statements inside of the repeat/endrepeat the specified number of times. The example shows how you might mill a diagonal series of shapes starting at the present position.
(Mill 5 diagonal shapes)
G91 (Incremental mode)
O103 repeat [5]
... (insert milling code here)
G0 X1 Y1 (diagonal move to next position)
O103 endrepeat
G90 (Absolute mode)
Indirection
The O-number may be given by a parameter or calculation.
O[#101+2] call
Computing values in O-words
In O-words, Parameters (section [sub:Numbered-Parameters]), Expressions (section [sub:Expressions]), Binary Operators (section [sub:Binary-Operators]) and Functions (table [cap:Functions]) are particularly useful.
Calling Files
To call a separate file with a subroutine name the file the same as your call and include a sub and endsub in the file. The file must be in the directory pointed to by PROGRAM_PREFIX. The file name can include lowercase letters, numbers, dash, and underscore only.
o<myfile> call (a named file)
or
o123 call (a number file)
In the called file you must include the oxxx sub and endsub and the file must be a valid file.
myfile.ngc
o<myfile> sub
...
o<myfile> endsub
M2
Other Codes
F: Set Feed Rate
To set the feed rate, program F<n> where "n" is a number. The application of the feed rate is as described in Section [sub:Feed-Rate], unless inverse time feed rate mode is in effect, in which case the feed rate is as described in Section [sub:G93,-G94:-Set].
S: Set Spindle Speed
To set the speed in revolutions per minute (rpm) of the spindle, program S- . The spindle will turn at that speed when it has been programmed to start turning. It is OK to program an S word whether the spindle is turning or not. If the speed override switch is enabled and not set at 100%, the speed will be different from what is programmed. It is OK to program S0; the spindle will not turn if that is done.
It is an error if:
-
the S number is negative.
As described in Section [sub:G84:-Right-Hand-Tapping], if a G84 (tapping) canned cycle is active and the feed and speed override switches are enabled, the one set at the lower setting will take effect. The speed and feed rates will still be synchronized. In this case, the speed may differ from what is programmed, even if the speed override switch is set at 100%.
T: Select Tool
To select a tool, program T<n> , where the <n> number is the carousel slot for the tool. The tool is not changed until an M6 is programmed (see Section [sub:M6:-Tool-Change]). The T word may appear on the same line as the M6 or on a previous line. It is OK, but not normally useful, if T words appear on two or more lines with no tool change. The carousel may move a lot, but only the most recent T word will take effect at the next tool change. It is OK to program T0 ; no tool will be selected. This is useful if you want the spindle to be empty after a tool change.
It is an error if:
-
a negative T number is used,
-
or a T number larger than the number of slots in the carousel is used.
On some machines, the carousel will move when a T word is programmed, at the same time machining is occurring. On such machines, programming the T word several lines before a tool change will save time. A common programming practice for such machines is to put the T word for the next tool to be used on the line after a tool change. This maximizes the time available for the carousel to move.
Rapid moves after a T<n> will not show on the AXIS preview until after a feed move. This is for machines that travel long distances to change the tool like a lathe. This can be very confusing at first. To turn this feature off for the current tool change program a G1 without any move after the T<n>.
Comments
Printable characters and white space inside parentheses is a comment. A left parenthesis always starts a comment. The comment ends at the first right parenthesis found thereafter. Once a left parenthesis is placed on a line, a matching right parenthesis must appear before the end of the line. Comments may not be nested; it is an error if a left parenthesis is found after the start of a comment and before the end of the comment. Here is an example of a line containing a comment: "G80 M5 (stop motion)". Comments do not cause a machining center to do anything.
Messages
A comment contains a message if "MSG, " appears after the left parenthesis and before any other printing characters. Variants of "MSG, " which include white space and lower case characters are allowed. The rest of the characters before the right parenthesis are considered to be a message. Messages should be displayed on the message display device. Comments not containing messages need not be displayed there.
Probe Logging
A comment can also be used to specify a file for the results of G38.x probing. See section [sub:G38.2:-Straight-Probe].
Often, general logging is more useful than probe logging. Using general logging, the format of the output data can be controlled.
(LOGOPEN,filename)
Opens the named log file. If the file already exists, it is truncated.
(LOGAPPEND,filename)
Opens the named log file. If the file already exists, the data is appended.
(LOGCLOSE)
If the log file is open, it is closed.
(LOG,…)
The message “…” is expanded as described below and then written to the log file if it is open.
Debugging Messages
Comments that look like: (debug, rest of comment) are the same as comments like (msg, rest of comment) with the addition of special handling for parameters.
Comments that look like: (print, rest of comment) are output to stderr with special handling for parameters.
Parameters in special comments
In the DEBUG, PRINT and LOG comments, the values of parameters in the message are expanded.
For example: to print a named global variable to stderr (the default console window) add a line to your gcode like…
(print,endmill dia = #<_endmill_dia>)
Inside the above types of comments, sequences like #123 are replaced by the value of the parameter 123. Sequences like #<named parameter> are replaced by the value of the named parameter. Remember that named parameters will have white space removed from them. So, #<named parameter> is the same as #<namedparameter>.
Lathe Specifics
This chapter attempts to bring together all the lathe specific information and is currently under construction.
Lathe Mode
When you set up a lathe using Lathe Mode you need to use a Lathe Tool Table so AXIS will display your tool properly. See the INI File section of the Integrators Manual for info on setting up AXIS for Lathe Mode. Use the "DIA" column for the tool tip diameter.
Lathe Mode in Axis does not set your default plane to G18 (XZ). You must program that in the preamble of each gcode file or (better) add it to your .ini.
Tool Table
The "Tool Table" is a text file that contains information about each tool. The file is located in the same directory as your configuration and is called "tool.tbl" by default. The tools might be in a tool changer or just changed manually. The file can be edited with a text editor or be updated using G10 L1. The maximum number of entries in the tool table is 56. The maximum tool and pocket number is 99999.
| T1 | P1 | D0.125000 | Z+0.511000 | Q7 | I-30 | J30 | ;Facing Tool |
|---|---|---|---|---|---|---|---|
T2 |
P2 |
D0.062500 |
Z+0.100000 |
Q1 |
I165 |
J105 |
;Back Cutting Tool |
T99999 |
P99999 |
… |
… |
… |
… |
… |
;You have lots of tools |
In general, the new tool table line format is:
-
T - tool number - integer, 0-99999 (you can have a large number of tools in inventory)
-
P - pocket number - integer, 1-99999 (tool table has a lower number of entries, currently 56)
-
D - tool diameter - floating-point, absolute value
-
X..W - tool length offset on specified axis - floating-point
-
I - front angle (lathe only) - floating-point
-
J - back angle (lathe only) - floating-point
-
Q - tool orientation (lathe only) - integer, 0-9
-
; - beginning of comment - text
The following figure shows the lathe tool orientations with the center line angle of each orientation and info on FRONTANGLE and BACKANGLE.
In AXIS the following figures show what Tool Positions look like from the above tool table.
Tool Touch Off
When running in lathe mode in AXIS you can set the X and Z in the tool table using the Touch Off window.
The X Axis
The X axis offsets for each tool is normally an offset from the center line of the spindle in the tool table.
One method is to take your normal turning tool and turn down some stock to a known diameter. Using the Tool Touch Off window enter the measured diameter (or radius if in radius mode) for that tool. Then using some layout fluid or a marker to coat the part bring each tool up till it just touches the dye and set it’s X offset to the diameter of the part used using the tool touch off. Make sure any tools in the corner quadrants have the nose radius set properly in the tool table so the control point is correct. Tool touch off automatically adds a G43 so the current tool is the current offset.
A typical session might be:
-
Home each axis if not homed.
-
Set the current tool with "TnM6" where "n" is the tool number.
-
Select the X axis in the Manual Control window.
-
Move the X to a known position or take a test cut and measure the diameter.
-
Select Touch Off and pick Tool Table then enter the position or the diameter.
Note: if you are in Radius Mode you must enter the radius, not the diameter.
The Z Tool Offset
The Z axis offsets can be a bit confusing at first because there are two elements to the Z offset. The tool table offset, and the machine coordinate offset. First we will look at the tool table offsets. One method is to use a fixed point on your lathe and set the Z offset for all tools from this point. Some use the spindle nose or chuck face. This gives you the ability to change to a new tool and set its Z offset without having to reset all the tools.
A typical session might be:
-
Home each axis if not homed.
-
Make sure no offsets are in effect for the current coordinate system.
-
Set the current tool with "TnM6" where "n" is the tool number.
-
Select the Z axis in the Manual Control window.
-
Bring the tool close to the control surface. Using a cylinder move the Z away from the control surface until the cylinder just passes between the tool and the control surface.
-
Select Touch Off and pick Tool Table and set the position to 0.0.
-
Repeat for each tool using the same cylinder.
Now all the tools are offset the same distance from a standard position. If you change a tool like a drill bit you repeat the above and it is now in sync with the rest of the tools for Z offset. Some tools might require a bit of cyphering to determine the control point from the touch off point. For example, if you have a 0.125" wide parting tool and you touch the left side off but want the right to be Z0, then enter 0.125" in the touch off window.
The Z Machine Offset
Once all the tools have the Z offset entered into the tool table you can use any tool to set the machine offset using the machine coordinate system.
A typical session might be:
-
Home each axis if not homed.
-
Set the current tool with "TnM6" where "n" is the tool number.
-
Issue a G43 so the current tool offset is in effect.
-
Bring the tool to the work piece and set the machine Z offset.
If you forget to set the G43 for the current tool when you set the machine coordinate system offset you will not get what you expect, as the tool offset will be added to the current offset when the tool is used in your program.
Threading
Threading with a lathe requires feedback from the spindle to EMC. Typically an encoder is used to provide the feedback. See the Integrators Manual for more information on spindle feedback.
The G76 threading cycle is used for both internal and external threads. For more information see G76 [sec:G76:-Threading-Canned] in the G Code section.
Constant Surface Speed
CSS or Constant Surface Speed (G96) uses the machine X origin modified by the tool X offset to compute the spindle speed in RPM. CSS will track changes in tool offsets. The X machine origin should be when the reference tool (the one with zero offset) is at the center of rotation.
Arcs
Calculating arcs can be mind challenging enough without considering radius and diameter mode on lathes as well as machine coordinate system orientation. The following applies to center format arcs. On a lathe you should include G18 in your preamble as the default is G17 even if you’re in lathe mode, in the user interface Axis. Arcs in G18 XZ plane use I (X axis) and K (Z axis) offsets.
Lathe Orientation
The typical lathe has the spindle on the left of the operator and the tools on the operator side of the spindle center line. This is typically set up with the imaginary Y axis pointing at the floor.
The following will be true on this type of setup:
-
Plus Z goes to the right away from the spindle.
-
Plus X goes toward the operator and when on the operator side of the spindle the X values are positive.
Some lathes with tools on the back side have the imaginary Y axis pointing up.
G2/G3 Arc directions are based on the axis they rotate around. In the case of lathes, it is the imaginary Y axis. If the Y points toward the floor, you have to look up for the arc to appear to go in the correct direction. So looking from above you reverse the G2/G3 for the arc to appear to go in the correct direction.
Radius & Diameter Mode
When calculating arcs in radius mode you only have to remember the direction of rotation as it applies to your lathe.
When calculating arcs in diameter mode X is diameter and the X offset (I) is radius even if you’re in G7 diameter mode.
Tool Path
Control Point
The control point for the tool follows the programmed path. The control point is the intersection of a line parallel to the X and Z axis and tangent to the tool tip diameter, as defined when you touch off the X and Z axes for that tool. When turning or facing straight sided parts the cutting path and the tool edge follow the same path. When turning radius and angles the edge of the tool tip will not follow the programmed path unless cutter comp is in effect. In the following figures you can see how the control point does not follow the tool edge as you might assume.
Cutting Angles without Cutter Comp
Now imagine we program a ramp without cutter comp. The programmed path is shown in the following figure. As you can see in the figure the programmed path and the desired cut path are one and the same as long as we are moving in an X or Z direction only.
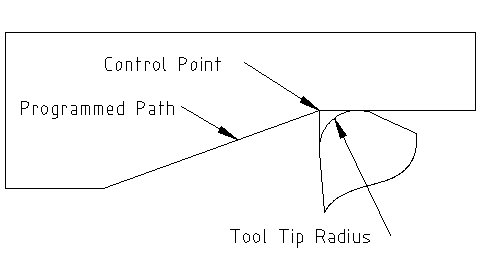
Now as the control point progresses along the programmed path the actual cutter edge does not follow the programmed path as shown in the following figure. There are two ways to solve this, cutter comp and adjusting your programmed path to compensate for tip radius.
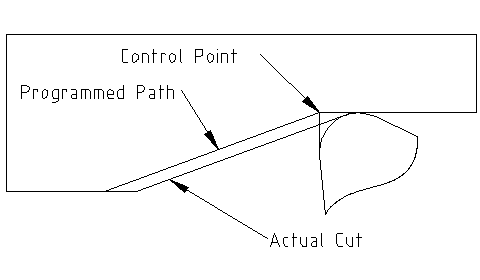
In the above example it is a simple exercise to adjust the programmed path to give the desired actual path by moving the programmed path for the ramp to the left the radius of the tool tip.
Cutting a Radius
In this example we will examine what happens during a radius cut without cutter comp. In the next figure you see the tool turning the OD of the part. The control point of the tool is following the programmed path and the tool is touching the OD of the part.
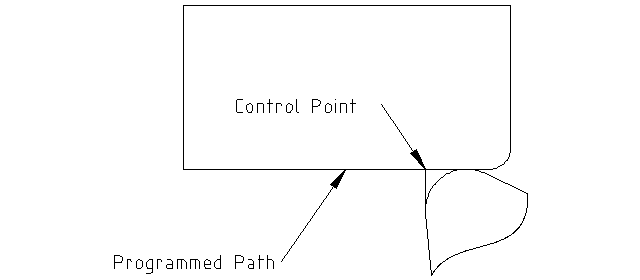
In this next figure you can see as the tool approaches the end of the part the control point still follows the path but the tool tip has left the part and is cutting air. You can also see that even though a radius has been programmed the part will actually end up with a square corner.
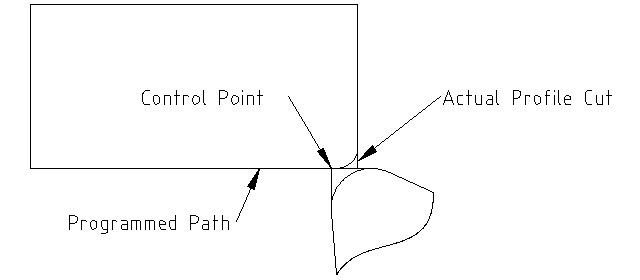
Now you can see as the control point follows the radius programmed the tool tip has left the part and is now cutting air.
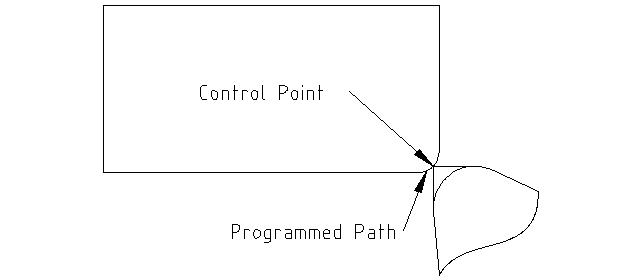
In the final figure we can see the tool tip will finish cutting the face but leave a square corner instead of a nice radius. Notice also that if you program the cut to end at the center of the part a small amount of material will be left from the radius of the tool. To finish a face cut to the center of a part you have to program the tool to go past center at least the nose radius of the tool.
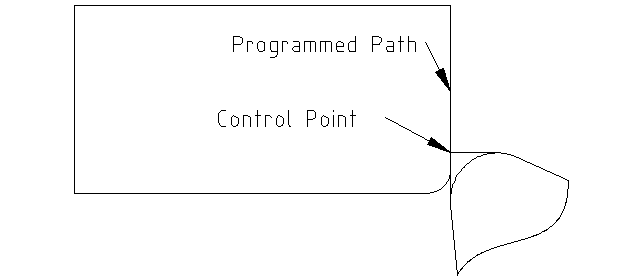
Using Cutter Comp
When using cutter comp on a lathe think of the tool tip radius as the radius of a round cutter. When using cutter comp the path must be large enough for a round tool that will not gouge into the next line. When cutting straight lines on the lathe you might not want to use cutter comp. For example boring a hole with a tight fitting boring bar you may not have enough room to do the exit move. The entry move into a cutter comp arc is important to get the correct results.
RS274NGC
Differences that change the meaning of RS274NGC programs
Location after a tool change
In EMC2, the machine does not return to its original position after a tool change. This change was made because the new tool might be longer than the old tool, and the move to the original machine position could therefore leave the tool tip too low.
Offset parameters are inifile units
In EMC2, the values stored in parameters for the G28 and G30 home locations, the P1…P9 coordinate systems, and the G92 offset are in "inifile units". This change was made because otherwise the meaning of a location changed depending on whether G20 or G21 was active when G28, G30, G10 L2, or G92.3 is programmed.
Tool table lengths/diameters are in inifile units
In EMC2, the tool lengths (offsets) and diameters in the tool table are specified in inifile units only. This change was made because otherwise the length of a tool and its diameter would change based on whether G20 or G21 was active when initiating G43, G41, G42 modes. This made it impossible to run gcode in the machine’s non-native units, even when the gcode was simple and well-formed (starting with G20 or G21, and didn’t change units throughout the program), without changing the tool table.
G84, G87 not implemented
G84 and G87 are not currently implemented, but may be added to a future release of EMC2.
G28, G30 with axis words
When G28 or G30 is programmed with only some axis words present, EMC2 only moves the named axes. This is common on other machine controls. To move some axes to an intermediate point and then move all axes to the predefined point, write two lines of gcode:
G0 X- Y- (axes to move to intermediate point) G28 (move all axes to predefined point)
Differences that do not change the meaning of RS274NGC programs
G33, G76 threading codes
These codes are not defined in RS274NGC.
G38.2
The probe tip is not retracted after a G38.2 movement. This retraction move may be added in a future release of EMC2.
G38.3…G38.5
These codes are not defined in RS274NGC
O-codes
These codes are not defined in RS274NGC
M50…M53 overrides
These codes are not defined in RS274NGC
M61..M66
These codes are not defined in RS274NGC
G43, G43.1
Negative Tool Lengths
The RS274NGC spec says "it is expected that" all tool lengths will be positive. However, G43 works for negative tool lengths.
Lathe tools
G43 tool length compensation can offset the tool in both the X and Z dimensions. This feature is primarily useful on lathes.
Dynamic tool lengths
EMC2 allows specification of a computed tool length through G43.1 I K.
G41.1, G42.1
EMC2 allows specification of a tool diameter and, if in lathe mode, orientation in the gcode. The format is G41.1/G42.1 D L, where D is diameter and L (if specified) is the lathe tool orientation.
G43 without H word
In ngc, this is not allowed. In EMC2, it sets length offsets for the currently loaded tool. If no tool is currently loaded, it is an error. This change was made so the user doesn’t have to specify the tool number in two places for each tool change, and because it’s consistent with the way G41/G42 work when the D word is not specified.
U, V, and W axes
EMC2 allows machines with up to 9 axes by defining an additional set of 3 linear axes known as U, V and W
Examples
G-Code Examples
After you install EMC2 several sample files are placed in the /nc_files folder. Make sure the sample file is appropriate for your machine before running.
Mill Examples
Helical Hole Milling
File Name: useful-subroutines.ngc
Description: Subroutine for milling a hole using parameters.
Slotting
File Name: useful-subroutines.ngc
Decription: Subroutine for milling a slot using parameters.
Grid Probe
File Name: gridprobe.ngc
Description: Rectangular Probing
This program repeatedly probes in a regular XY grid and writes the probed location to the file probe-results.txt in the same directory as the .ini file.
Smart Probe
File Name: smartprobe.ngc
Description: Rectangular Probing
This program repeatedly probes in a regular XY grid and writes the probed location to the file probe-results.txt in the same directory as the .ini file. This is improved from the grid probe file.
Tool Length Probe
File Name: tool-lenght-probe.ngc
Description: Tool Length Probing
This program shows an example of how to measure tool lengths automatically using a switch hooked to the probe input. This is useful for machines without tool holders, where the length of a tool is different every time it is inserted.
Hole Probe
File Name: probe-hole.ngc
Description: Finding the Center and Diameter of a hole.
The program demonstrates how to find the center of a hole, measure the hole diameter and record the results.
Cutter Compensation
To be added
Lathe Examples
Threading
File Name lathe-g76.ngc
Description: Facing, threading and parting off.
This file shows an example of threading on a lathe using parameters.
Image-to-gcode: Milling “depth maps”
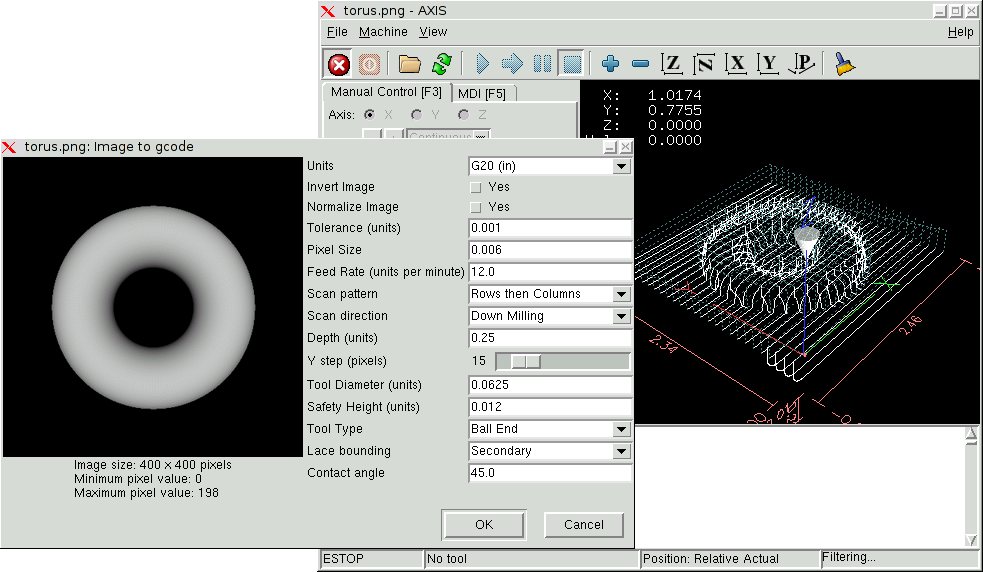
What is a depth map?
A depth map is a greyscale image where the brightness of each pixel corresponds to the depth (or height) of the object at each point.
Integrating image-to-gcode with the AXIS user interface
Add the following lines to the [FILTER] section of your .ini file to make AXIS automatically invoke image-to-gcode when you open a .png, .gif, or .jpg image:
PROGRAM_EXTENSION = .png,.gif,.jpg Grayscale Depth Image +
png = image-to-gcode +
gif = image-to-gcode +
jpg = image-to-gcode
The standard sim/axis.ini configuration file is already configured this way.
Using image-to-gcode
Start image-to-gcode either by opening an image file in AXIS, or by invoking image-to-gcode from the terminal, as follows:
image-to-gcode torus.png > torus.ngc
Verify all the settings in the right-hand column, then press OK to create the gcode. Depending on the image size and options chosen, this may take from a few seconds to a few minutes. If you are loading the image in AXIS, the gcode will automatically be loaded and previewed once image-to-gcode completes. In AXIS, hitting reload will show the image-to-gcode option screen again, allowing you to tweak them.
Option Reference
Units
Specifies whether to use G20 (inches) or G21 (mm) in the generated g-code and as the units for each option labeled (units).
Invert Image
If “no”, the black pixel is the lowest point and the white pixel is the highest point. If “yes”, the black pixel is the highest point and the white pixel is the lowest point.
Normalize Image
If “yes”, the darkest pixel is remapped to black, the lightest pixel is remapped to white.
Expand Image Border
If “None”, the input image is used as-is, and details which are at the very edges of the image may be cut off. If “White” or “Black”, then a border of pixels equal to the tool diameter is added on all sides, and details which are at the very edges of the images will not be cut off.
Tolerance (units)
When a series of points are within tolerance of being a straight line, they are output as a straight line. Increasing tolerance can lead to better contouring performance in emc, but can also remove or blur small details in the image.
Pixel Size (units)
One pixel in the input image will be this many units—usually this number is much smaller than 1.0. For instance, to mill a 2.5x2.5-inch object from a 400x400 image file, use a pixel size of .00625, because 2.5 / 400 = .00625.
Plunge Feed Rate (units per minute)
The feed rate for the initial plunge movement
Feed Rate (units per minute)
The feed rate for other parts of the path
Spindle Speed (RPM)
.
Scan Pattern
Possible scan patterns are:
-
Rows
-
Columns
-
Rows, then Columns
-
Columns, then Rows
Scan Direction
Possible scan directions are:
-
Positive: Start milling at a low X or Y axis value, and move towards a high X or Y axis value
-
Negative: Start milling at a high X or Y axis value, and move towards a low X or Y axis value
-
Alternating: Start on the same end of the X or Y axis travel that the last move ended on. This reduces the amount of traverse movements
-
Up Milling: Start milling at low points, moving towards high points
-
Down Milling: Start milling at high points, moving towards low points
Depth (units)
The top of material is always at Z=0. The deepest cut into the material is Z=-depth.
Step Over (pixels)
The distance between adjacent rows or columns. To find the number of pixels for a given units distance, compute distance/pixel size and round to the nearest whole number'.' For example, if pixel size=.006 and the desired step over distance=.015, then use a Step Over of 2 or 3 pixels, because .015/.006=2.5.
Tool Diameter
The diameter of the cutting part of the tool.
Safety Height
The height to move to for traverse movements. image-to-gcode always assumes the top of material is at Z=0.
Tool Type
The shape of the cutting part of the tool. Possible tool shapes are:
-
Ball End
-
Flat End
-
45 degree “vee”
-
60 degree “vee”
Lace bounding
This controls whether areas that are relatively flat along a row or column are skipped. This option only makes sense when both rows and columns are being milled. Possible bounding options are:
-
None: Rows and columns are both fully milled.
-
Secondary: When milling in the second direction, areas that do not strongly slope in that direction are skipped.
-
Full: When milling in the first direction, areas that strongly slope in the second direction are skipped. When milling in the second direction, areas that do not strongly slope in that direction are skipped.
Contact angle
When Lace bounding is not None, slopes greater than Contact angle are considered to be “strong” slopes, and slopes less than that angle are considered to be weak slopes.
Roughing offset and depth per pass
Image-to-gcode can optionally perform rouging passes. The depth of successive roughing passes is given by “Roughing depth per pass”. For instance, entering 0.2 will perform the first roughing pass with a depth of 0.2, the second roughing pass with a depth of 0.4, and so on until the full Depth of the image is reached. No part of any roughing pass will cut closer than Roughing Offset to the final part. Figure [cap:Roughing-passes-and] shows a tall vertical feature being milled. In this image, Roughing depth per pass is 0.2 inches and roughing offset is 0.1 inches.
Diagnostics
Steppers
If what you get is not what you expect many times you just got some experience. Learning from the experience increases your understanding of the whole. Diagnosing problems is best done by divide and conquer. By this I mean if you can remove 1/2 of the variables from the equation each time you will find the problem the fastest. In the real world this is not always the case but a good place to start usually.
Common Problems
Stepper Moves One Step
The most common reason in a new installation for the stepper not to move is the step and direction signals are backwards. If you press the jog foward and backward key and the stepper moves one step each time in the same direction there is your sign.
No Steppers Move
Many drives have an enable pin or need a charge pump to enable the output.
Distance Not Correct
If you command the axis to move a specific distance and it does not move that distance then your scale is wrong.
Error Messages
Following Error
The concept of a following error is funny when talking about stepper motors. Since they are an open loop system, there is no position feedback to let you know if you actually are out of range. EMC calculates if it can keep up with the motion called for and if not then it gives a following error. Following errors usually are the result of one of the following on stepper systems.
-
FERROR to small
-
MIN_FERROR to small
-
MAX_VELOCITY to fast
-
MAX_ACCELERATION to fast
-
BASE_PERIOD set to long
-
Backlash added to an axis
Any of the above can cause the RT pulsing to not be able to keep up the requested step rate. This can happen if you didn’t run the latency test long enough to get a good number to plug into the Stepconf Wizard or if you set the Maximum Velocity or Maximum Acceleration too high.
If you added backlash you need to increase the STEPGEN_MAXACCEL up to double the MAX_ACCELERATION in the AXIS section of the INI file for each axis you added backlash to. EMC uses "extra acceleration" at a reversal to take up the backlash. Without backlash correction step generator acceleration can be just a few percent above the motion planner acceleration.
RTAPI Error
When you get this error:
RTAPI: ERROR: Unexpected realtime delay on task n
This error is generated by rtapi based on an indication from rtai that a deadline was missed. It is usually an indication that the BASE_PERIOD in the [EMCMOT] section of the ini file is set too low. You should run the Latency Test for an extended period of time to see if you have any delays that would cause this problem. If you used the Stepconf Wizard run it again and test the Base Period Jitter again and adjust the Base Period Maximum Jitter on the Basic Machine Information page. You might have to leave the test running for an extended period of time to find out if some hardware causes intermittent problems.
EMC2 tracks the number of CPU cycles between invocations of the real-time thread. If some element of your hardware is causing delays or your realtime threads are set too fast you will get this error.
|
Note
|
This error is only displayed once per session. If you had your BASE_PERIOD too low you could get hundreds of thousands of error messages per second if more than one was displayed. |
Testing
Step Timing
If you are seeing an axis ending up in the wrong location over multiple moves, it is likely that you do not have the correct direction hold times or step timing for your stepper drivers. Each direction change may be losing a step or more. If the motors are stalling, it is also possible you have either the MAX_ACCELERATION or MAX_VELOCITY set too high for that axis.
The following program will test the Z axis configuration for proper setup. Copy the program to your emc2/nc_files directory and name it TestZ.ngc or similar. Zero your machine with Z = 0.000 at the table top. Load and run the program. It will make 200 moves back and forth from 0.5 to 1". If you have a configuration issue, you will find that the final position will not end up 0.500" that the axis window is showing. To test another axis just replace the Z with your axis in the G0 lines.
( test program to see if Z axis loses position ) +
( msg, test 1 of Z axis configuration ) +
G20 #1000=100 ( loop 100 times ) +
( this loop has delays after moves ) +
( tests acc and velocity settings ) +
o100 while [#1000] +
G0 Z1.000 +
G4 P0.250 +
G0 Z0.500 +
G4 P0.250 +
#1000 = [#1000 - 1] +
o100 endwhile +
( msg, test 2 of Z axis configuration S to continue) +
M1 (stop here) +
#1000=100 ( loop 100 times ) +
( the next loop has no delays after moves ) +
 ( tests direction hold times on driver config and also max accel
setting ) +
o101 while [#1000]  +
G0 Z1.000 +
G0 Z0.500 +
#1000 = [#1000 - 1] +
o101 endwhile +
( msg, Done...Z should be exactly .5" above table ) +
M2
Appendices
Index
Glossary
A listing of terms and what they mean. Some terms have a general meaning and several additional meanings for users, installers, and developers.
- Acme Screw
-
A type of lead-screw that uses an acme thread form. Acme threads have somewhat lower friction and wear than simple triangular threads, but ball-screws are lower yet. Most manual machine tools use acme lead-screws.
- Axis
-
One of the computer control movable parts of the machine. For a typical vertical mill, the table is the X axis, the saddle is the Y axis, and the quill or knee is the Z axis. Additional linear axes parallel to X, Y, and Z are called U, V, and W respectively. Angular axes like rotary tables are referred to as A, B, and C.
- Axis
-
One of the Graphical User Interfaces available to users of EMC2. Features the modern use of menus and mouse buttons while automating and hiding some of the more traditional EMC2 controls. It is the only open-source interface that displays the entire tool path as soon as a file is opened.
- Backlash
-
The amount of "play" or lost motion that occurs when direction is reversed in a lead screw. or other mechanical motion driving system. It can result from nuts that are loose on leadscrews, slippage in belts, cable slack, "wind-up" in rotary couplings, and other places where the mechanical system is not "tight". Backlash will result in inaccurate motion, or in the case of motion caused by external forces (think cutting tool pulling on the work piece) the result can be broken cutting tools. This can happen because of the sudden increase in chip load on the cutter as the work piece is pulled across the backlash distance by the cutting tool.
- Backlash Compensation
-
- Any technique that attempts to reduce the effect of backlash without actually removing it from the mechanical system. This is typically done in software in the controller. This can correct the final resting place of the part in motion but fails to solve problems related to direction changes while in motion (think circular interpolation) and motion that is caused when external forces (think cutting tool pulling on the work piece) are the source of the motion.
- Ball Screw
-
A type of lead-screw that uses small hardened steel balls between the nut and screw to reduce friction. Ball-screws have very low friction and backlash, but are usually quite expensive.
- Ball Nut
-
A special nut designed for use with a ball-screw. It contains an internal passage to re-circulate the balls from one end of the screw to the other.
- CNC
-
Computer Numerical Control. The general term used to refer to computer control of machinery. Instead of a human operator turning cranks to move a cutting tool, CNC uses a computer and motors to move the tool, based on a part program .
- Comp
-
A tool used to build, compile and install EMC2 HAL components.
- Configuration(n)
-
A directory containing a set of configuration files. Custom configurations are normally saved in the users home/emc2/configs directory. These files include EMC’s traditional INI file and HAL files. A configuration may also contain several general files that describe tools, parameters, and NML connections.
- Configuration(v)
-
The task of setting up EMC2 so that it matches the hardware on a machine tool.
- Coordinate Measuring Machine
-
A Coordinate Measuring Machine is used to make many accurate measurements on parts. These machines can be used to create CAD data for parts where no drawings can be found, when a hand-made prototype needs to be digitized for moldmaking, or to check the accuracy of machined or molded parts.
- Display units
-
The linear and angular units used for onscreen display.
- DRO
-
A Digital Read Out is a device attached to the slides of a machine tool or other device which has parts that move in a precise manner to indicate the current location of the tool with respect to some reference position. Nearly all DRO’s use linear quadrature encoders to pick up position information from the machine.
- EDM
-
EDM is a method of removing metal in hard or difficult to machine or tough metals, or where rotating tools would not be able to produce the desired shape in a cost-effective manner. An excellent example is rectangular punch dies, where sharp internal corners are desired. Milling operations can not give sharp internal corners with finite diameter tools. A wire EDM machine can make internal corners with a radius only slightly larger than the wire’s radius. A sinker EDM cam make corners with a radius only slightly larger than the radius on the corner of the convex EDM electrode.
- EMC
-
The Enhanced Machine Controller. Initially a NIST project. EMC is able to run a wide range of motion devices.
- EMCIO
-
The module within EMC that handles general purpose I/O, unrelated to the actual motion of the axes.
- EMCMOT
-
The module within EMC that handles the actual motion of the cutting tool. It runs as a real-time program and directly controls the motors.
- Encoder
-
A device to measure position. Usually a mechanical-optical device, which outputs a quadrature signal. The signal can be counted by special hardware, or directly by the parport with emc2.
- Feed
-
Relatively slow, controlled motion of the tool used when making a cut.
- Feed rate
-
The speed at which a motion occurs. In manual mode, jog speed can be set from the graphical interface. In auto or mdi mode feed rate is commanded using a (f) word. F10 would mean ten units per minute.
- Feedback
-
A method (e.g., quadrature encoder signals) by which emc receives information about the position of motors
- Feed rate Override
-
A manual, operator controlled change in the rate at which the tool moves while cutting. Often used to allow the operator to adjust for tools that are a little dull, or anything else that requires the feed rate to be “tweaked”.
- Floating Point Number
-
A number that has a decimal point. (12.300) In HAL it is known as float.
- G-Code
-
The generic term used to refer to the most common part programming language. There are several dialects of G-code, EMC uses RS274/NGC.
- GUI
-
- General
-
A type of interface that allows communications between a computer and human (in most cases) via the manipulation of icons and other elements (widgets) on a computer screen.
- EMC
-
An application that presents a graphical screen to the machine operator allowing manipulation of machine and the corresponding controlling program.
- HAL
-
H*ardware *A*bstraction *L ayer. At the highest level, it is simply a way to allow a number of building blocks to be loaded and interconnected to assemble a complex system. Many of the building blocks are drivers for hardware devices. However, HAL can do more than just configure hardware drivers.
- Home
-
A specific location in the machine’s work envelope that is used to make sure the computer and the actual machine both agree on the tool position.
- ini file
-
A text file that contains most of the information that configures EMC for a particular machine
- Instance
-
One can have an instance of a class or a particular object. The instance is the actual object created at runtime. In programmer jargon, the Lassie object is an instance of the Dog class.
- Joint Coordinates
-
These specify the angles between the individual joints of the machine. See also Kinematics
- Jog
-
Manually moving an axis of a machine. Jogging either moves the axis a fixed amount for each key-press, or moves the axis at a constant speed as long as you hold down the key.
- kernel-space
- Kinematics
-
The position relationship between world coordinates and joint coordinates of a machine. There are two types of kinematics. Forward kinematics is used to calculate world coordinates from joint coordinates. Inverse kinematics is used for exactly opposite purpose.Note that kinematics does not take into account, the forces, moments etc. on the machine. It is for positioning only.
- Lead-screw
-
An screw that is rotated by a motor to move a table or other part of a machine. Lead-screws are usually either ball-screws or acme screws, although conventional triangular threaded screws may be used where accuracy and long life are not as important as low cost.
- Machine units
-
The linear and angular units used for machine configuration. These units are used in the inifile. HAL pins and parameters are also generally in machine units.
- MDI
-
Manual Data Input. This is a mode of operation where the controller executes single lines of G-code as they are typed by the operator.
- NIST
-
National Institute of Standards and Technology. An agency of the Department of Commerce in the United States.
- Offsets
- Part Program
-
A description of a part, in a language that the controller can understand. For EMC, that language is RS-274/NGC, commonly known as G-code.
- Program Units
-
The linear and angular units used for part programs.
- Python
-
General-purpose, very high-level programming language. Used in EMC2 for the Axis GUI, the Stepconf configuration tool, and several G-code programming scripts.
- Rapid
-
Fast, possibly less precise motion of the tool, commonly used to move between cuts. If the tool meets the material during a rapid, it is probably a bad thing!
- Real-time
-
Software that is intended to meet very strict timing deadlines. Under Linux, in order to meet these requirements it is necessary to install RTAI or RTLINUX and build the software to run in those special environments. For this reason real-time software runs in kernel-space.
- RTAI
-
Real Time Application Interface, see https://www.rtai.org/, one of two real-time extensions for Linux that EMC can use to achieve real-time performance.
- RTLINUX
-
See http://www.rtlinux.org, one of two real-time extensions for Linux that EMC can use to achieve real-time performance.
- RTAPI
-
A portable interface to real-time operating systems including RTAI and RTLINUX
- RS-274/NGC
- Servo Motor
-
A special kind of motor that uses error-sensing feedback to correct the position of an actuator.
- Servo Loop
-
A control loop used to control position or velocity of an motor equipped with a feedback device.
- Signed Integer
-
A whole number that can have a positive or negitive sign. (-12) In HAL it is known as s32.
- Spindle
-
On a mill or drill, the spindle holds the cutting tool. On a lathe, the spindle holds the workpiece.
- Spindle Speed Override
-
A manual, operator controlled change in the rate at which the tool rotates while cutting. Often used to allow the operator to adjust for chatter caused by the cutter’s teeth. Spindle Speed Override assume that the EMC2 software has been configured to control spindle speed.
- Stepconf
-
An EMC2 configuration wizard. It is able to handle many step-and-direction motion command based machines. Writes a full configuration after the user answers a few questions about the computer and machine to be run with.
- Stepper Motor
-
A type of motor that turns in fixed steps. By counting steps, it is possible to determine how far the motor has turned. If the load exceeds the torque capability of the motor, it will skip one or more steps, causing position errors.
- TASK
-
The module within EMC that coordinates the overall execution and interprets the part program.
- Tcl/Tk
-
A scripting language and graphical widget toolkit with which several of the EMC’s GUI’s and selection wizards were written.
- Traverse Move
-
A move in a straight line from the start point to the end point.
- Units
-
See "Machine Units", "Display Units", or "Program Units".
- Unsigned Integer
-
A whole number that has no sign. (123) In HAL it is known as u32.
- World Coordinates
-
This is the absolute frame of reference. It gives coordinates in terms of a fixed reference frame that is attached to some point (generally the base) of the machine tool.
Legal Section
Copyright Terms
Copyright (c) 2000 LinuxCNC.org
Permission is granted to copy, distribute and/or modify this document under the terms of the GNU Free Documentation License, Version 1.1 or any later version published by the Free Software Foundation; with no Invariant Sections, no Front-Cover Texts, and one Back-Cover Text: "This EMC Handbook is the product of several authors writing for linuxCNC.org. As you find it to be of value in your work, we invite you to contribute to its revision and growth." A copy of the license is included in the section entitled "GNU Free Documentation License". If you do not find the license you may order a copy from Free Software Foundation, Inc. 59 Temple Place, Suite 330, Boston, MA 02111-1307
GNU Free Documentation License
GNU Free Documentation License Version 1.1, March 2000
Copyright © 2000 Free Software Foundation, Inc. 59 Temple Place, Suite 330, Boston, MA 02111-1307 USA Everyone is permitted to copy and distribute verbatim copies of this license document, but changing it is not allowed.
-
PREAMBLE
The purpose of this License is to make a manual, textbook, or other written document "free" in the sense of freedom: to assure everyone the effective freedom to copy and redistribute it, with or without modifying it, either commercially or noncommercially. Secondarily, this License preserves for the author and publisher a way to get credit for their work, while not being considered responsible for modifications made by others.
This License is a kind of "copyleft", which means that derivative works of the document must themselves be free in the same sense. It complements the GNU General Public License, which is a copyleft license designed for free software.
We have designed this License in order to use it for manuals for free software, because free software needs free documentation: a free program should come with manuals providing the same freedoms that the software does. But this License is not limited to software manuals; it can be used for any textual work, regardless of subject matter or whether it is published as a printed book. We recommend this License principally for works whose purpose is instruction or reference.
1. APPLICABILITY AND DEFINITIONS
This License applies to any manual or other work that contains a notice placed by the copyright holder saying it can be distributed under the terms of this License. The "Document", below, refers to any such manual or work. Any member of the public is a licensee, and is addressed as "you".
A "Modified Version" of the Document means any work containing the Document or a portion of it, either copied verbatim, or with modifications and/or translated into another language.
A "Secondary Section" is a named appendix or a front-matter section of the Document that deals exclusively with the relationship of the publishers or authors of the Document to the Document’s overall subject (or to related matters) and contains nothing that could fall directly within that overall subject. (For example, if the Document is in part a textbook of mathematics, a Secondary Section may not explain any mathematics.) The relationship could be a matter of historical connection with the subject or with related matters, or of legal, commercial, philosophical, ethical or political position regarding them.
The "Invariant Sections" are certain Secondary Sections whose titles are designated, as being those of Invariant Sections, in the notice that says that the Document is released under this License.
The "Cover Texts" are certain short passages of text that are listed, as Front-Cover Texts or Back-Cover Texts, in the notice that says that the Document is released under this License.
A "Transparent" copy of the Document means a machine-readable copy, represented in a format whose specification is available to the general public, whose contents can be viewed and edited directly and straightforwardly with generic text editors or (for images composed of pixels) generic paint programs or (for drawings) some widely available drawing editor, and that is suitable for input to text formatters or for automatic translation to a variety of formats suitable for input to text formatters. A copy made in an otherwise Transparent file format whose markup has been designed to thwart or discourage subsequent modification by readers is not Transparent. A copy that is not "Transparent" is called "Opaque".
Examples of suitable formats for Transparent copies include plain ASCII without markup, Texinfo input format, LaTeX input format, SGML or XML using a publicly available DTD, and standard-conforming simple HTML designed for human modification. Opaque formats include PostScript, PDF, proprietary formats that can be read and edited only by proprietary word processors, SGML or XML for which the DTD and/or processing tools are not generally available, and the machine-generated HTML produced by some word processors for output purposes only.
The "Title Page" means, for a printed book, the title page itself, plus such following pages as are needed to hold, legibly, the material this License requires to appear in the title page. For works in formats which do not have any title page as such, "Title Page" means the text near the most prominent appearance of the work’s title, preceding the beginning of the body of the text.
2. VERBATIM COPYING
You may copy and distribute the Document in any medium, either commercially or noncommercially, provided that this License, the copyright notices, and the license notice saying this License applies to the Document are reproduced in all copies, and that you add no other conditions whatsoever to those of this License. You may not use technical measures to obstruct or control the reading or further copying of the copies you make or distribute. However, you may accept compensation in exchange for copies. If you distribute a large enough number of copies you must also follow the conditions in section 3.
You may also lend copies, under the same conditions stated above, and you may publicly display copies.
3. COPYING IN QUANTITY
If you publish printed copies of the Document numbering more than 100, and the Document’s license notice requires Cover Texts, you must enclose the copies in covers that carry, clearly and legibly, all these Cover Texts: Front-Cover Texts on the front cover, and Back-Cover Texts on the back cover. Both covers must also clearly and legibly identify you as the publisher of these copies. The front cover must present the full title with all words of the title equally prominent and visible. You may add other material on the covers in addition. Copying with changes limited to the covers, as long as they preserve the title of the Document and satisfy these conditions, can be treated as verbatim copying in other respects.
If the required texts for either cover are too voluminous to fit legibly, you should put the first ones listed (as many as fit reasonably) on the actual cover, and continue the rest onto adjacent pages.
If you publish or distribute Opaque copies of the Document numbering more than 100, you must either include a machine-readable Transparent copy along with each Opaque copy, or state in or with each Opaque copy a publicly-accessible computer-network location containing a complete Transparent copy of the Document, free of added material, which the general network-using public has access to download anonymously at no charge using public-standard network protocols. If you use the latter option, you must take reasonably prudent steps, when you begin distribution of Opaque copies in quantity, to ensure that this Transparent copy will remain thus accessible at the stated location until at least one year after the last time you distribute an Opaque copy (directly or through your agents or retailers) of that edition to the public.
It is requested, but not required, that you contact the authors of the Document well before redistributing any large number of copies, to give them a chance to provide you with an updated version of the Document.
4. MODIFICATIONS
You may copy and distribute a Modified Version of the Document under the conditions of sections 2 and 3 above, provided that you release the Modified Version under precisely this License, with the Modified Version filling the role of the Document, thus licensing distribution and modification of the Modified Version to whoever possesses a copy of it. In addition, you must do these things in the Modified Version:
-
Use in the Title Page (and on the covers, if any) a title distinct from that of the Document, and from those of previous versions (which should, if there were any, be listed in the History section of the Document). You may use the same title as a previous version if the original publisher of that version gives permission. B. List on the Title Page, as authors, one or more persons or entities responsible for authorship of the modifications in the Modified Version, together with at least five of the principal authors of the Document (all of its principal authors, if it has less than five). C. State on the Title page the name of the publisher of the Modified Version, as the publisher. D. Preserve all the copyright notices of the Document. E. Add an appropriate copyright notice for your modifications adjacent to the other copyright notices. F. Include, immediately after the copyright notices, a license notice giving the public permission to use the Modified Version under the terms of this License, in the form shown in the Addendum below. G. Preserve in that license notice the full lists of Invariant Sections and required Cover Texts given in the Document’s license notice. H. Include an unaltered copy of this License. I. Preserve the section entitled "History", and its title, and add to it an item stating at least the title, year, new authors, and publisher of the Modified Version as given on the Title Page. If there is no section entitled "History" in the Document, create one stating the title, year, authors, and publisher of the Document as given on its Title Page, then add an item describing the Modified Version as stated in the previous sentence. J. Preserve the network location, if any, given in the Document for public access to a Transparent copy of the Document, and likewise the network locations given in the Document for previous versions it was based on. These may be placed in the "History" section. You may omit a network location for a work that was published at least four years before the Document itself, or if the original publisher of the version it refers to gives permission. K. In any section entitled "Acknowledgements" or "Dedications", preserve the section’s title, and preserve in the section all the substance and tone of each of the contributor acknowledgements and/or dedications given therein. L. Preserve all the Invariant Sections of the Document, unaltered in their text and in their titles. Section numbers or the equivalent are not considered part of the section titles. M. Delete any section entitled "Endorsements". Such a section may not be included in the Modified Version. N. Do not retitle any existing section as "Endorsements" or to conflict in title with any Invariant Section.
If the Modified Version includes new front-matter sections or appendices that qualify as Secondary Sections and contain no material copied from the Document, you may at your option designate some or all of these sections as invariant. To do this, add their titles to the list of Invariant Sections in the Modified Version’s license notice. These titles must be distinct from any other section titles.
You may add a section entitled "Endorsements", provided it contains nothing but endorsements of your Modified Version by various parties—for example, statements of peer review or that the text has been approved by an organization as the authoritative definition of a standard.
You may add a passage of up to five words as a Front-Cover Text, and a passage of up to 25 words as a Back-Cover Text, to the end of the list of Cover Texts in the Modified Version. Only one passage of Front-Cover Text and one of Back-Cover Text may be added by (or through arrangements made by) any one entity. If the Document already includes a cover text for the same cover, previously added by you or by arrangement made by the same entity you are acting on behalf of, you may not add another; but you may replace the old one, on explicit permission from the previous publisher that added the old one.
The author(s) and publisher(s) of the Document do not by this License give permission to use their names for publicity for or to assert or imply endorsement of any Modified Version.
5. COMBINING DOCUMENTS
You may combine the Document with other documents released under this License, under the terms defined in section 4 above for modified versions, provided that you include in the combination all of the Invariant Sections of all of the original documents, unmodified, and list them all as Invariant Sections of your combined work in its license notice.
The combined work need only contain one copy of this License, and multiple identical Invariant Sections may be replaced with a single copy. If there are multiple Invariant Sections with the same name but different contents, make the title of each such section unique by adding at the end of it, in parentheses, the name of the original author or publisher of that section if known, or else a unique number. Make the same adjustment to the section titles in the list of Invariant Sections in the license notice of the combined work.
In the combination, you must combine any sections entitled "History" in the various original documents, forming one section entitled "History"; likewise combine any sections entitled "Acknowledgements", and any sections entitled "Dedications". You must delete all sections entitled "Endorsements."
6. COLLECTIONS OF DOCUMENTS
You may make a collection consisting of the Document and other documents released under this License, and replace the individual copies of this License in the various documents with a single copy that is included in the collection, provided that you follow the rules of this License for verbatim copying of each of the documents in all other respects.
You may extract a single document from such a collection, and distribute it individually under this License, provided you insert a copy of this License into the extracted document, and follow this License in all other respects regarding verbatim copying of that document.
7. AGGREGATION WITH INDEPENDENT WORKS
A compilation of the Document or its derivatives with other separate and independent documents or works, in or on a volume of a storage or distribution medium, does not as a whole count as a Modified Version of the Document, provided no compilation copyright is claimed for the compilation. Such a compilation is called an "aggregate", and this License does not apply to the other self-contained works thus compiled with the Document, on account of their being thus compiled, if they are not themselves derivative works of the Document.
If the Cover Text requirement of section 3 is applicable to these copies of the Document, then if the Document is less than one quarter of the entire aggregate, the Document’s Cover Texts may be placed on covers that surround only the Document within the aggregate. Otherwise they must appear on covers around the whole aggregate.
8. TRANSLATION
Translation is considered a kind of modification, so you may distribute translations of the Document under the terms of section 4. Replacing Invariant Sections with translations requires special permission from their copyright holders, but you may include translations of some or all Invariant Sections in addition to the original versions of these Invariant Sections. You may include a translation of this License provided that you also include the original English version of this License. In case of a disagreement between the translation and the original English version of this License, the original English version will prevail.
9. TERMINATION
You may not copy, modify, sublicense, or distribute the Document except as expressly provided for under this License. Any other attempt to copy, modify, sublicense or distribute the Document is void, and will automatically terminate your rights under this License. However, parties who have received copies, or rights, from you under this License will not have their licenses terminated so long as such parties remain in full compliance.
10. FUTURE REVISIONS OF THIS LICENSE
The Free Software Foundation may publish new, revised versions of the GNU Free Documentation License from time to time. Such new versions will be similar in spirit to the present version, but may differ in detail to address new problems or concerns. See http:///www.gnu.org/copyleft/.
Each version of the License is given a distinguishing version number. If the Document specifies that a particular numbered version of this License "or any later version" applies to it, you have the option of following the terms and conditions either of that specified version or of any later version that has been published (not as a draft) by the Free Software Foundation. If the Document does not specify a version number of this License, you may choose any version ever published (not as a draft) by the Free Software Foundation.
ADDENDUM: How to use this License for your documents
To use this License in a document you have written, include a copy of the License in the document and put the following copyright and license notices just after the title page:
Copyright (c) YEAR YOUR NAME. Permission is granted to copy, distribute and/or modify this document under the terms of the GNU Free Documentation License, Version 1.1 or any later version published by the Free Software Foundation; with the Invariant Sections being LIST THEIR TITLES, with the Front-Cover Texts being LIST, and with the Back-Cover Texts being LIST. A copy of the license is included in the section entitled "GNU Free Documentation License".
If you have no Invariant Sections, write "with no Invariant Sections" instead of saying which ones are invariant. If you have no Front-Cover Texts, write "no Front-Cover Texts" instead of "Front-Cover Texts being LIST"; likewise for Back-Cover Texts.
If your document contains nontrivial examples of program code, we recommend releasing these examples in parallel under your choice of free software license, such as the GNU General Public License, to permit their use in free software.
